Free 3D Models!
Deep gratitude and special thanks are owed to:
- ✸ Lily Gabriel, Undergraduate Research Assistant at Unstable Design Lab
- ✸ Joel Swanson, Associate Professor & Director of TYPO Lab (Atlas Institute)
- ✸ Mimi Shalf, PhD, Information Technology, ATLAS institute, & Riso whisperer
- ✸Vibeke Vestby, inventor of the Thread Controller loom
- ✸ Bhakti Ziek & Alice Schlein, co-authors of the Woven Pixel
- ✸ BTU Lab (Atlas Institute)
- ✸ Printmaking at University of Kansas
- & most importantly: all our teachers
- ✸ Resistance is a hand-made Risograph publication by Poppy DeltaDawn at the Unstable Design Lab, ATLAS Institute within the University of Colorado, Boulder, and University of Kansas Printmaking.
- ✸ You are viewing the digital version, enjoy!
- ✸ an edition of 40 risograph books and 50 digitally printed books were printed
- ✸ Resistance was conceived of and designed by Poppy DeltaDawn, and is a collaboration between her and Unstable Design Lab members Laura Devendorf, Steven Frost, and Etta Sandry.
- ✸ Digital Weaving to Save the World is an ongoing printmedia series developed by Poppy DeltaDawn. This is the second segment.
- ✸ Made during the artist's Experimental Weaving Artist Residency hosted by Unstable Design Lab.
- _infinity_ /50, Spring 2025
- The digital version of this project is licensed under a Creative Commons Attribution-NonCommercial-ShareAlike 4.0 International License.
Chapter 1: Resistance
Poppy DeltaDawn
In 1866, Ludwig Feuerbach famously proclaimed
Der Mensch ist was er isst
- Man is what he eats.Then in 1932, from an Italian prison cell, Antonio Gramsci considered Feuerbach in his essay
What is Man?
He writes …since diet is one expression of complex social relationships…there is some truth in the saying ‘man is what he eats,’but in the same way one could say‘man is the clothing he wears,’ man is his habitation…
He continues,
food, dress, housing, and reproducing are elements of social life in which…the whole complex of social relations is most obviously and most widely manifested.
Gramsci is saying that our natural resources and material culture amount to more than simply fuel and protection for our bodies.
Man (AKA people) are the clothing that they wear. Food and clothing and the very states we live in are
expressions of complex social relationships.
Humanity is not in its own object category; it is a constituent of the natural world. My work is a practice of contemporary art, design, and of culture. I consider my research to be an esthetic expression.
In
Art as Experience
, 1934, John Dewey writes that flowers can be enjoyed without knowing about the interactions of soil, air, moisture, and seeds of which they are the result. However, he adds, flowers cannot be understood without taking just these interactions into account - and theory is a matter of understanding.
Dewey, a psychologist and progressive educational reformer thought that the separation of doing and thinking was shit
1
. John Dewey also was part of the American Pragmatist Philosophical tradition, which above all, favored truth in experience. Nothing can be proven unless it is done. As Etta Sandry says, you gotta weave it to believe it.
- In Dewey’s words: “undermining the unity of knowledge”
Conventional European epistemologies are rooted in a dualistic mind/body separation
2
. Our educational industrial complex has produced distinct and complex, yet fallible delineations of contemporary art, design, craft, etc. Yet, to operate with intention in any of these disciplines, all methodologies, skills, and histories are necessary.RESISTANCE is a collaboration between 4 artists and researchers including myself during my Spring 2025 residency at the Unstable Design Lab. Resistance is the double entendre that makes this all possible: without resistance – tension – there is no need for a loom. Without a loom, there is no taut warp, of which the horizontal, x-axis threads intersect with the vertical y-axis warp threads. Without resistance – not too much and not too little – we lack control of the threads’ inevitable destiny.
This publication is more than a manual. This booklet, a chapter of
Digital Weaving to Save the World
is a call to action. Without the transmission of cultural knowledge, aka weaving and other craft, how are we to preserve and propel our intersecting and evolving cultural identities?In March 2025, Rollins College in collaboration with the Institute for Citizens and Scholars hosted a conference called
John Dewey 90 Years Later: How the Liberal Arts Strengthen Democracy
. Founded in 1885, Florida’s Rollins College brought Dewey’s radically progressive liberal arts education to the university. In 1931, Rollins hosted the first national curriculum conference on the liberal arts, chaired by Dewey.The college’s first president, Hamilton Holt, intended to integrate the idea of open-ended inquiry, critical analyses, and the Socratic method to universities in place of the traditional lecture course. In 1930, Rhodes scholar John Andrew Rice was hired by Holt to teach Greek and Latin, and to carry out their progressive agenda of holistic higher learning.
Long story short-ish: Rice and several of his colleagues were asked to sign a loyalty pledge supporting the college’s administration before being fired or resigning in solidarity, followed by a group of their students.
In 1933, The American Association of University Professors, of which John Dewey incidentally was the first president, voted to censure the college for the firings which were and are antithetical to academic freedom and tenure.
Black Mountain College
was formed by a collective of faculty members and students led by John Rice, who were reacting to the evolving fascist conditions of academia. What did Rice and his colleagues do after they were shut out of their home institution?They ran full speed towards a utopic vision of democracy, art, and an aesthetically, or spiritually informed and whole life. In response to the firings at Rollins, the president Holt replied, “When you fire a cook you don’t go out and get a committee of neighbors to tell you what to do.” Holt’s complacent sensibility brings me to ask the scary question, how experimental can a college which relies on capital, market realities, and ultimately the state…really be?
This censorship reminds me of David Graeber. Graeber was an anthropologist, author, and activist who died in 2020 of pancreatitis stemming from COVID-19. He was originally a professor at Yale until the institution declined to renew his contract. Graeber and his supporters strongly suspected political motivation stemming from his anthropological research on anarchism .
What does this all amount to? I can’t help but think about Graeber and Rice and what they did when confronted with fascism and the market-driven realities of their tenure in the academy. I’m not suggesting we start a new radically democratic college dedicated to integrative whole education and civil and ethical responsibility, but like ··· doesn’t that sound nice?
David Graeber, rather than starting an experimental college, helped to form and mobilize the
Occupy Wall Street
movement, of which his story is detailed in The Democracy Project: A History, a Crisis, a Movement
. In it, Graeber clarifies what, exactly, democracy even is
. Dewey and Graeber had this preponderance with democracy in common. Democracy is not a form of government but a way of life. It is an ethos, and a cultural value.Occupy Wall Street was a utopic experiment that, for a brief time before being systematically torn apart by the state police, successfully established an autonomous and liberated zone in lower Manhattan. Graeber writes that the movement was taking hold of a destabilizing moment in our country’s history following the 2008 financial crisis. Participants, most of whom were current or recently graduated college students, lamented a problem that I have also recently noted: we followed all the rules, and did what we were supposed to do, so why don’t we have anything to show for it, and why aren’t we free. Liberty is, after all -
above all
- our only unifying American cultural value.Why aren’t we free from debt, free from state-sanctioned violence, and free to be ourselves? My student loan payment last month went from $250 to $1,100. I know that I haven’t talked about weaving yet but...international scholars and people who are legally in the country are being disappeared. Visitors from Europe are being turned away at the border. Our academic freedom is yet again being threatened. The story of these immigrants, Bauhaüslers, and other members of the intelligentsia fled their homelands in the face of Nazi persecution while still managing to carry out their life’s work and resisting fascism through education. This is at present, the only thing that brings me solace and a modicum of hope.
And after all, spaces of textile production have not only been sites of oppression and exploitation but have proven to be spaces of resistance. Perhaps this is owed to the collective nature of so much textile production. Perhaps generative handwork and material culture reminds the makers of their agency and autonomy. Perhaps through the marginalization of millions of people, we see the power in cloth alongside food.
For evidence, look to Mahatma Gandhi and the Swadeshi movement led with a spinning wheel. Look to innumerable textile workers’ protests and revolts throughout history (I think back to the French Silk Workers’ Revolts of 1831 & 1834). Look to the oppressive laws of history including England’s Calico Acts of 1700 and 1721 (a prohibition of the import and eventually the sales of printing Indian cotton), the dress act of 1746 banning Kilts in Scotland and their subsequent rise to fame and popularity, and the Panamanian outlawing of molas (appliquéd blouses) by the Indigenous Kuna in Panama for forced assimilation. Today – right now – look to the Keffiyeh, a Bedouin headscarf which has become a symbol of Palestinian heritage and liberation which has been intermittently outlawed by Zionist regimes.
- For more on Descartes’ dualism, see his Principles of Philosophy, 1656
Anni Albers promoted weaving as an art form through production but also through writing and publication. She was an advocate of cultural transmission; Michael Beggs asserts that she perhaps was more well-known as a writer than an artist when she left the college for Harvard. He continues that Albers, in 1941, called for weavers to “use their handlooms as tools of design rather than of (re)production.”
3
Resistance is vital to the fabric of our society, just like it is vital to the conception of cloth on my loom.
Despite Dewey and Rice and the Albers and experimental colleges, we, as a 250-year-old American culture and community are still not over the hump of the very Euro tendency of trying to pull apart and isolate art, design, and theory. Art, material culture, and the process of becoming, both as the maker and the thing being made, are what make us human.
Through material culture, we have not only formed our society, our social culture, and the physical world around us, but we have literally formed human cognition. Through spatial and material considerations, we think with our bodies, which includes our brains. The brain isn’t the only player though. We were spinning thread as neanderthals –
before
we were human: nearly 90,000 years. Textile production is embedded within our DNA, which is, perhaps coincidentally, also twisted into a double helix and is compiled to make a whole.Our technology, our knowledge, and our art ··· isn’t ours. We have passed our traditional production knowledges down for at least 90,000 years. The artwork that I make also belongs to my mentors and teachers and their mentors and teachers. We are all related: in Lakota,
Mitákuye Oyás’iŋ
.I want to consider Sofi Thanhauser, the author of the 2019
Worn: A People’s History of Clothing
. I have no criticisms of Thanhauser’s eye-opening account of how textiles are objects of power. I do have one little gripe, however, that I want to share with you. In the Weavers Chapter of Worn, Thanhauser critiques Anni Albers’ November 1938 essay first published in a pamphlet from Black Mountain College, Work with Material
. She quotes Albers, “Like any craft it may end in producing useful objects, or it may rise to the level of art.”Thanhauser explains the false hierarchy of “useful” objects and art objects as they relate to Navajo weavings and European contemporary art objects. She stops short of the possibility that the art object may also have use.
The art object is an object of contemplation and ultimately of possibility (Adorno footnote). When an artist hangs a weaving on the wall, I am asking the people in front of the weaving to consider: what is it? How can you THINK about using the hung work, even if it remains on the wall forever? Does it remind you of a family member? Does it remind you of a place that you grew up, or does it have a smell you recognize? Is it made of cotton, or dyed with chemicals? In
Ratio
and in Resistance
, I ask: Why are we still weaving by hand today?Textiles intrinsically complicate the conversation between objects of “use” and spiritual secular objects of contemplation, aka contemporary art as we know it today. Thanhauser’s point is well-taken; Indigenous communities within the Americas and globally have been creating objects of both use and reflection for millennia; it is not an either/or, and this ultimately was Dewey and Rice and Albers’ life’s work.
After spending time in Central and South America and Mexico with her husband Josef learning with and being taught and inspired by indigenous weavers, Anni returned to Black Mountain College and taught students backstrap weaving. Anni Albers’ quote is taken out of context in this instance. Just before she concludes her text with the quote used in Worn, Albers notes,
We use materials to satisfy our substantial needs and our spiritual ones as well. We have useful things and beautiful things – equipment and works of art. In earlier civilizations there was no clear separation of this sort. The useful thing could be made beautiful in the hands of the artisan, who was also the manufacturer.
- Beggs’ essay, Specialization and Generalization, 1940-1947 continues with the salacious drama of the gentle rivalry between Anni Albers and the influential American weaver, Mary M. Atwater. So good.
She continues,
Free experimentation here can result in the fulfillment of an inner urge to give form and to give permanence to ideas, that is to say, it can result in art, or it can result in the satisfaction of invention in some more technical way.
So, Albers was differentiating between a personal aesthetic experience as dictated by the maker, and of technical objects meant to stir innovation and evolution of form, ie samples, etc. The hierarchy she is indicating is not between, say: a blanket and a painting. Also, Albers wanted to be a painter but the Bauhaus didn’t permit women in that workshop . Her attitude must have been deeply affected by the deeply patriarchal and shitty cultural climate she lived with.
4
Adorno writes in
Aesthetic Theory
,Artworks are alive in that they speak in a fashion that is denied to natural objects and the subjects who make them. They speak by virtue of the communication of everything in particular in them…thus they come into contrast with the arbitrariness of what simply exists.
Yet it is precisely as artifacts, as products of social labor that they also communicate with the empirical experience that they reject and from which they draw their content.
Adorno is differentiating between “natural” objects which simply exist, and art objects, which are of social labor.
They have us in them. They have spirit, and community. When we make art, we are making spiritual albeit secular experiences. Adorno sharply critiques a society which fails to value art and instead focusing on the value, the possession, the domination of the art object which was purchased by a customer. I am simply asking for our community to continue to value art, because without our traditions of aesthetic cultural production, objects cease to live and become something of monetary or social power and domination. We need art if we are to escape fascism. We need spiritual objects if we stand a chance against capitalists.
- I am not suggesting that Albers was a saint; she was a misogynist and was a product of her time: while she respected and valued arts and craft of the Americas, ultimately, she still did the speaking. For more on the checkered past of textiles, I recommend the online series Bauhaus Imaginista, and specifically Elissa Auther’s essay on modern fiber art’s appropriation of Andean weaving and other cultural practices.
In 2025, 92 years after Hitler’s rise to power, America struggles to pry itself out of fascism’s cold shadow. Fascism is a funny thing: Elon Musk goads us by parroting the sorry excuse he has offered in response to a global outpouring of disgust for the multiple accounts in which he gave what some call a
Roman salute
, otherwise known as an Asshole’s salute
5
. He responded by accusing mainstream media of propaganda on his Twitter. The Trump administration continues to revoke international student visas for protesting the ongoing genocide of Palestinians.Donald Trump met in the Oval Office last week with El Salvadorian dictator Nayib Bukele to publicly curate the prisoners of the concentration camp, CECOT.
Let this book be another call to arms for weavers: what we do isn’t simply design, or clothing, or craft, or even contemporary art. What we do is care and community. What we do is primordial. It cannot be taken away, and to continue in the legacy of Black Mountain College and Adorno and all our ancestors, is to assert our humanity, our compassion, and our right to autonomy.
- On January 21 at Donald Trump’s presidential inauguration, Musk emphatically threw his arm out in a salute. Then, during CPAC 2025, Steve Bannon also performed the fascist salute.
- Among his exact words, “The 'everyone is Hitler' attack is sooo tired”
- Musk renamed the media platform X, but until they acknowledge my transition, I can’t acknowledge Twitter’s transition.
- Adorno, Theodor W., Gretel Adorno, and Rolf Tiedemann. Aesthetic Theory. Theory and History of Literature. Minneapolis: University of Minnesota Press, 1997.
- Auther, Elissa. "Andean Weaving and the Appropriation of the Ancient Past in Modern Fiber Art." Bauhaus Imaginista(2019).
- Droste, Magdalena. "Bauhaus : 1919-1933." edited by Jane translator Michael and Museum für Gestaltung issuing body Bauhaus - Archiv.Revised and updated edition.Köln : Taschen, 2019.
- Feuerbach, Ludwig. "The Fiery Brook Selected Writings of Ludwig Feuerbach." Garden City, N.Y.: Garden City, N.Y., Anchor Books, 1972.
- Gramsci, Antonio.The Modern Prince & Other Writings.Collection “Foundations”. second ed.Vol. 14, Paris: Foreign Language Press, 2021.
- Lane, Jack C. "The Rollins College Inquiry of 1933 and the Aaup’s Struggle for Shared Governance at Small Colleges." Journal of Academic Freedom 11(2020).
- Nader, Laura. "Unravelling the Politics of Silencing."[In English]. Public Anthropologist 1, no. 1(22 Jan. 2019): 81 - 95.
- Prezioso, Emanuele.Introduction to Material Engagement Theory. 2021.
- Ritter, Jennifer M. "Beyond Progressive Education: Why John Andrew Rice Really Opened Black Mountain College." Rollins Undergraduate Research Journal 5, no. 2(2011).
- St.Clair, Kassia.The Golden Thread: How Fabric Changed History. 2020.
- Thanhauser, Sofi.Worn : A People's History of Clothing. First edition. ed., 2022.
Chapter 2: What the warp remembers
Steven Frost
In art school, I was handed an over duplicated copy of Arthur C. Danto’s exhibition essay for Sheila Hicks’s show weaving as a metaphor. Danto rests his essay on Greek myths and philosophy to argue that weaving is at the foundation of Western Civilization. Critiques of this Eurocentric vision of culture aside, he wants us to look to the past to give meaning and relevance to the work of visionary artist Sheila Hicks. For him, it is the metaphors of distant civilizations that tell us why we should respect weaving as an art form. He’s not wrong; weaving, alongside fire, tools, and early images, played a foundational role in the formation of human culture.
In 2020, a group of researchers in Southern France found evidence the Neanderthals used twisted fibers to construct tools, specifically a 3-ply cordage fragment adhered to a stone tool. This small but powerful discovery expands the timeline of fiber-based technologies and provides rare material evidence for what archaeologist Linda Hurcombe calls the “missing majority,” the vast world of organic material culture from prehistoric communities that has decayed and disappeared and is therefore often excluded from dominant historical narratives. In the case of this missing majority, we are left not only to imagine the yarn, animal skins, and woven goods that once existed, but also to consider the labor, skill, and cultural knowledge embedded in their making. Just as contemporary textile work is often undervalued or invisibilized, this absence in the archaeological record reflects a long-standing dismissal of soft materials and the people, often women and often unnamed, who worked with them. To understand weaving today, we must also acknowledge what has been lost, overlooked, or rendered invisible in the past.
Even today, textiles continue to conceal much of their story, whether it is the labor of garment workers, the farmers who grow raw materials, the designers who develop imagery, or, in the case of digital weaving, the act of warping the loom itself. When I first learned to design for a digital loom, the focus was on creating surface imagery through digital files. The warp, the structural foundation of the weaving, was already prepared, out of sight and out of mind. It reminded me of a paint-your-own-pottery studio, where the form has already been shaped, fired, and glazed, and your role is simply to decorate the surface. The core labor of making, including the preparation and structure, remained invisible, and I began to question what that invisibility means for how we value the work.
Artist and educator Poppy DeltaDawn, one of the co-creators of this book, often reminds us that "the warp is half of the weaving." In her digital weaving practice, the warp is not something to be hidden or backgrounded; it is a central element of the composition. Her use of vivid, intentionally designed warps refuses the invisibility that has long been imposed on structural labor, both in textiles and beyond. Poppy describes her work as architectural, and it’s easy to see why: her threads function like the exposed beams of a modern building, where structure and form are equally celebrated. The warp in her work doesn’t just hold the image, it opens up a visual and conceptual space for reflection on the often-erased frameworks that support creative expression. Through her teaching and artistic practice, she models a way of making that values transparency, presence, and structural clarity, reminding us that what holds something together is just as meaningful as what’s placed on top.
Recognizing the warp, both literally and metaphorically, is a way of honoring the invisible frameworks that sustain artistic and cultural production. In digital weaving, as in history, what is hidden often shapes what is seen. By foregrounding the labor, structure, and material knowledge embedded in weaving, we begin to challenge the dominant narratives that have long rendered these contributions invisible. As a weaver, I return to the warp not just to build structure, but to remember. In the classroom, in the studio, and through digital tools, I encourage students and collaborators to look beyond the surface image and consider the work beneath it. The warp serves as a reminder of those who came before, of what is often forgotten, and of the power of textiles to carry meaning, resistance, and memory, thread by thread.
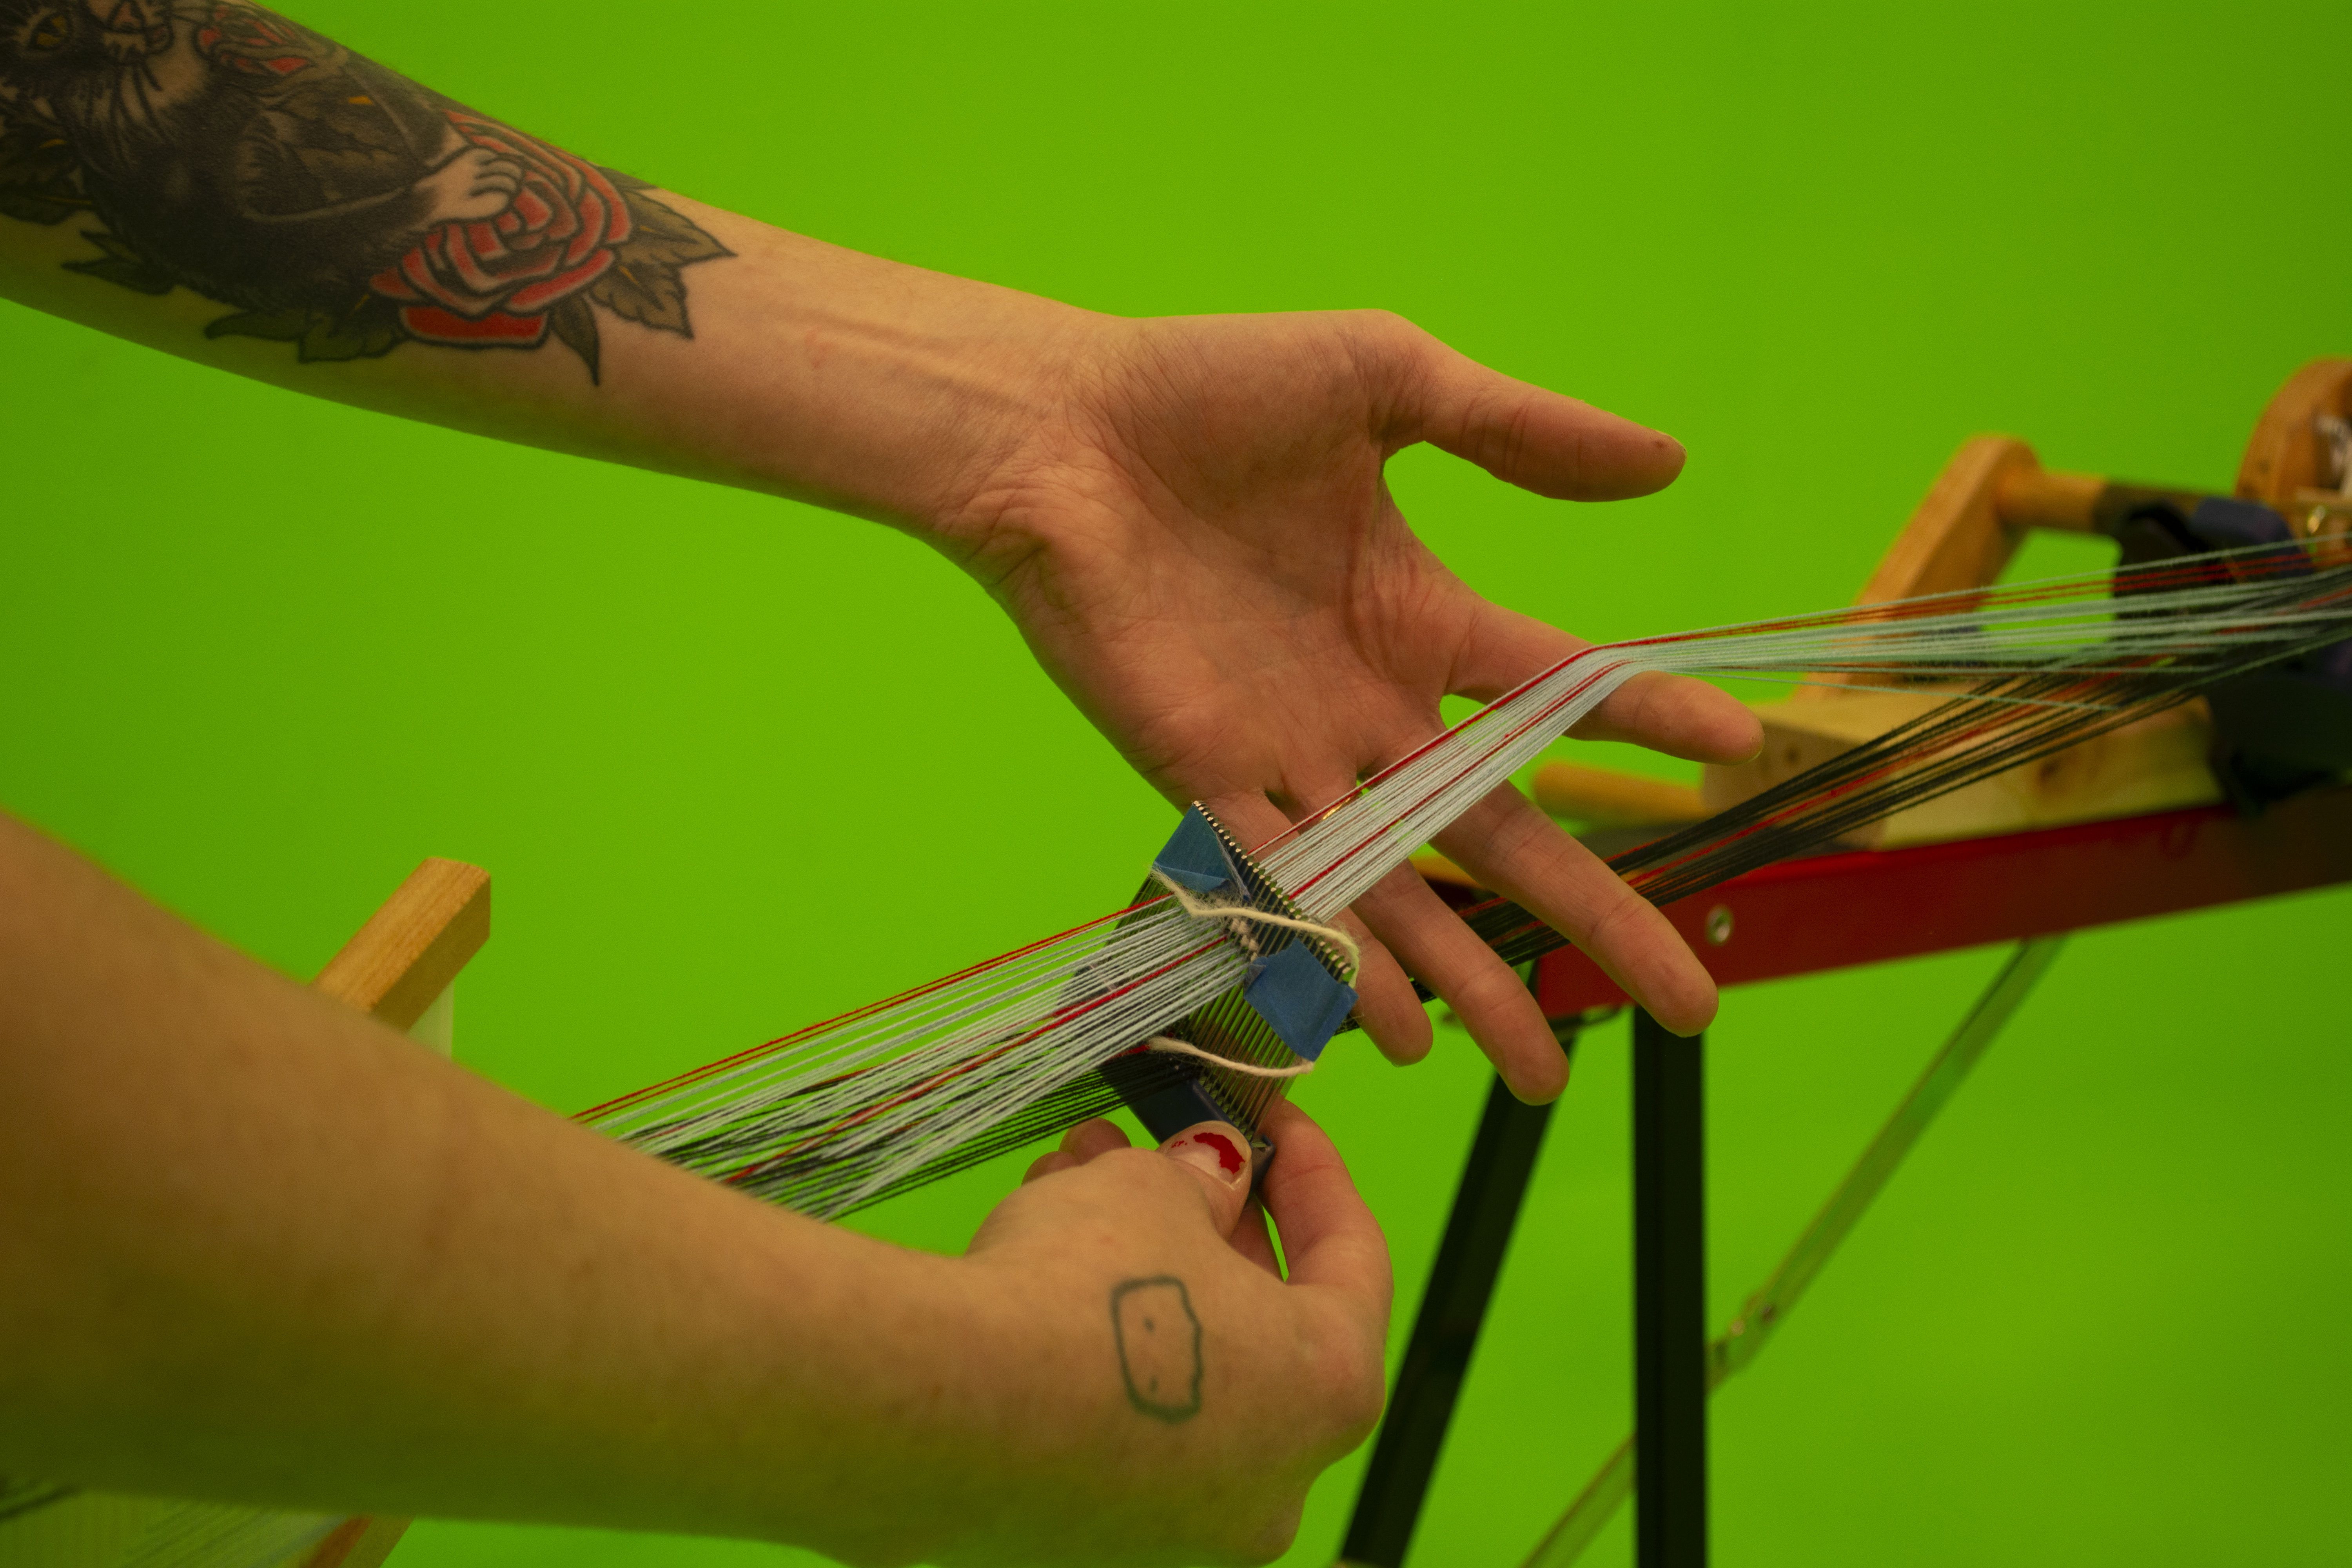
Chapter 3: On Designing a Warp
Etta Sandry
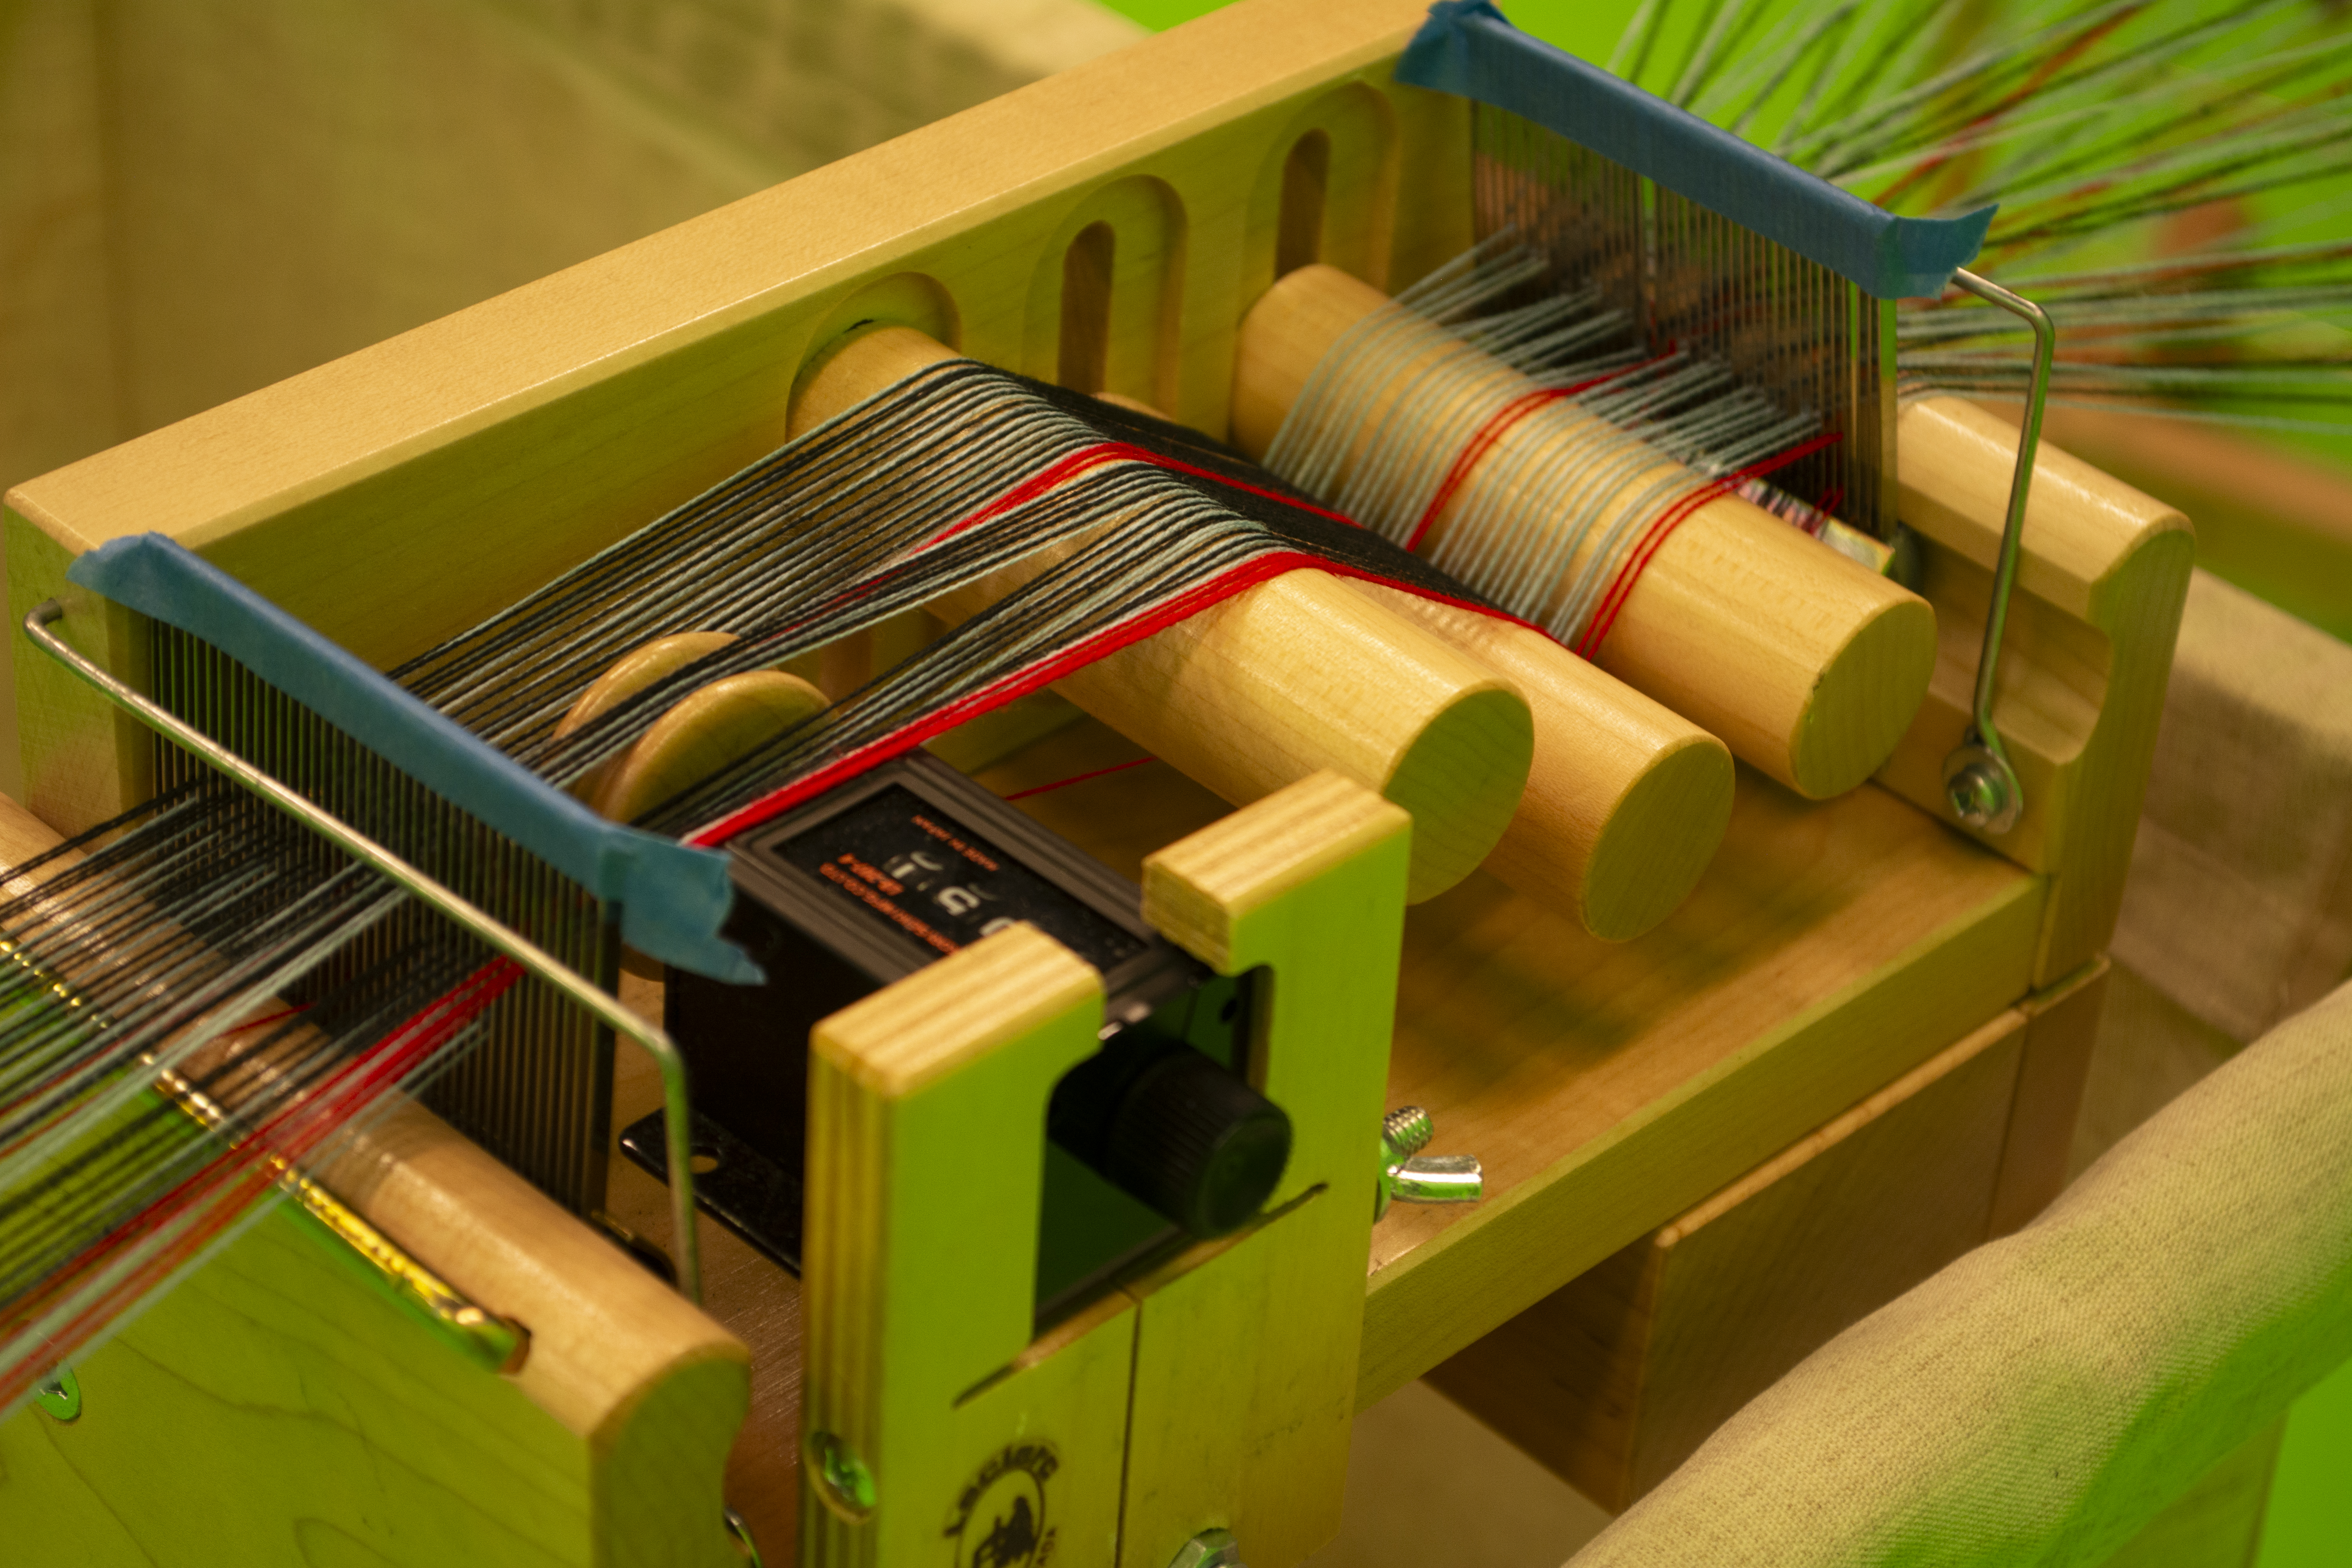
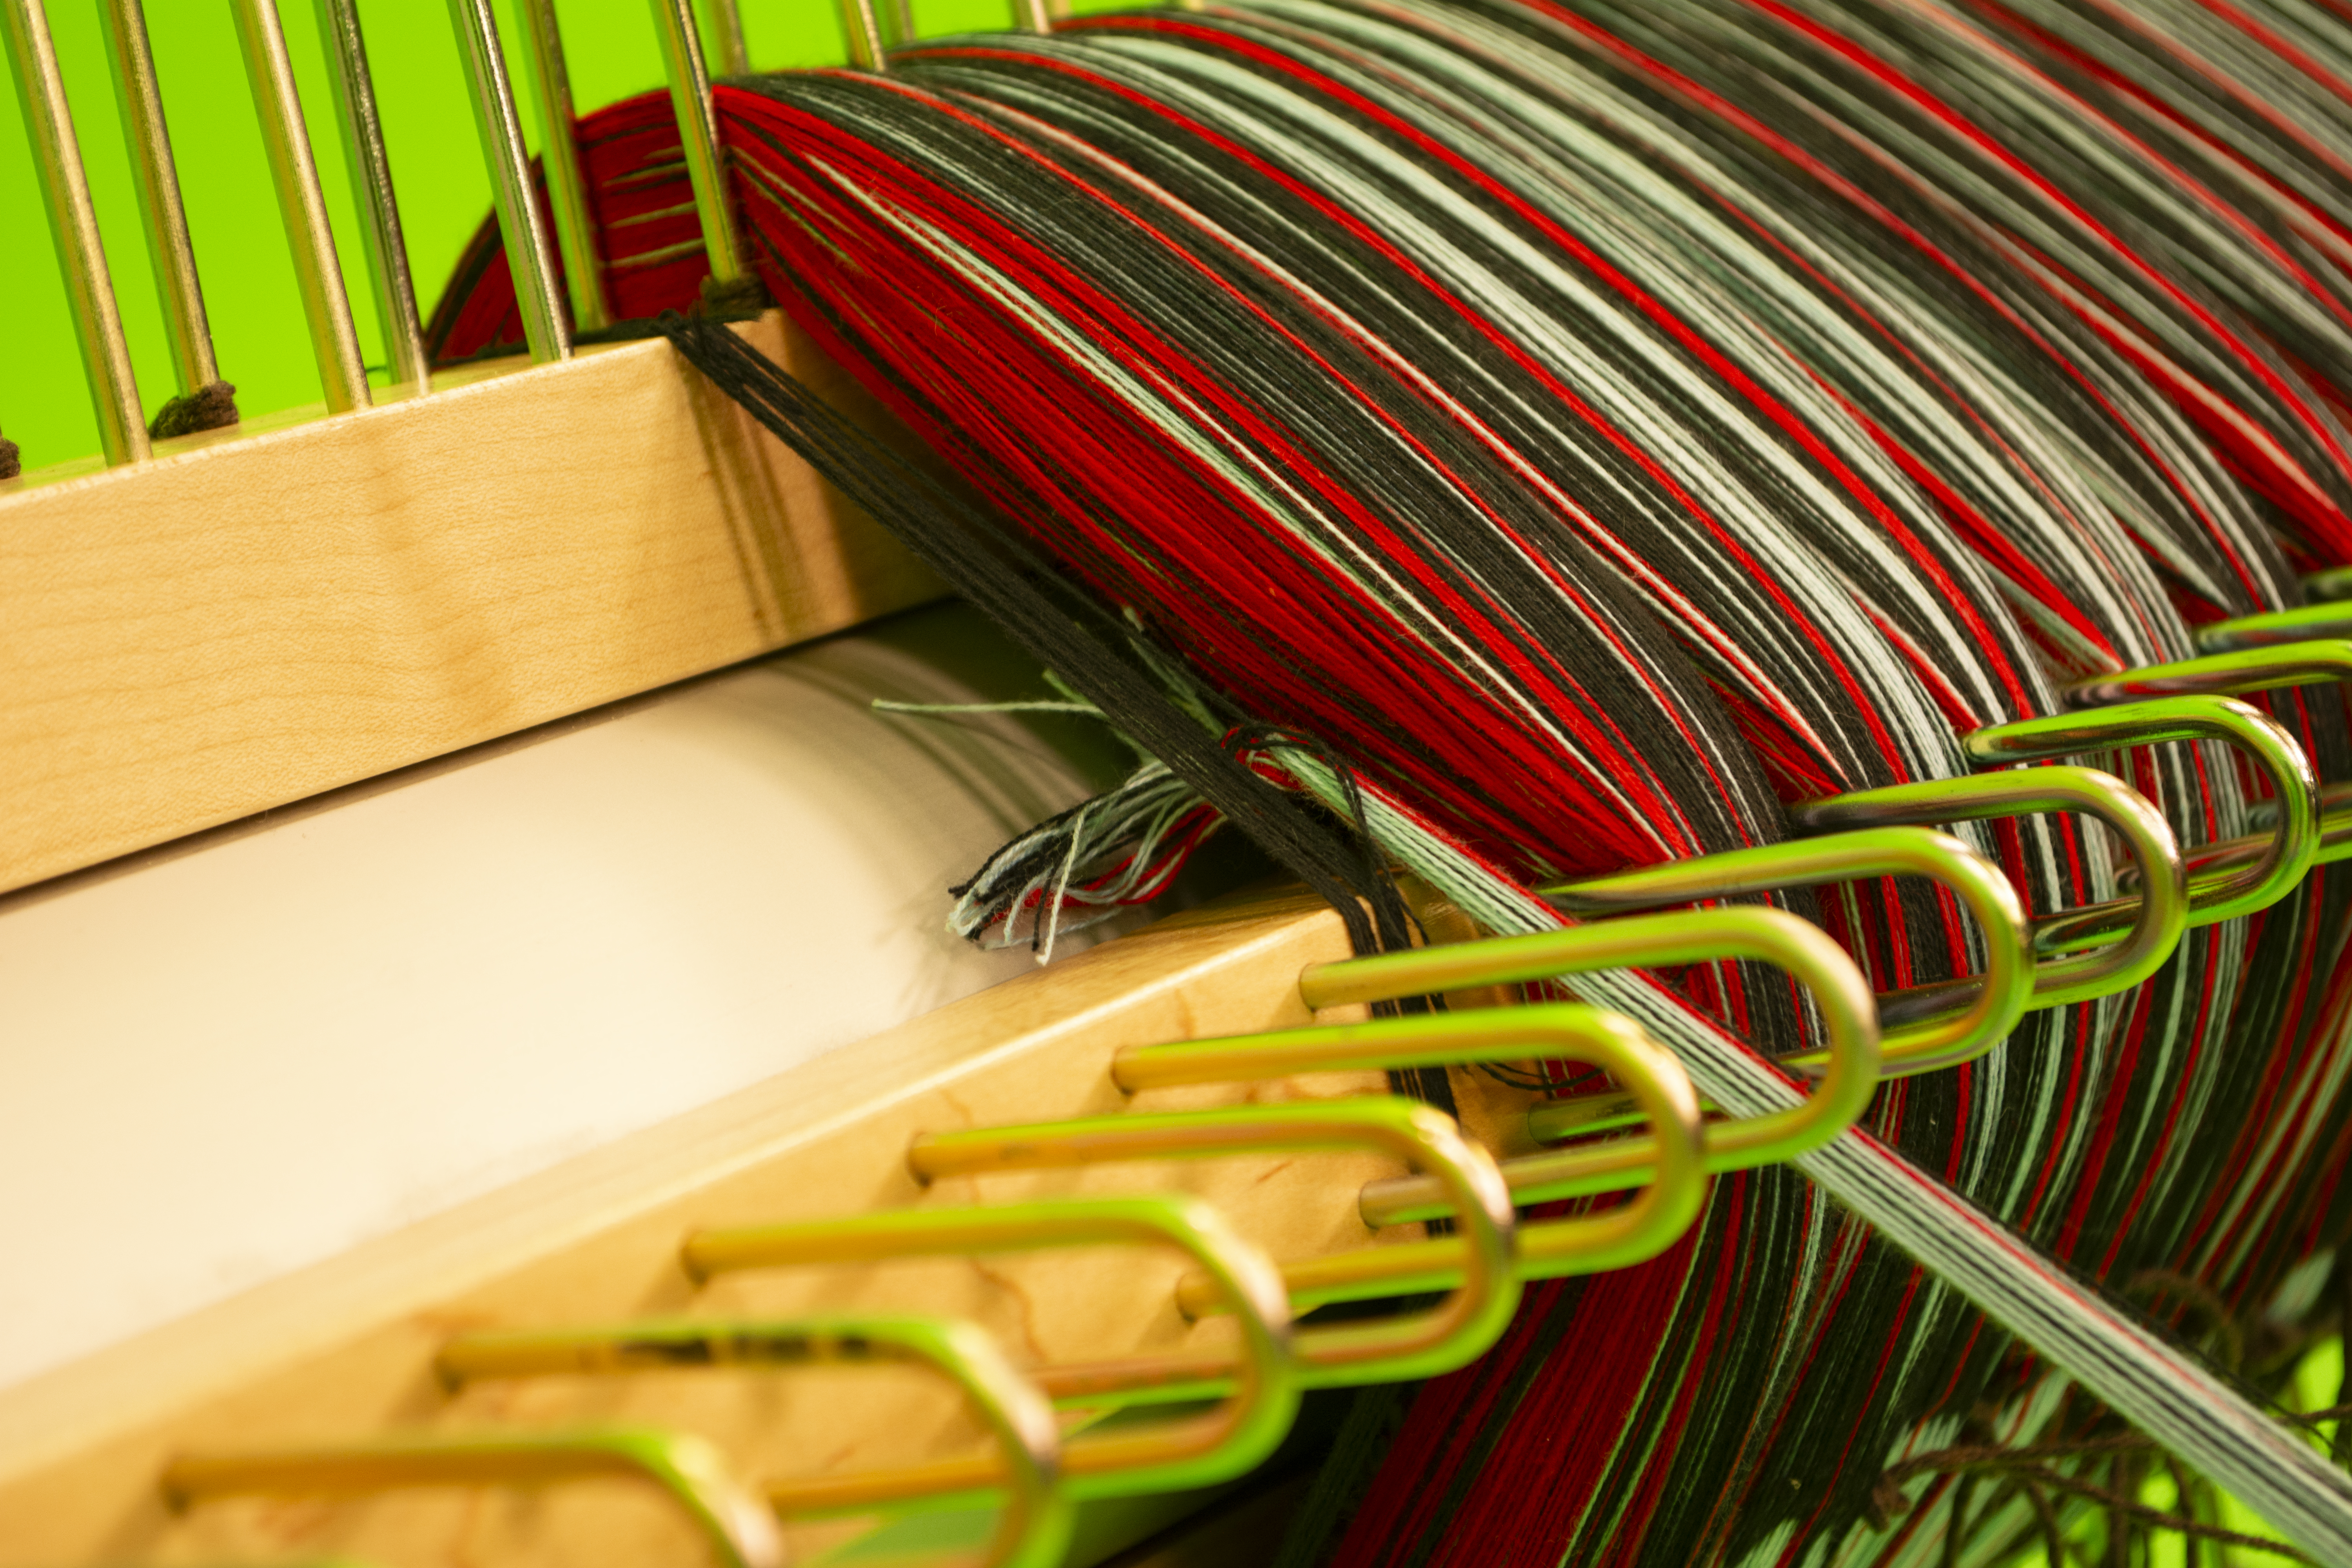
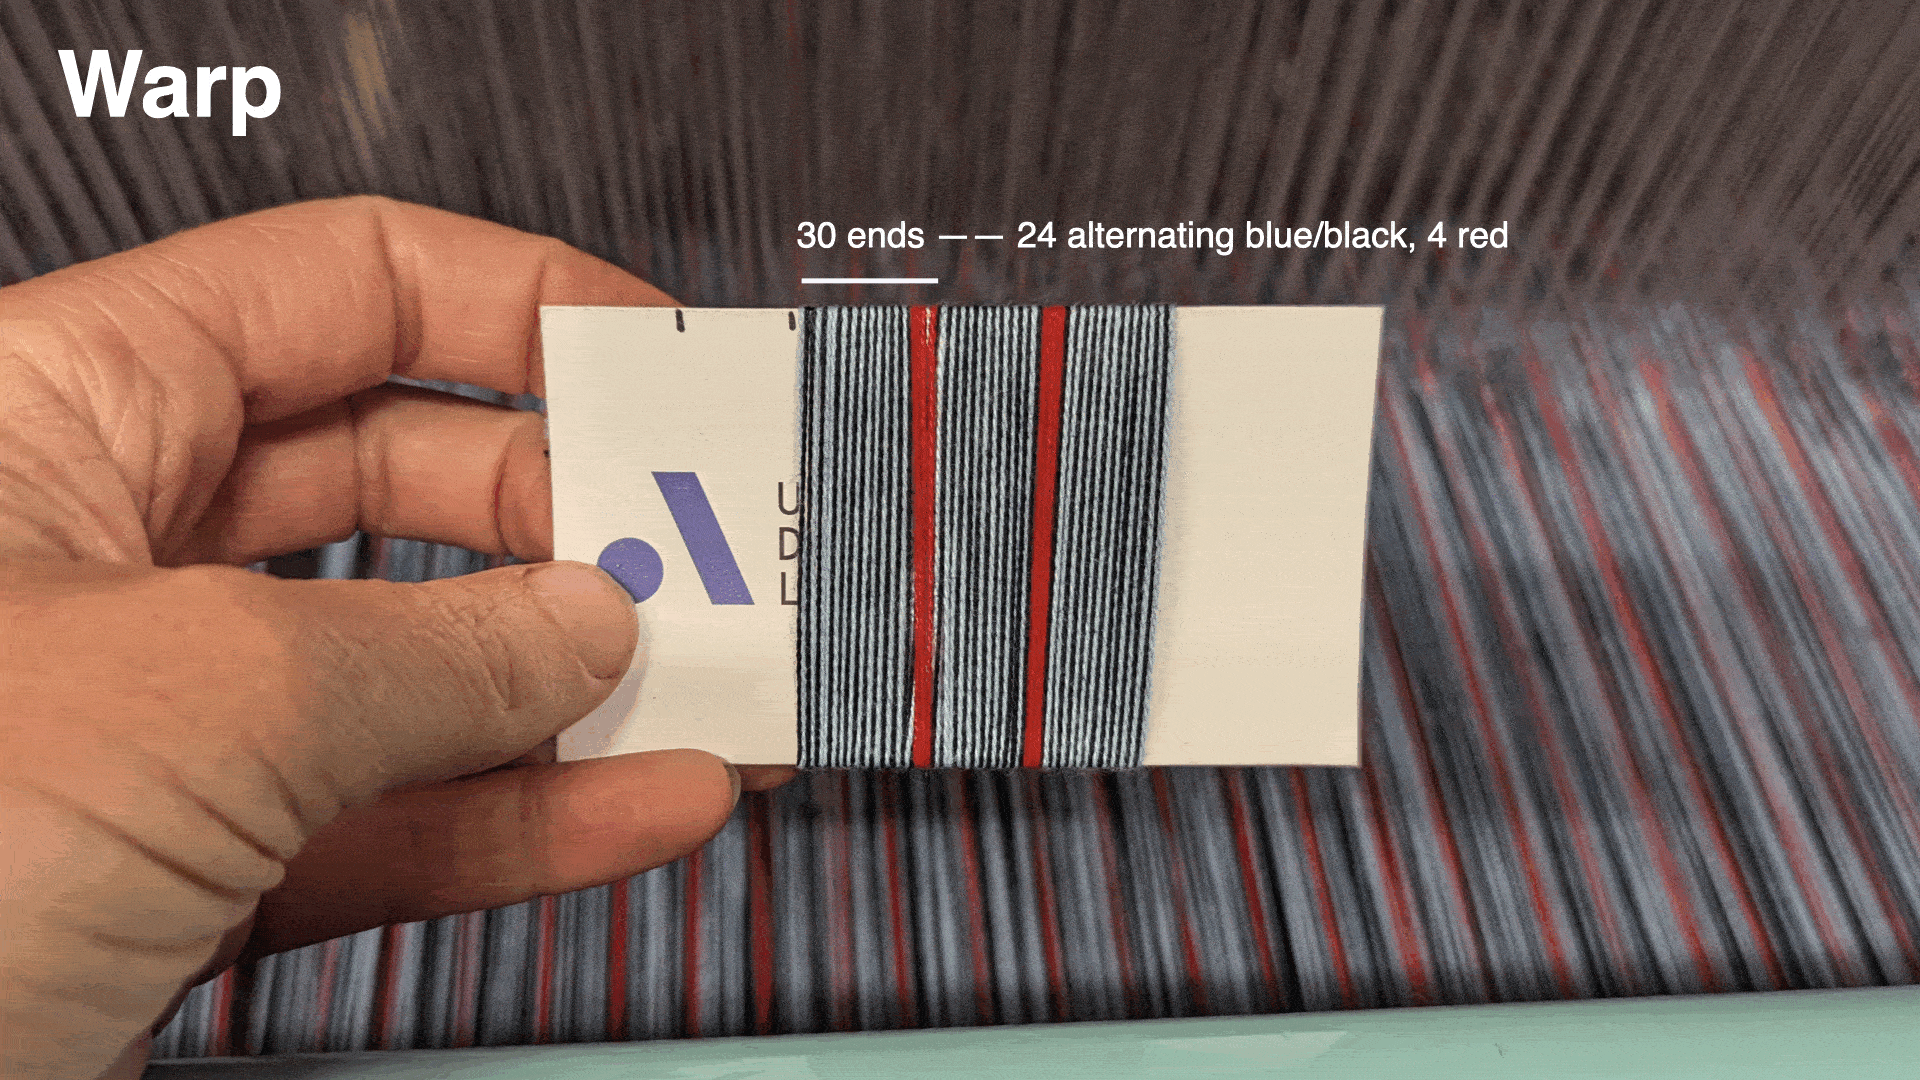
As the last of our sixty yards of white warp came into view and the arrival of our 2025 Experimental Weaver in Residence, Poppy DeltaDawn, drew closer, Laura and I sat down in the Unstable Design Lab to plan our next warp. We were venturing into (for us) uncharted territory: a multi-colored threading pattern. We wanted to try something a little more fun than a black and white end-on-end warp, but I was apprehensive about getting too ambitious before understanding how the structures and design on a multi-color jacquard warp would work. We pulled out the thread sample cards and started pinching threads together, discussing their merits and color associations like sports teams, holidays, and the style choices of our youth.

You can test out striping patterns and color combinations for your warp by drawing color bands using colored pencils or markers. The templates below have one inch and once centimeter markings, so you can try out some color repeats. Match to your yarn selection and take notes on thread colors/sources under each band.
 Download Warping Template 🖨️
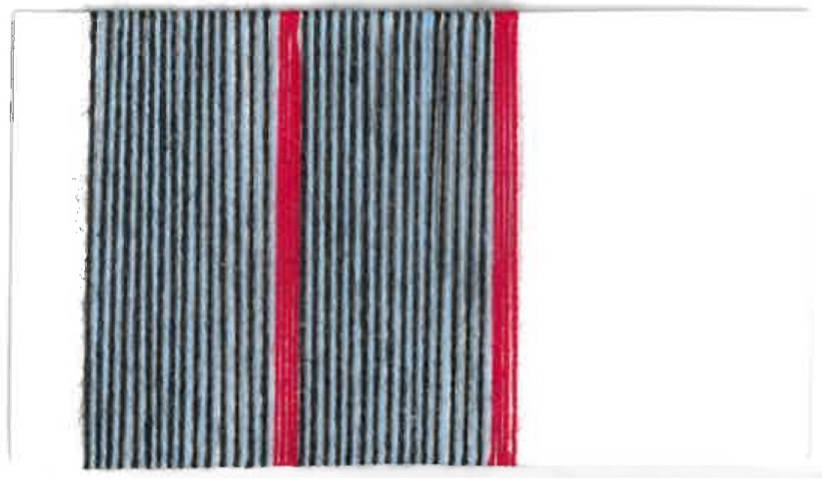
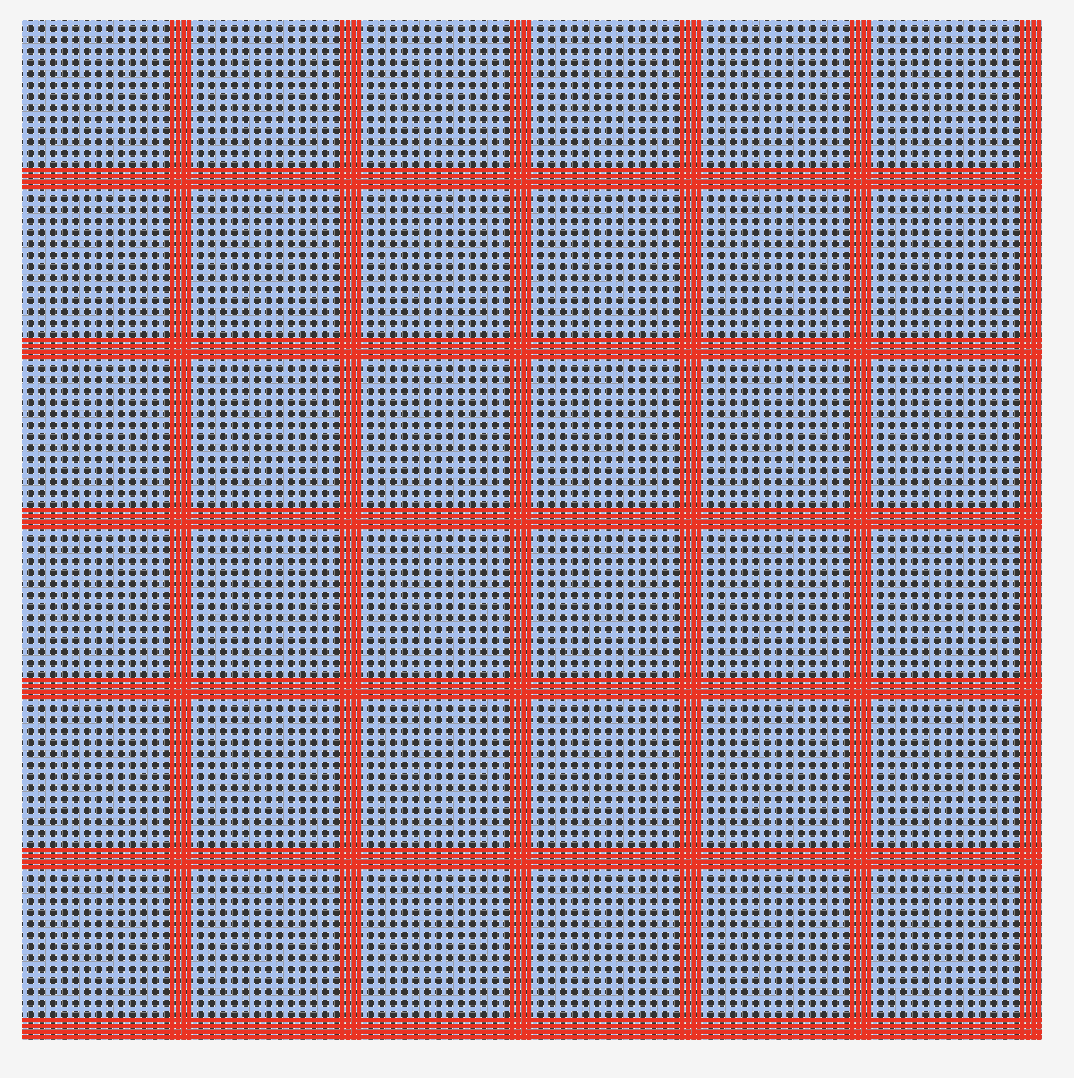
To maintain the tonal contrast that black and white offers, but with a pop of color, we drew from Dorothy Liebes’s design formula of ‘a light, a bright, and a dark,’ envisioning an end-on-end warp of light and dark threads, interspersed with stripes of a brighter color. I sketched out some promising combinations with colored pencils and graph paper and we ordered some spools of various colors to test through thread wrapping before making final decisions. One morning, Laura came into the lab after a morning swim, inspired by the pool’s pale blue water and black center lines of the lanes. These became our base colors, with stripes of four scarlet red ends every inch.
Chapter 4: On Sectionally Warping & Beaming the TC2 Loom
Poppy DeltaDawn
1. Wind the spools.
❊ This is tedious: find yourself some noise-cancelling headphones and a good audio book or podcast and go to town. I recommend David Graeber’s The Democracy Project.
❊ Do not skimp on the amount of yarn: the more you must refill your yarn; the more knots will have in your warp from tying on new bobbins
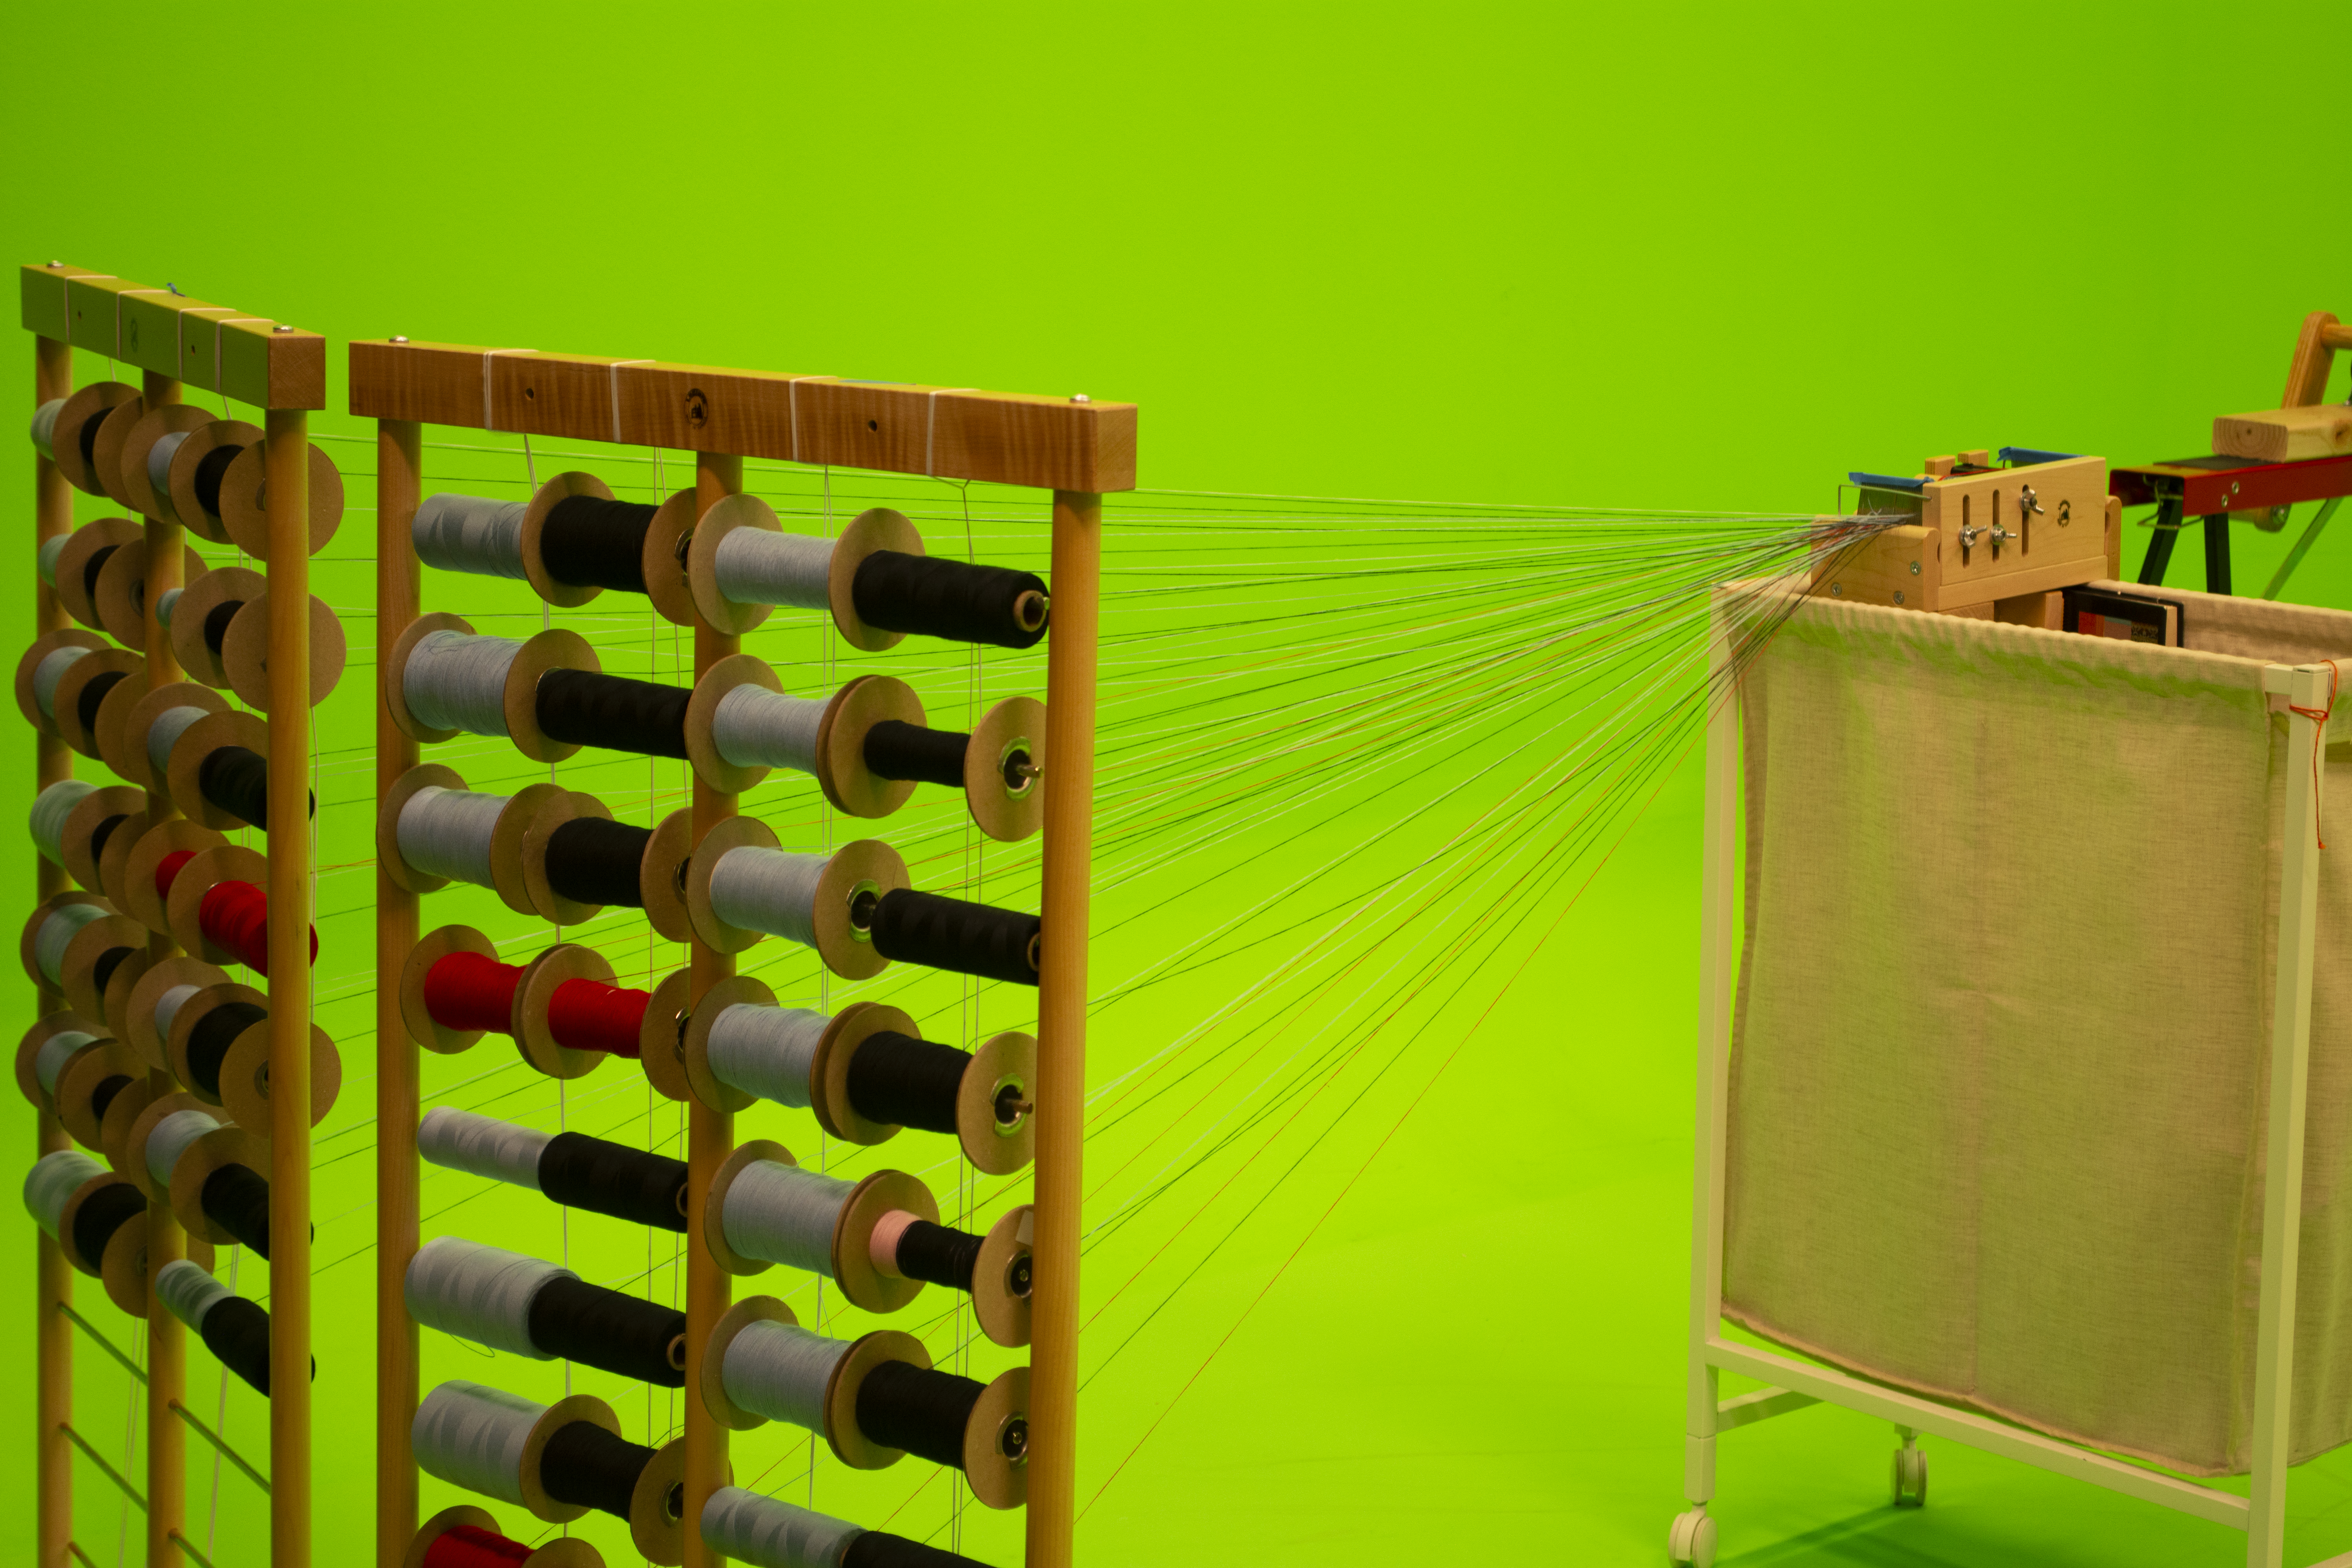
❊ You will need each spool to have the total warp length of warp thread, multiplied by the width of your loom in inches.
❊ At Unstable Design, we warped 20 yards onto our beam. Our loom is 44 inches wide. How many spools? It's easiest and best to have one inch of your warp beamed on at a time. Our EPI was 60, so we had 60 bobbins, each with 660 yards of thread.
20 yards x 44 inches = 880 yards on each spool.
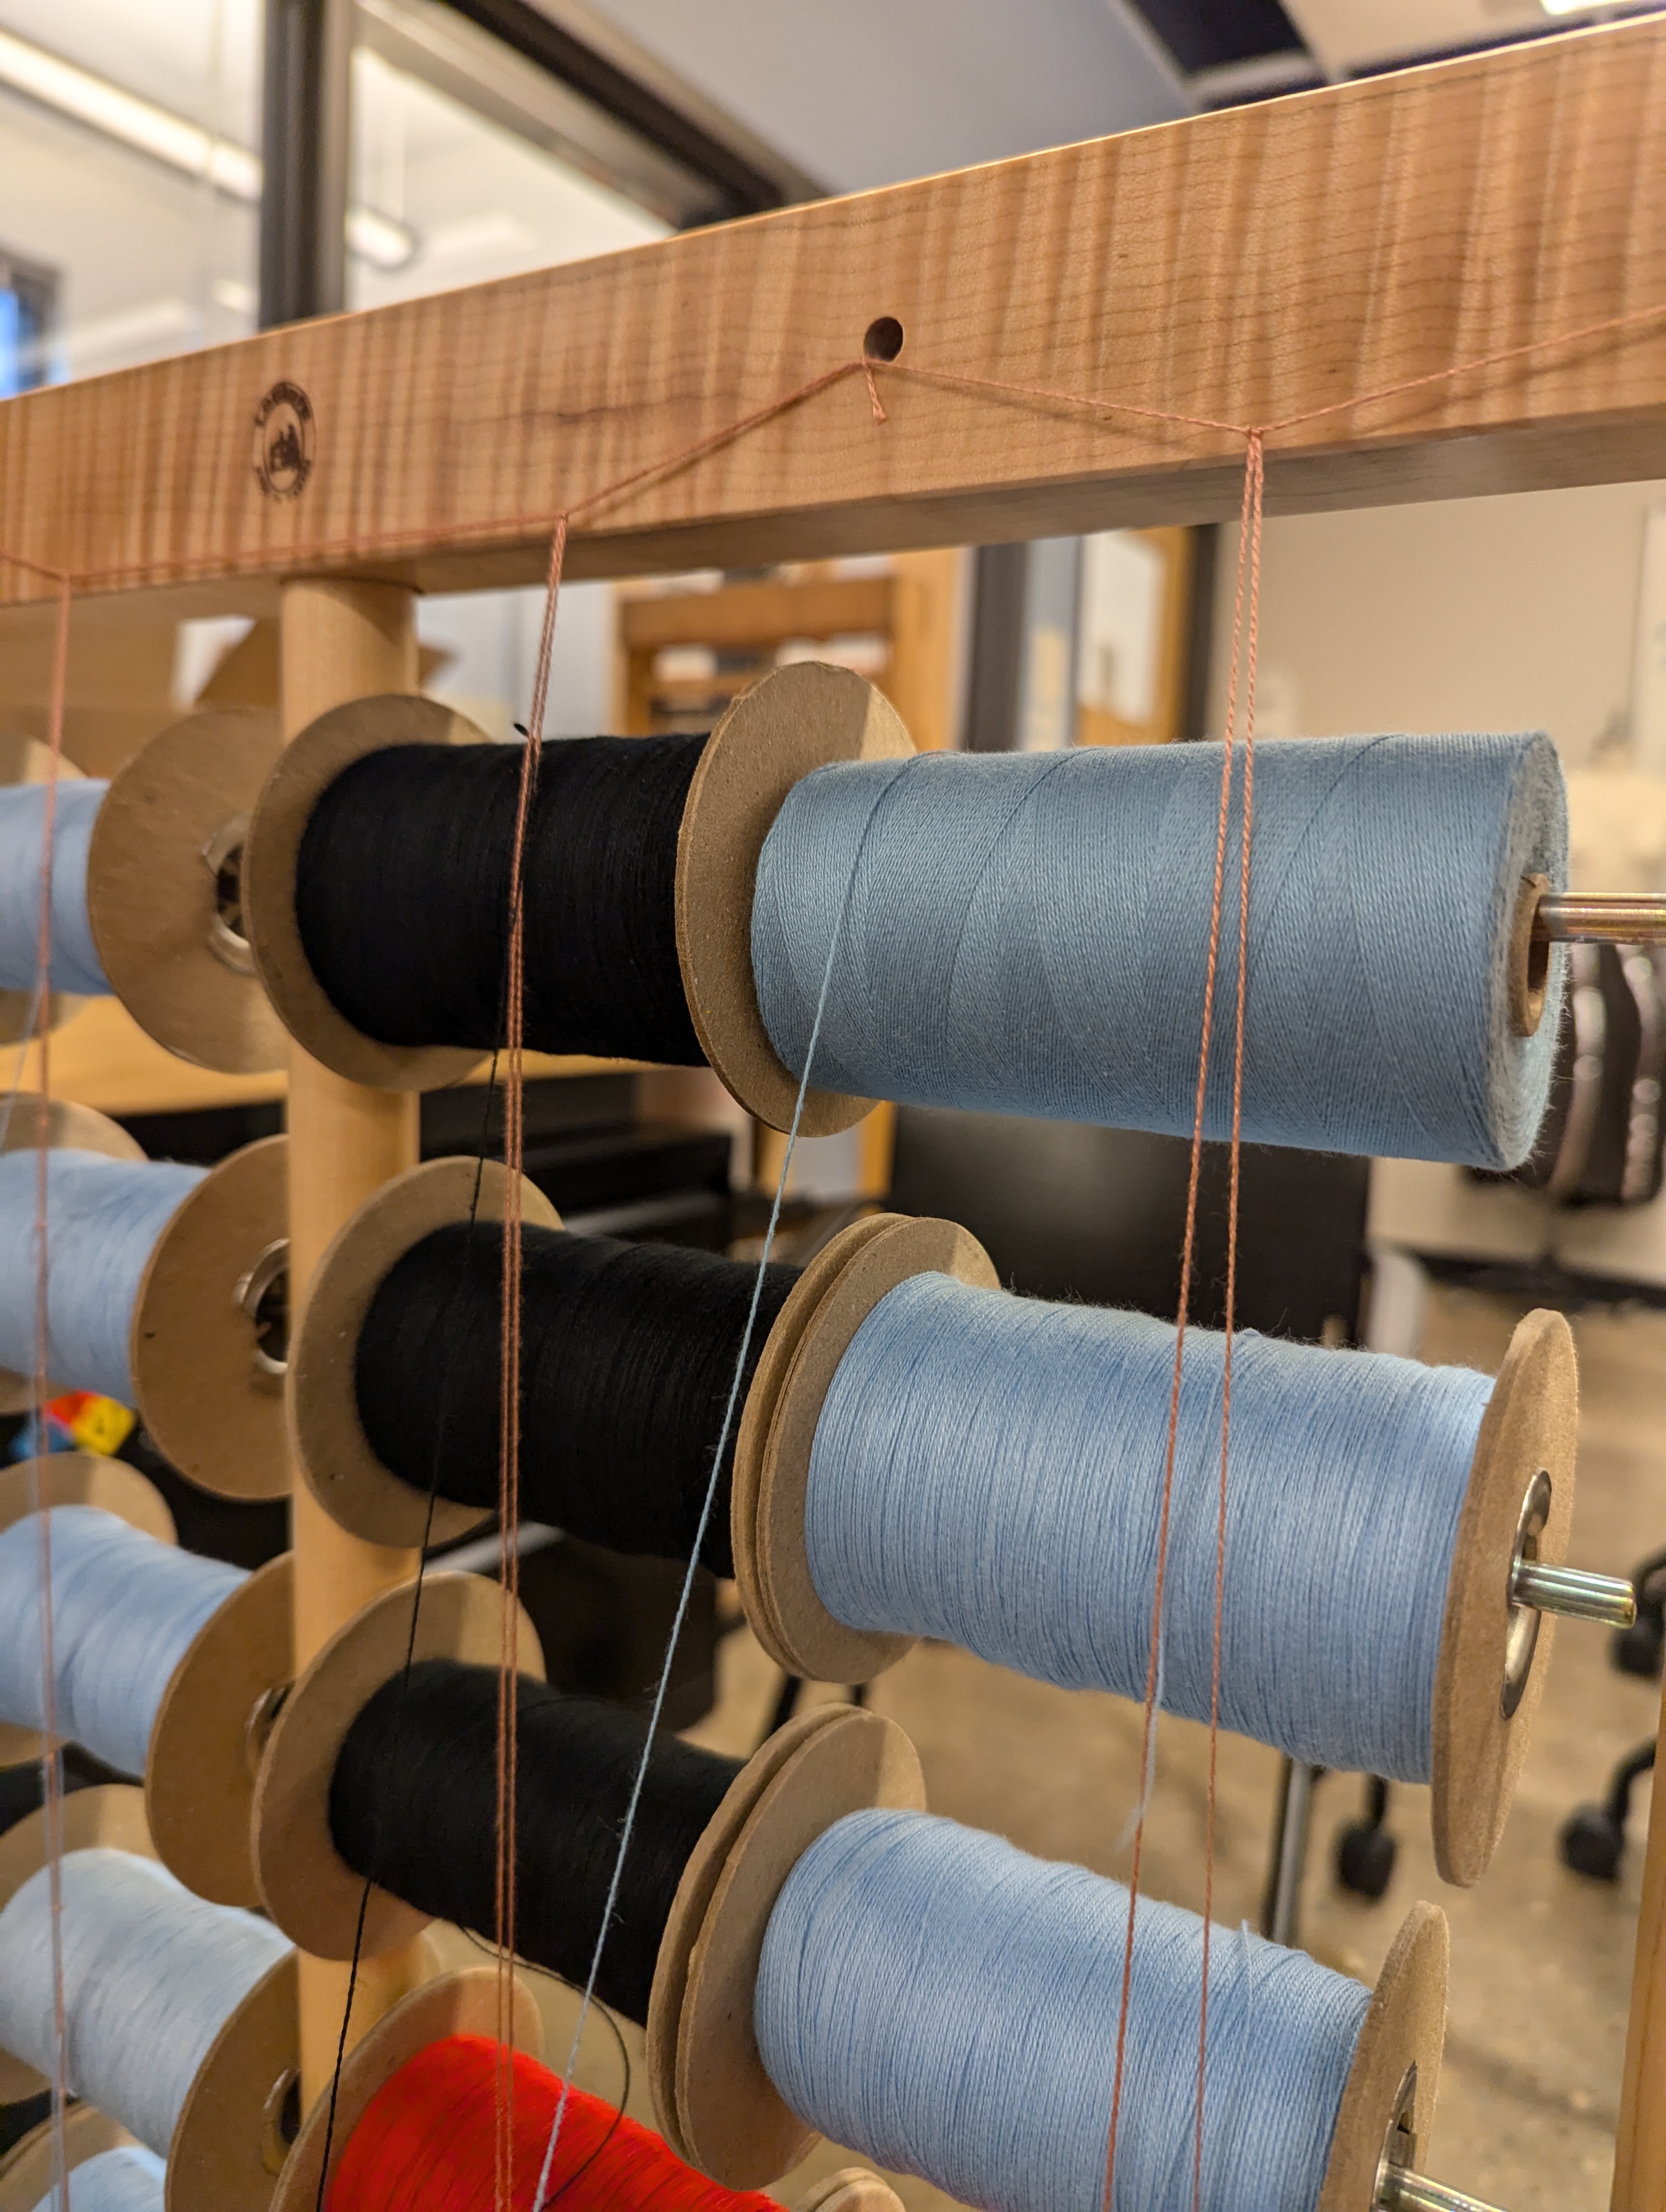
❊ Make sure that the bobbin, goes onto the creel, with the thread coming from the top (think like a toilet paper roll)
❊ Make a guide string going from the top to the bottom of your creel, with two threads, creating a giant heddle for the bobbin threads to travel through. This will prevent them from getting caught on the metal rod and snapping while warping.
❊ The order of the bobbins should go from top left row to the top right, and then to the next row’s left-most bobbin, and then finally ending at the bottom right bobbin. This order should be reflected in the order of the threads sleyed in the dent of your tension box.
❊Left to right ➬ left to right, row by row, to the bottom of the creel.
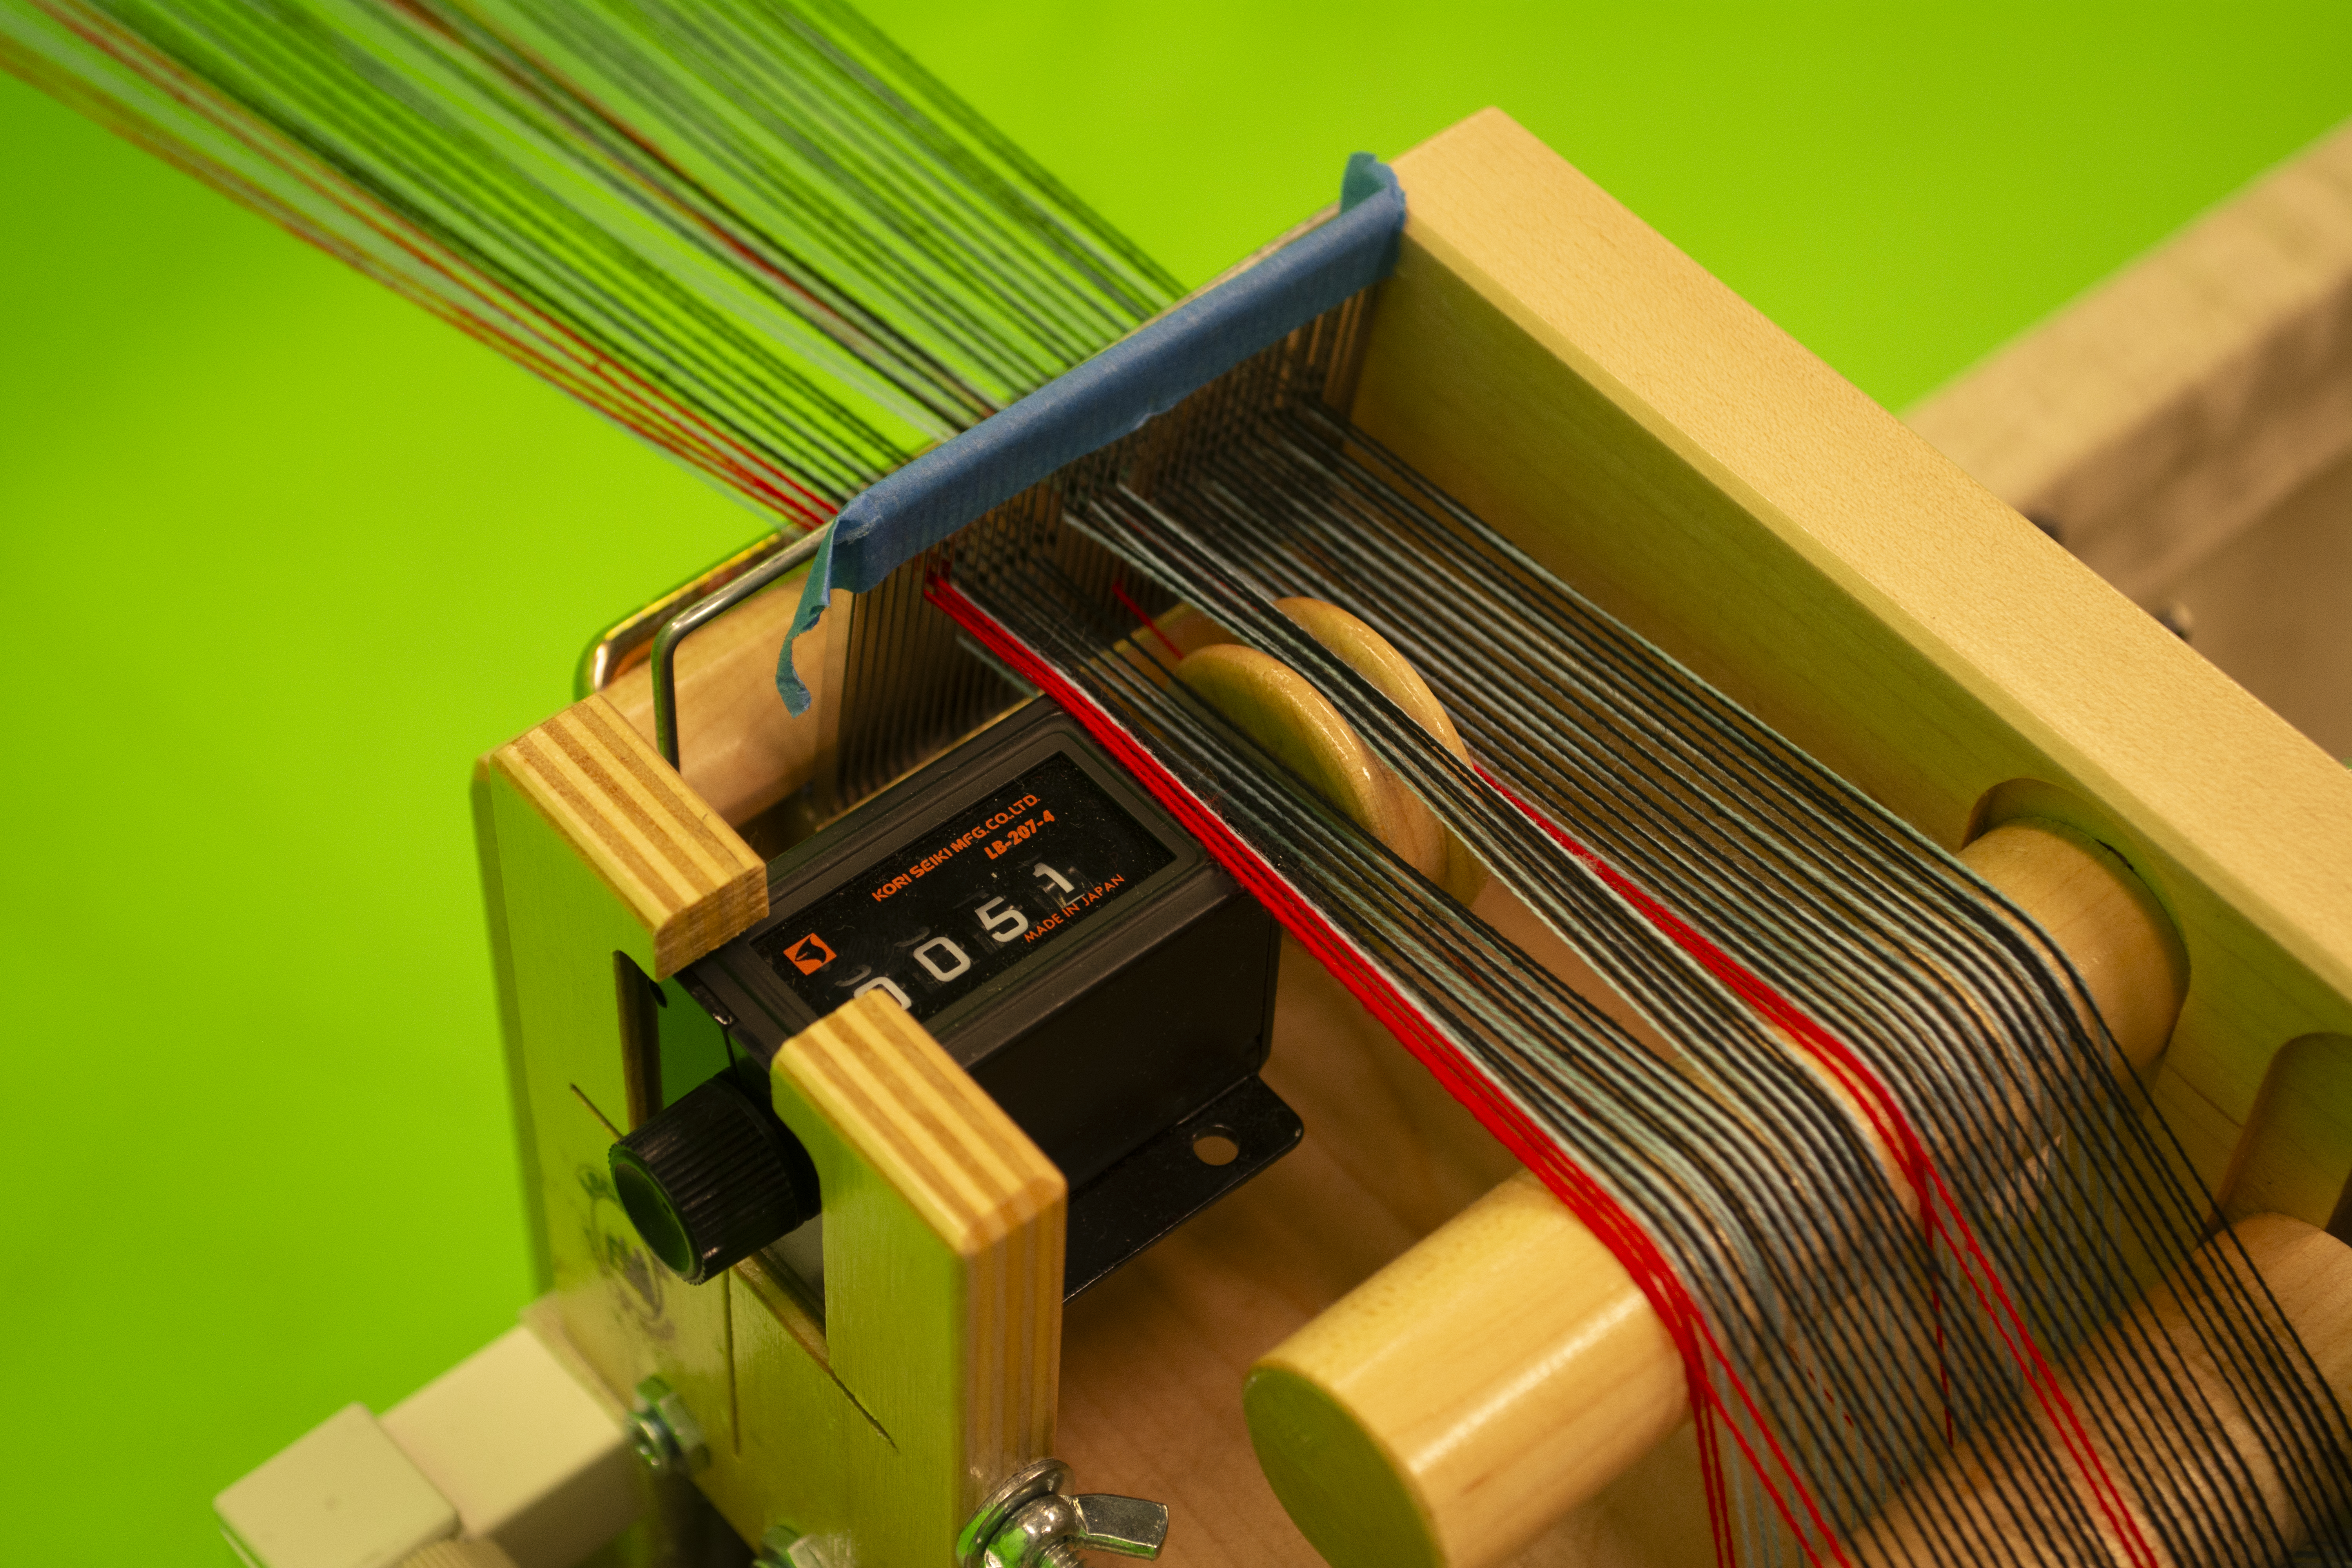
2. Set up the tension Box
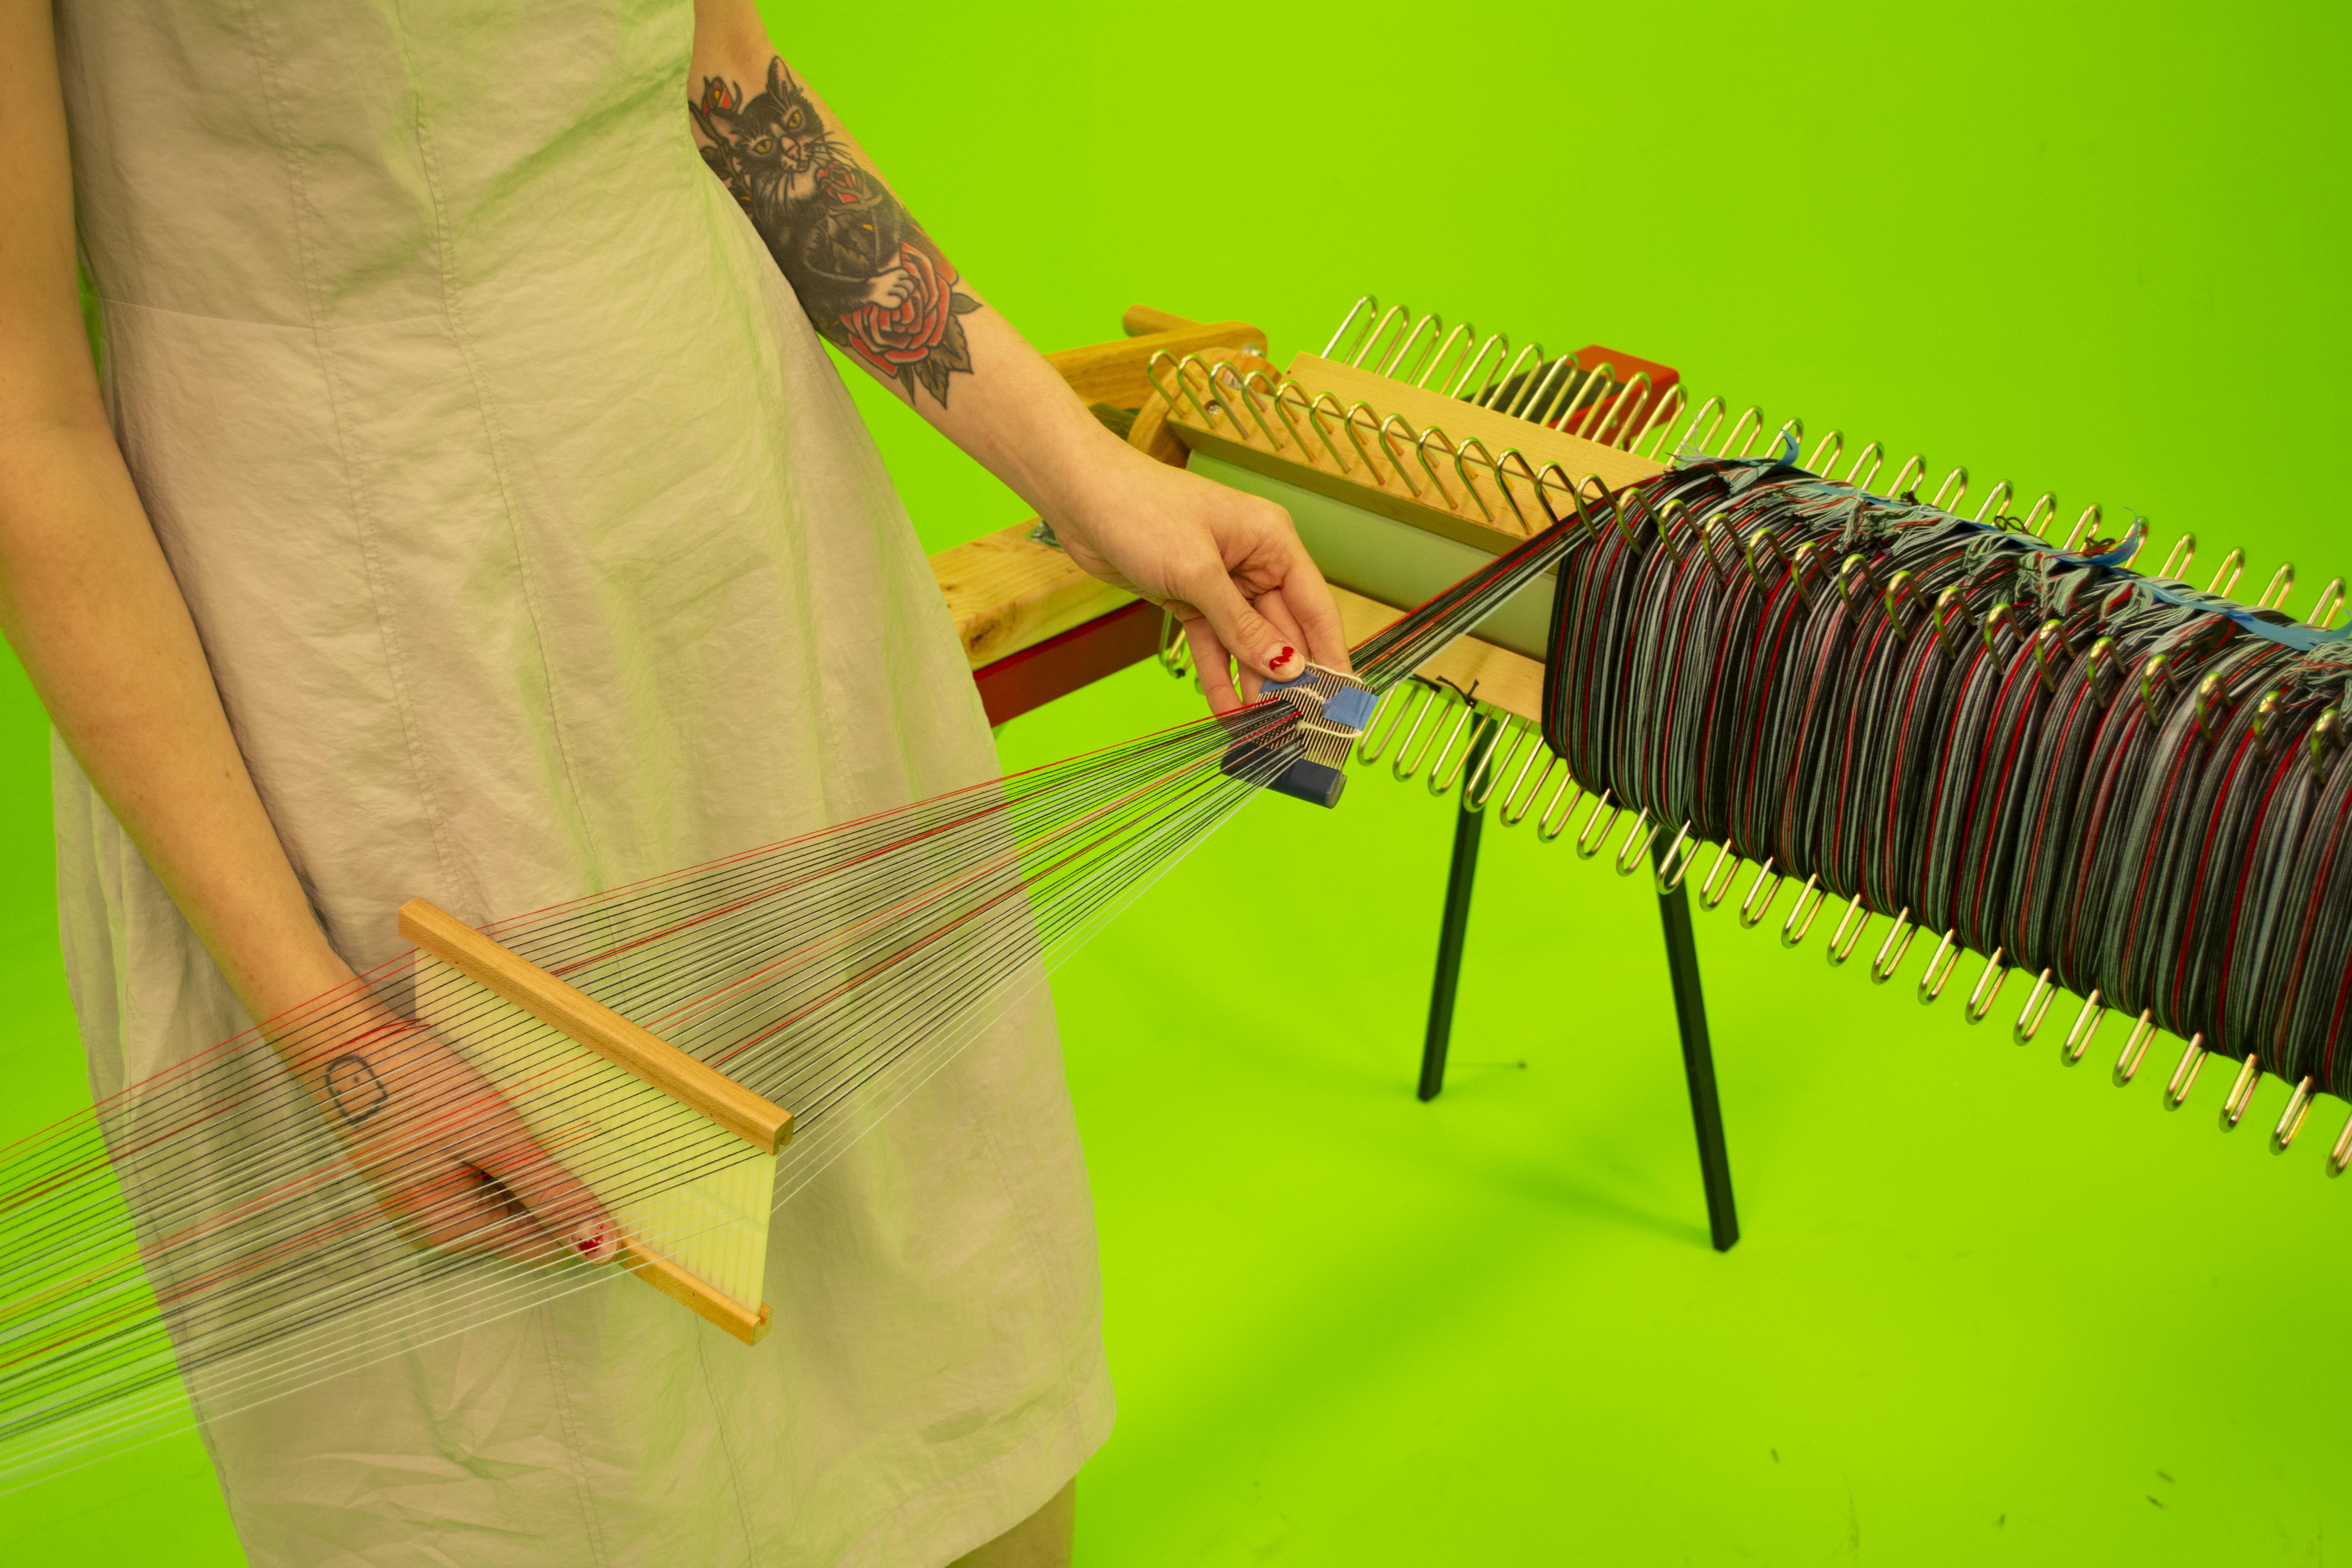
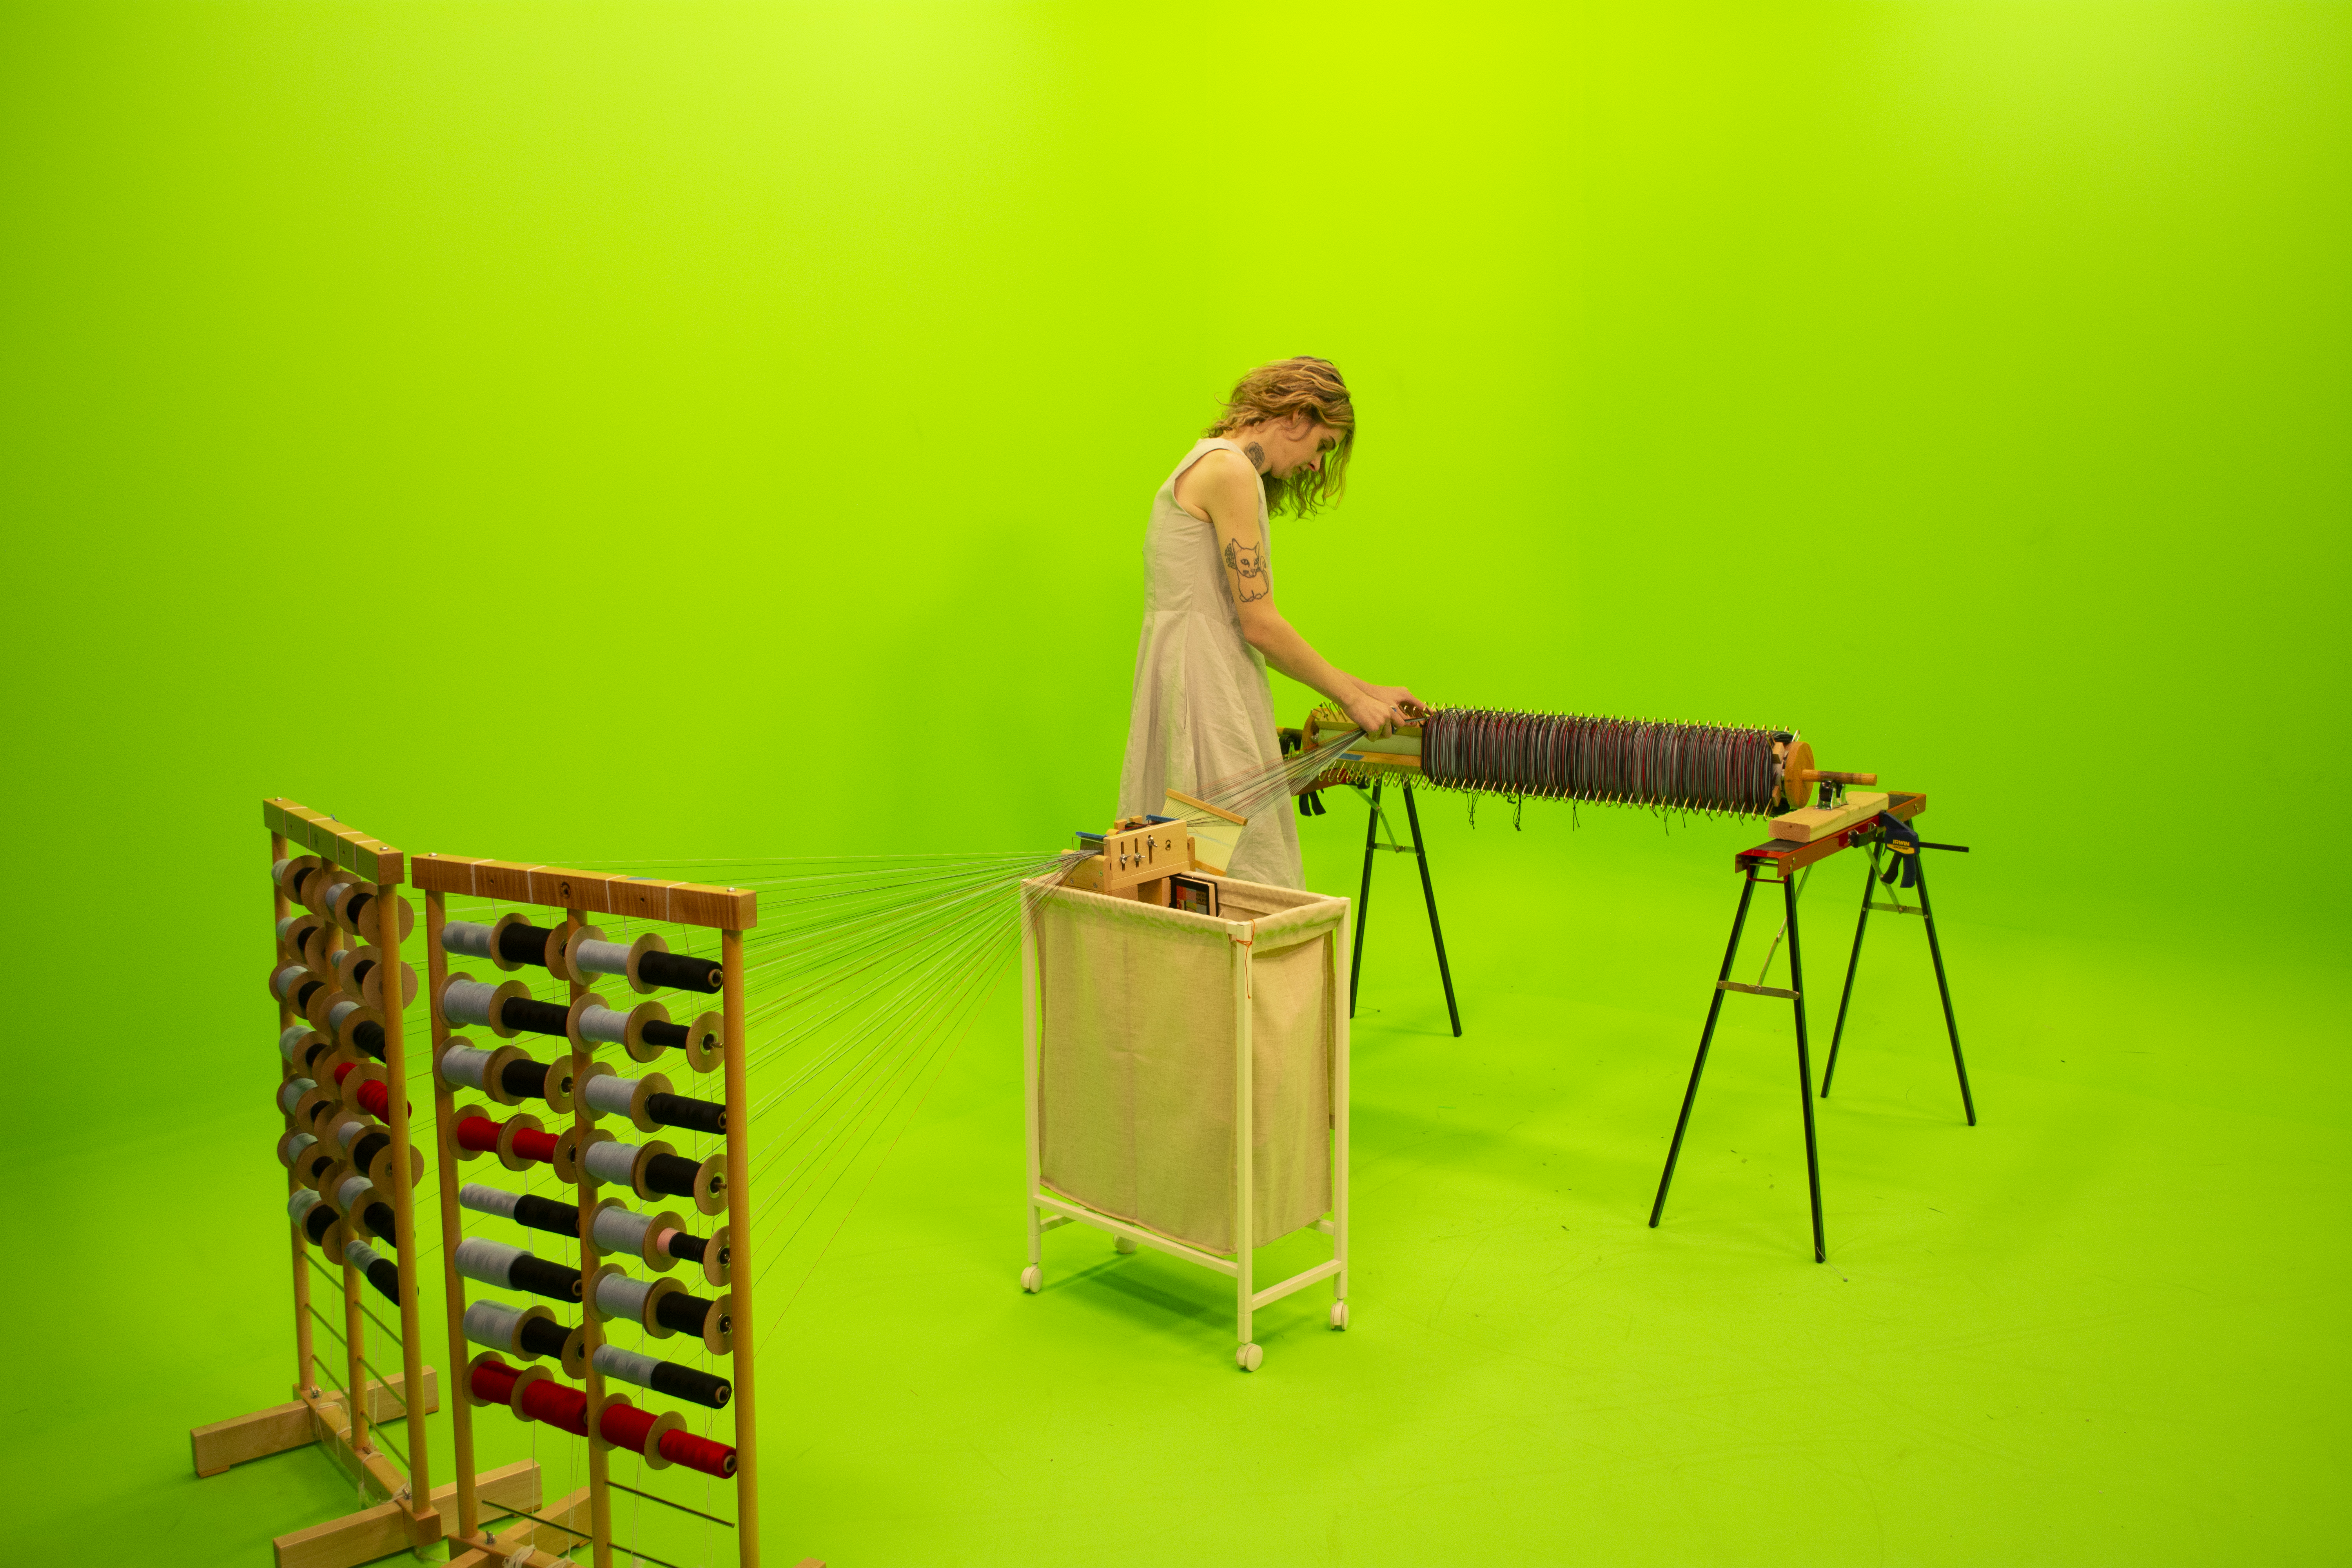
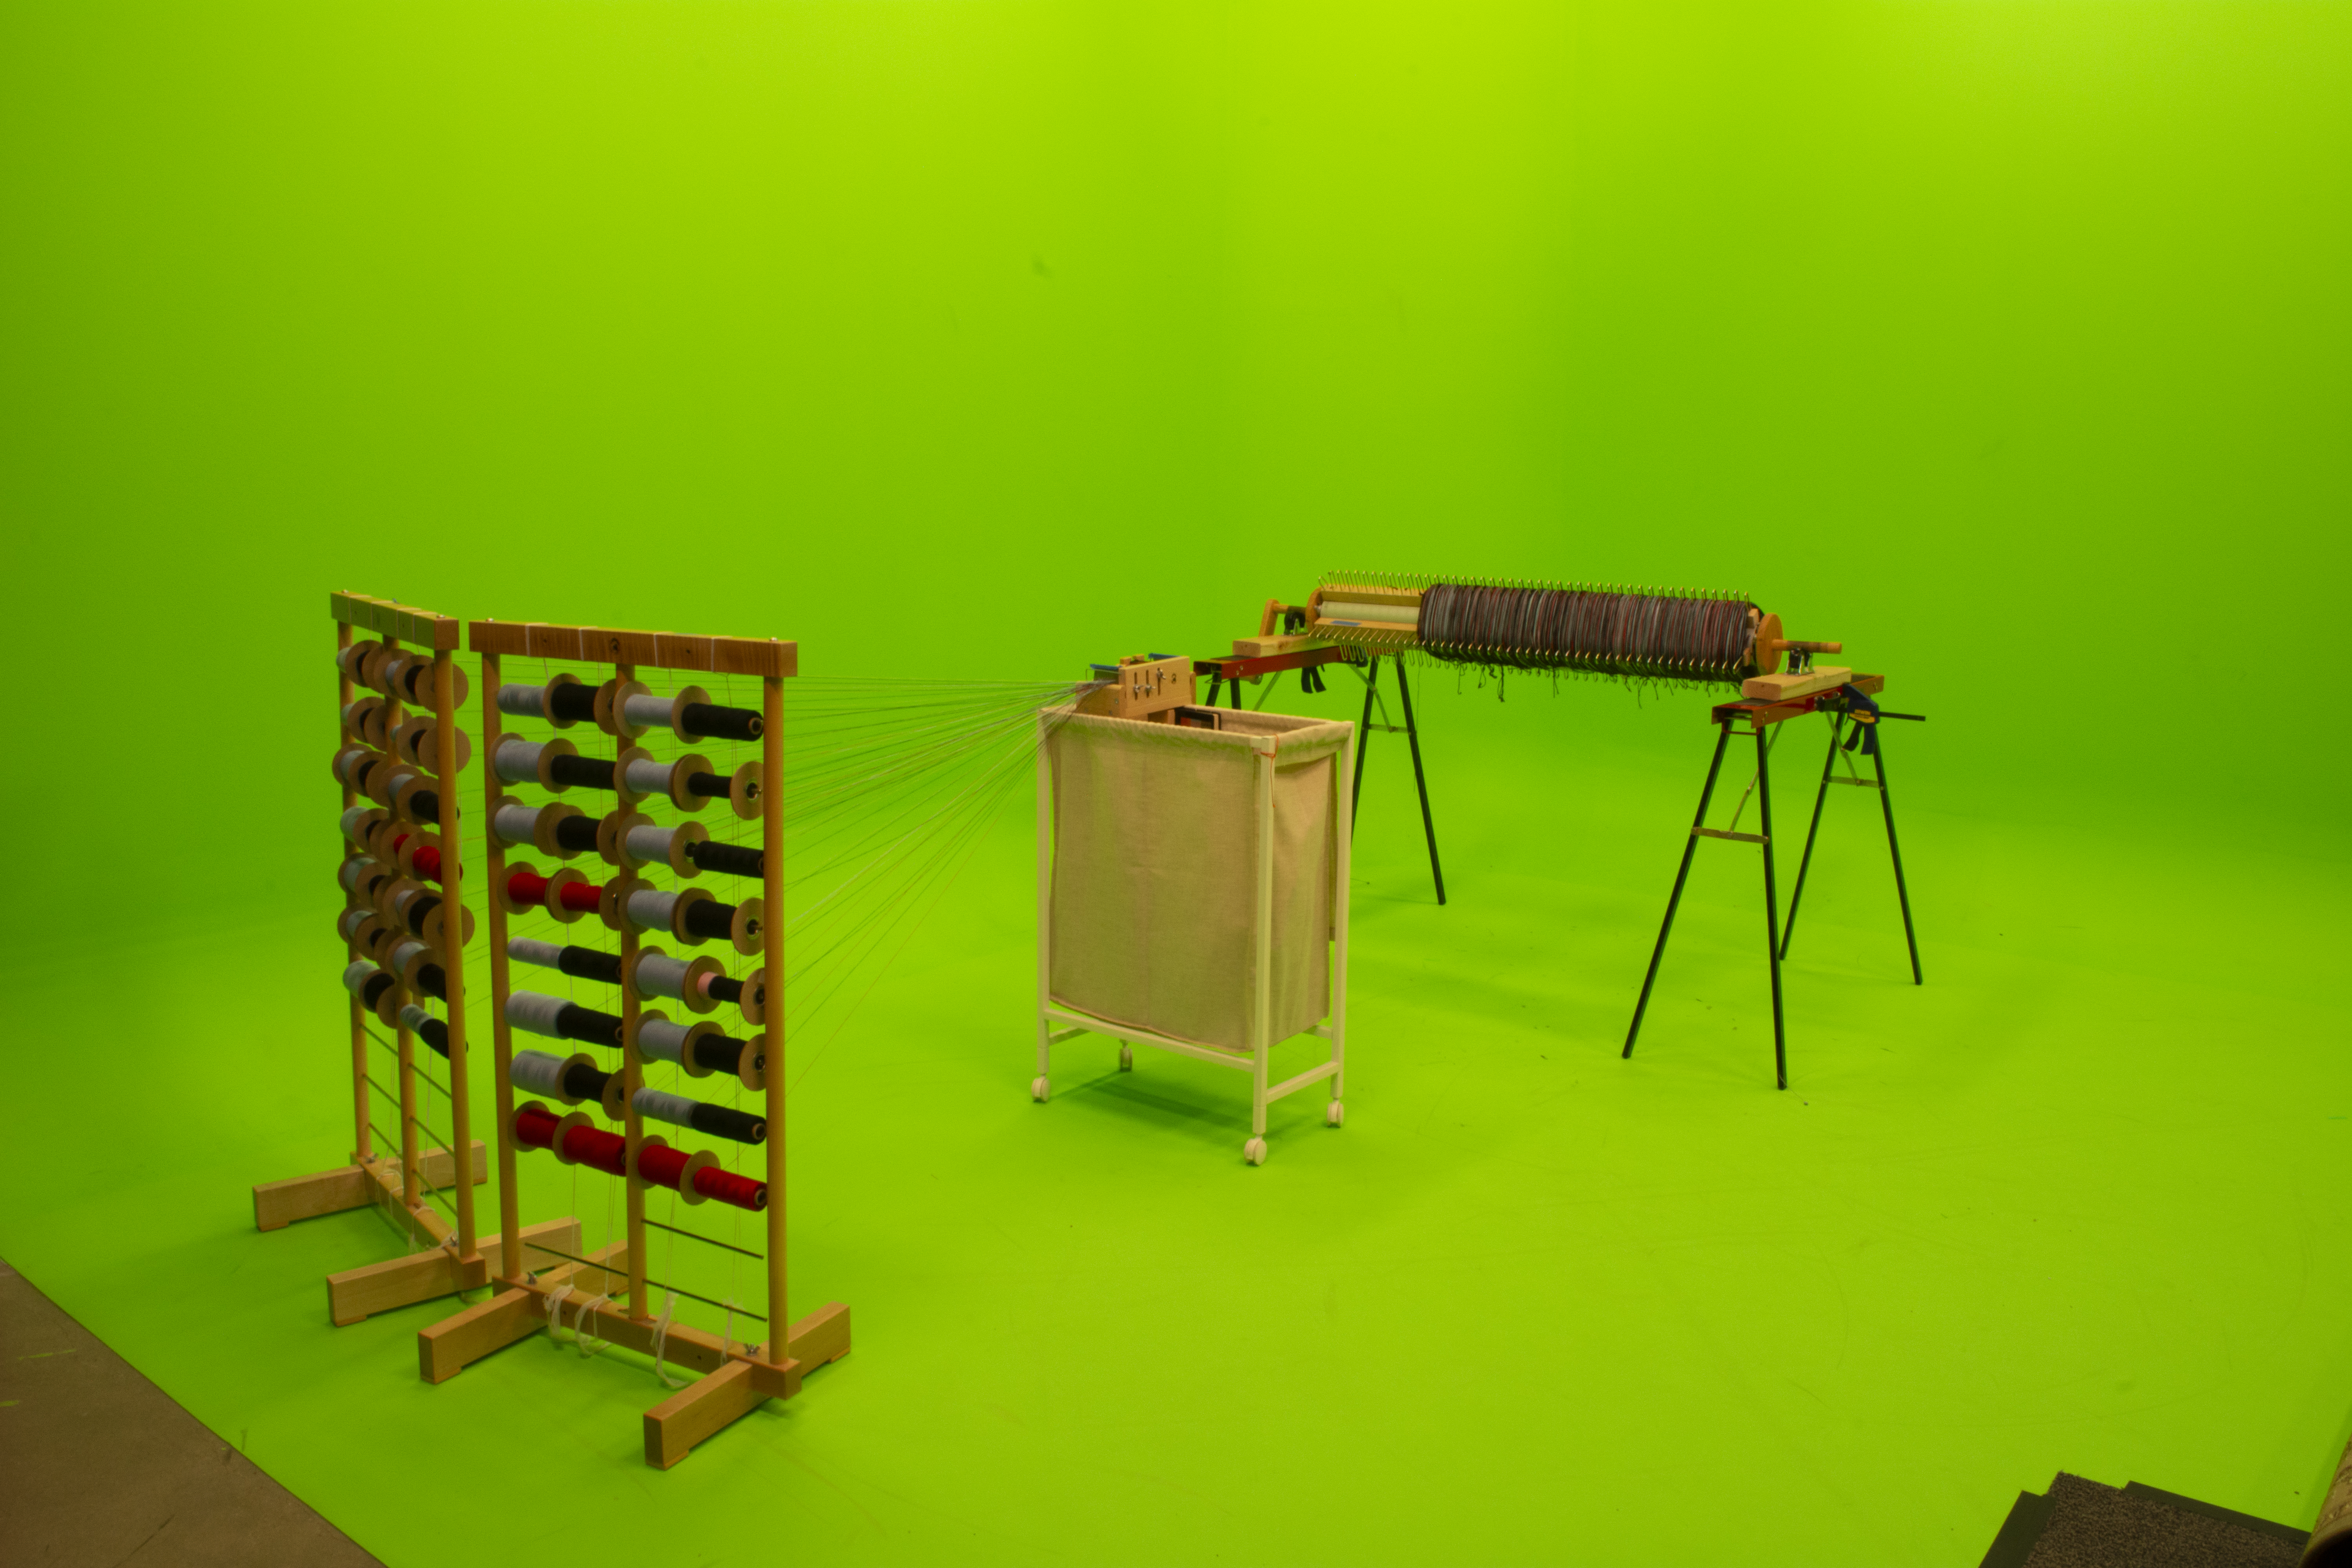
❊ Use the pegs and a threading hook in the box, forming at least one cross: the purpose of the tension box is to give even tension. There should not be resistance when pulling the threads through the box, though. If you are using two creels like us, with 60 bobbins total, position them so that the face inwards at about a 30-degree angle, with the threads travelling a straight, parallel path to the tension box.
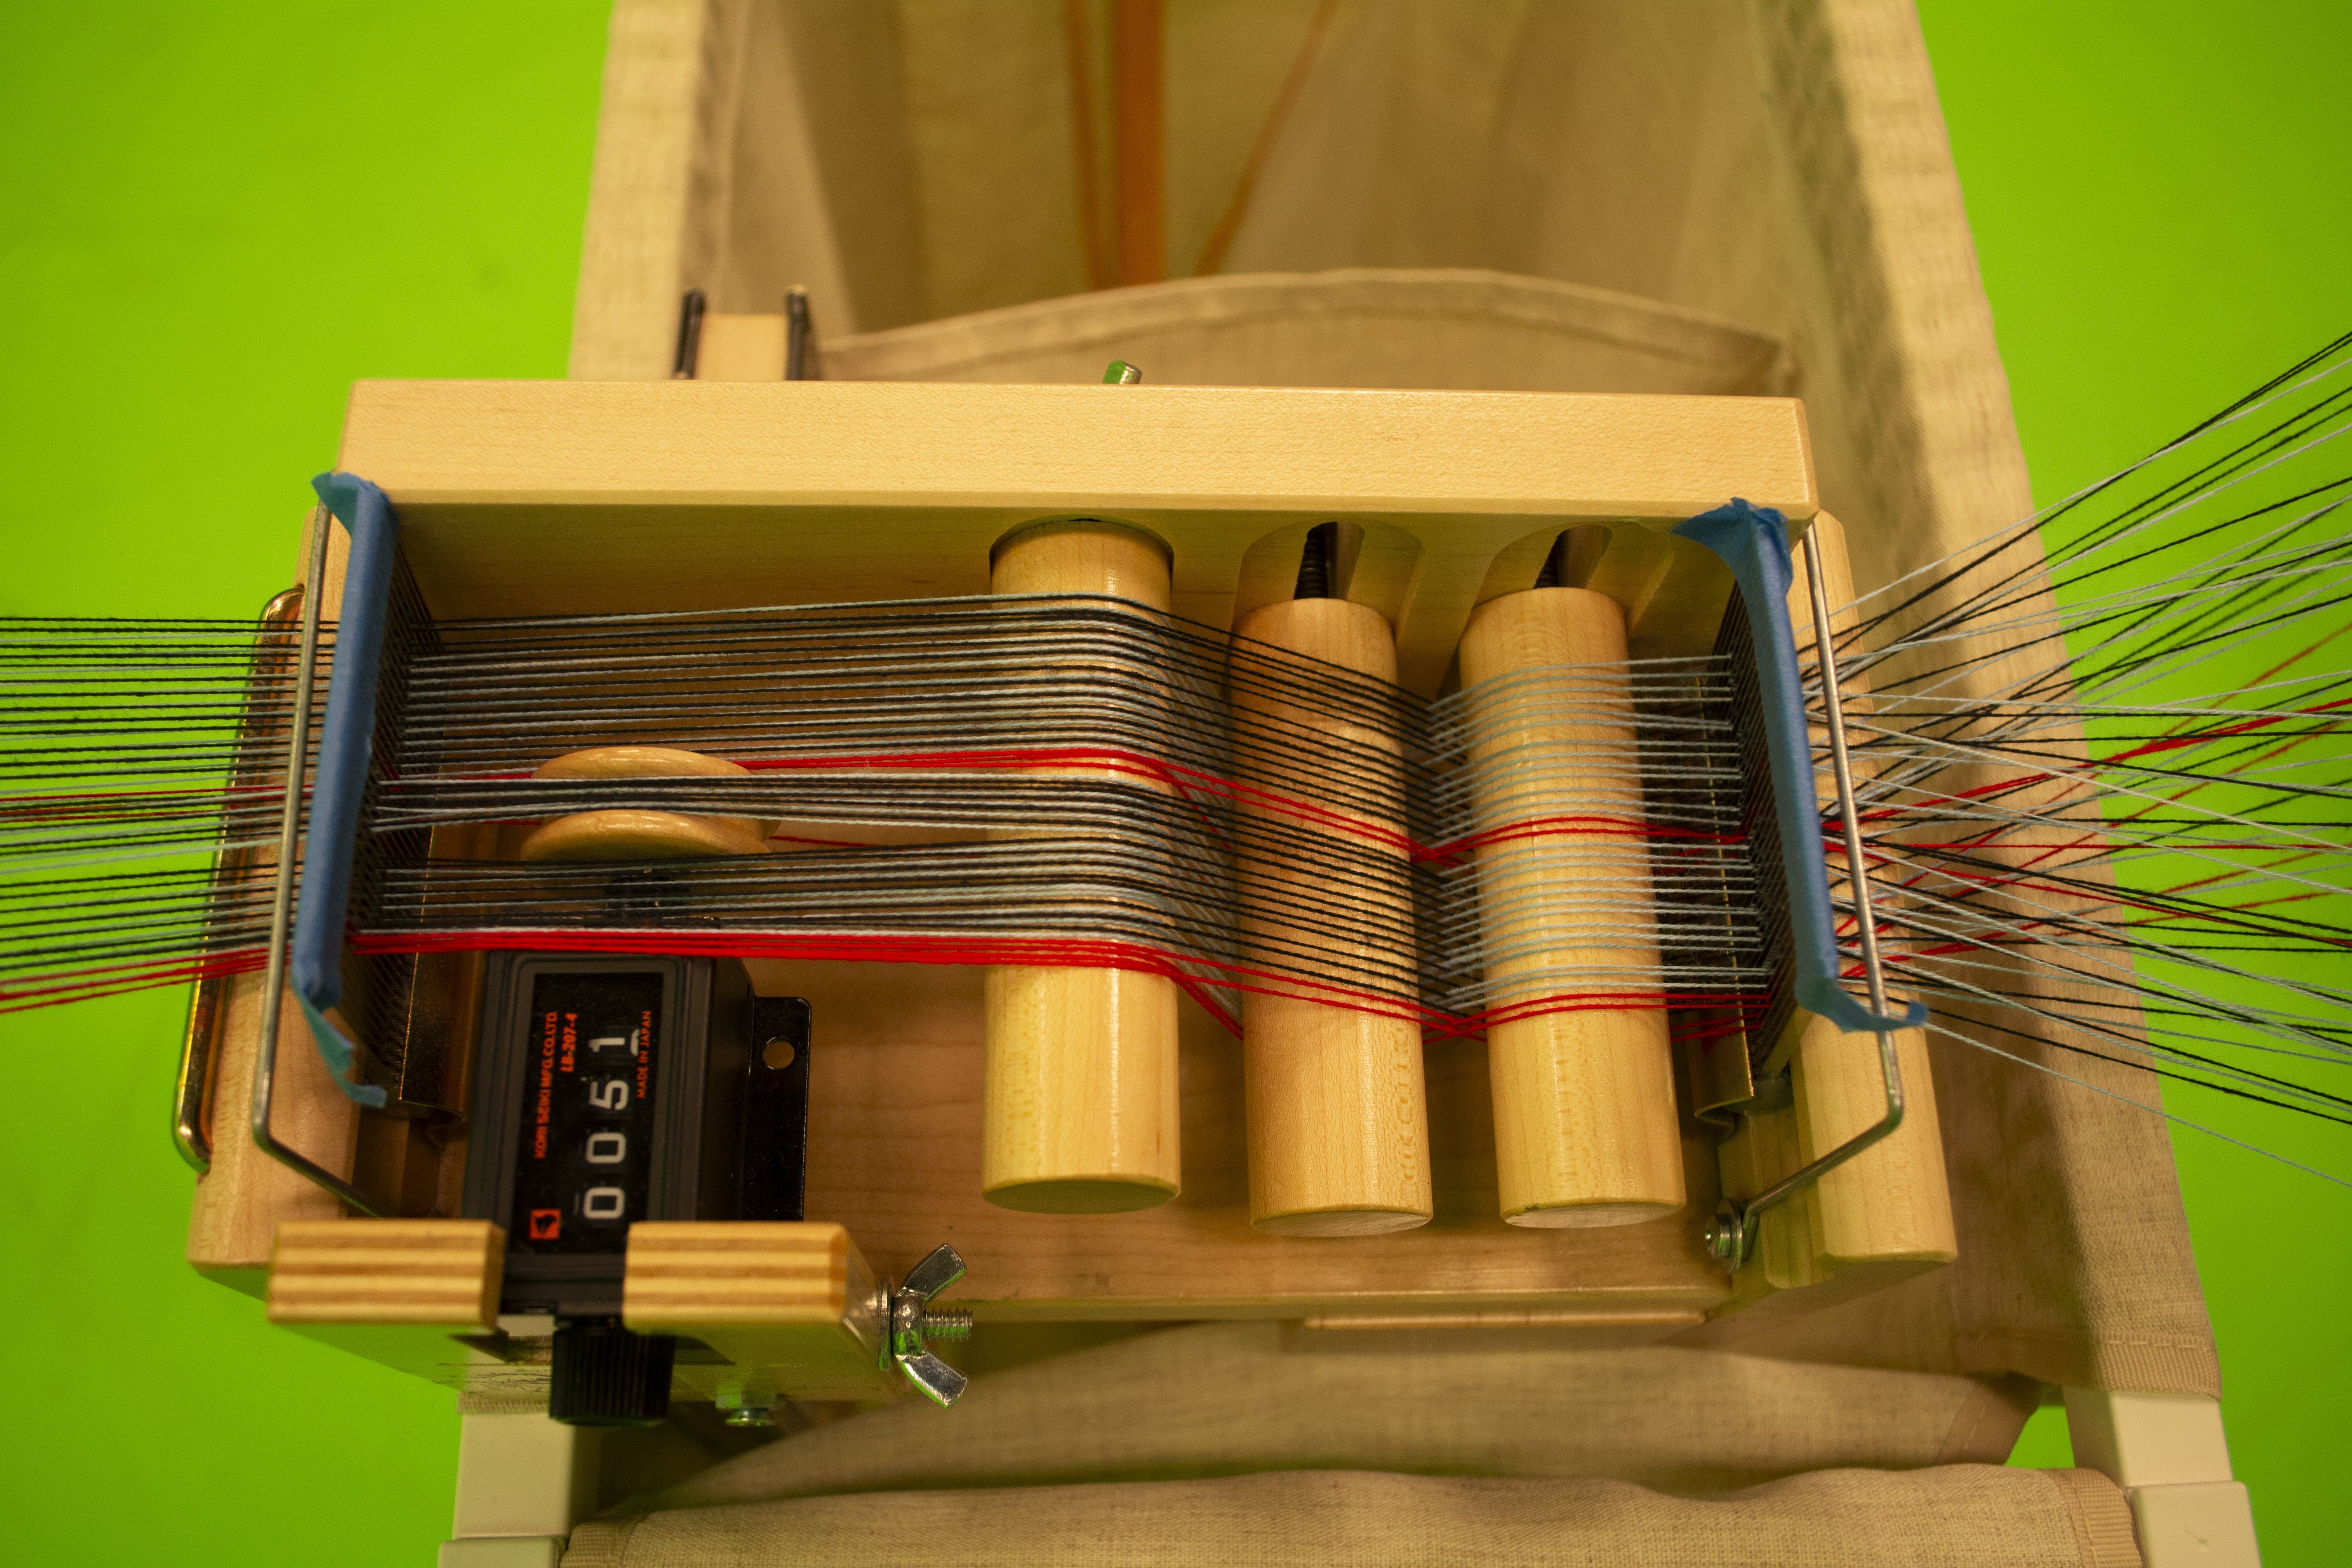
After the threads come through the tension box, they will need a rigid heddle or a paddle with a slot-and-hole scheme. After that, we found it helpful to use a second small dent reed which kept the precise width of an inch while we warped. It is essential that these tools are in this order:
Creel ☞ tension box ☞ paddle/reed with slots and holes ☞ second reed ☞ Beam
Creel ☞ tension box ☞ paddle/reed with slots and holes ☞ second reed ☞ Beam
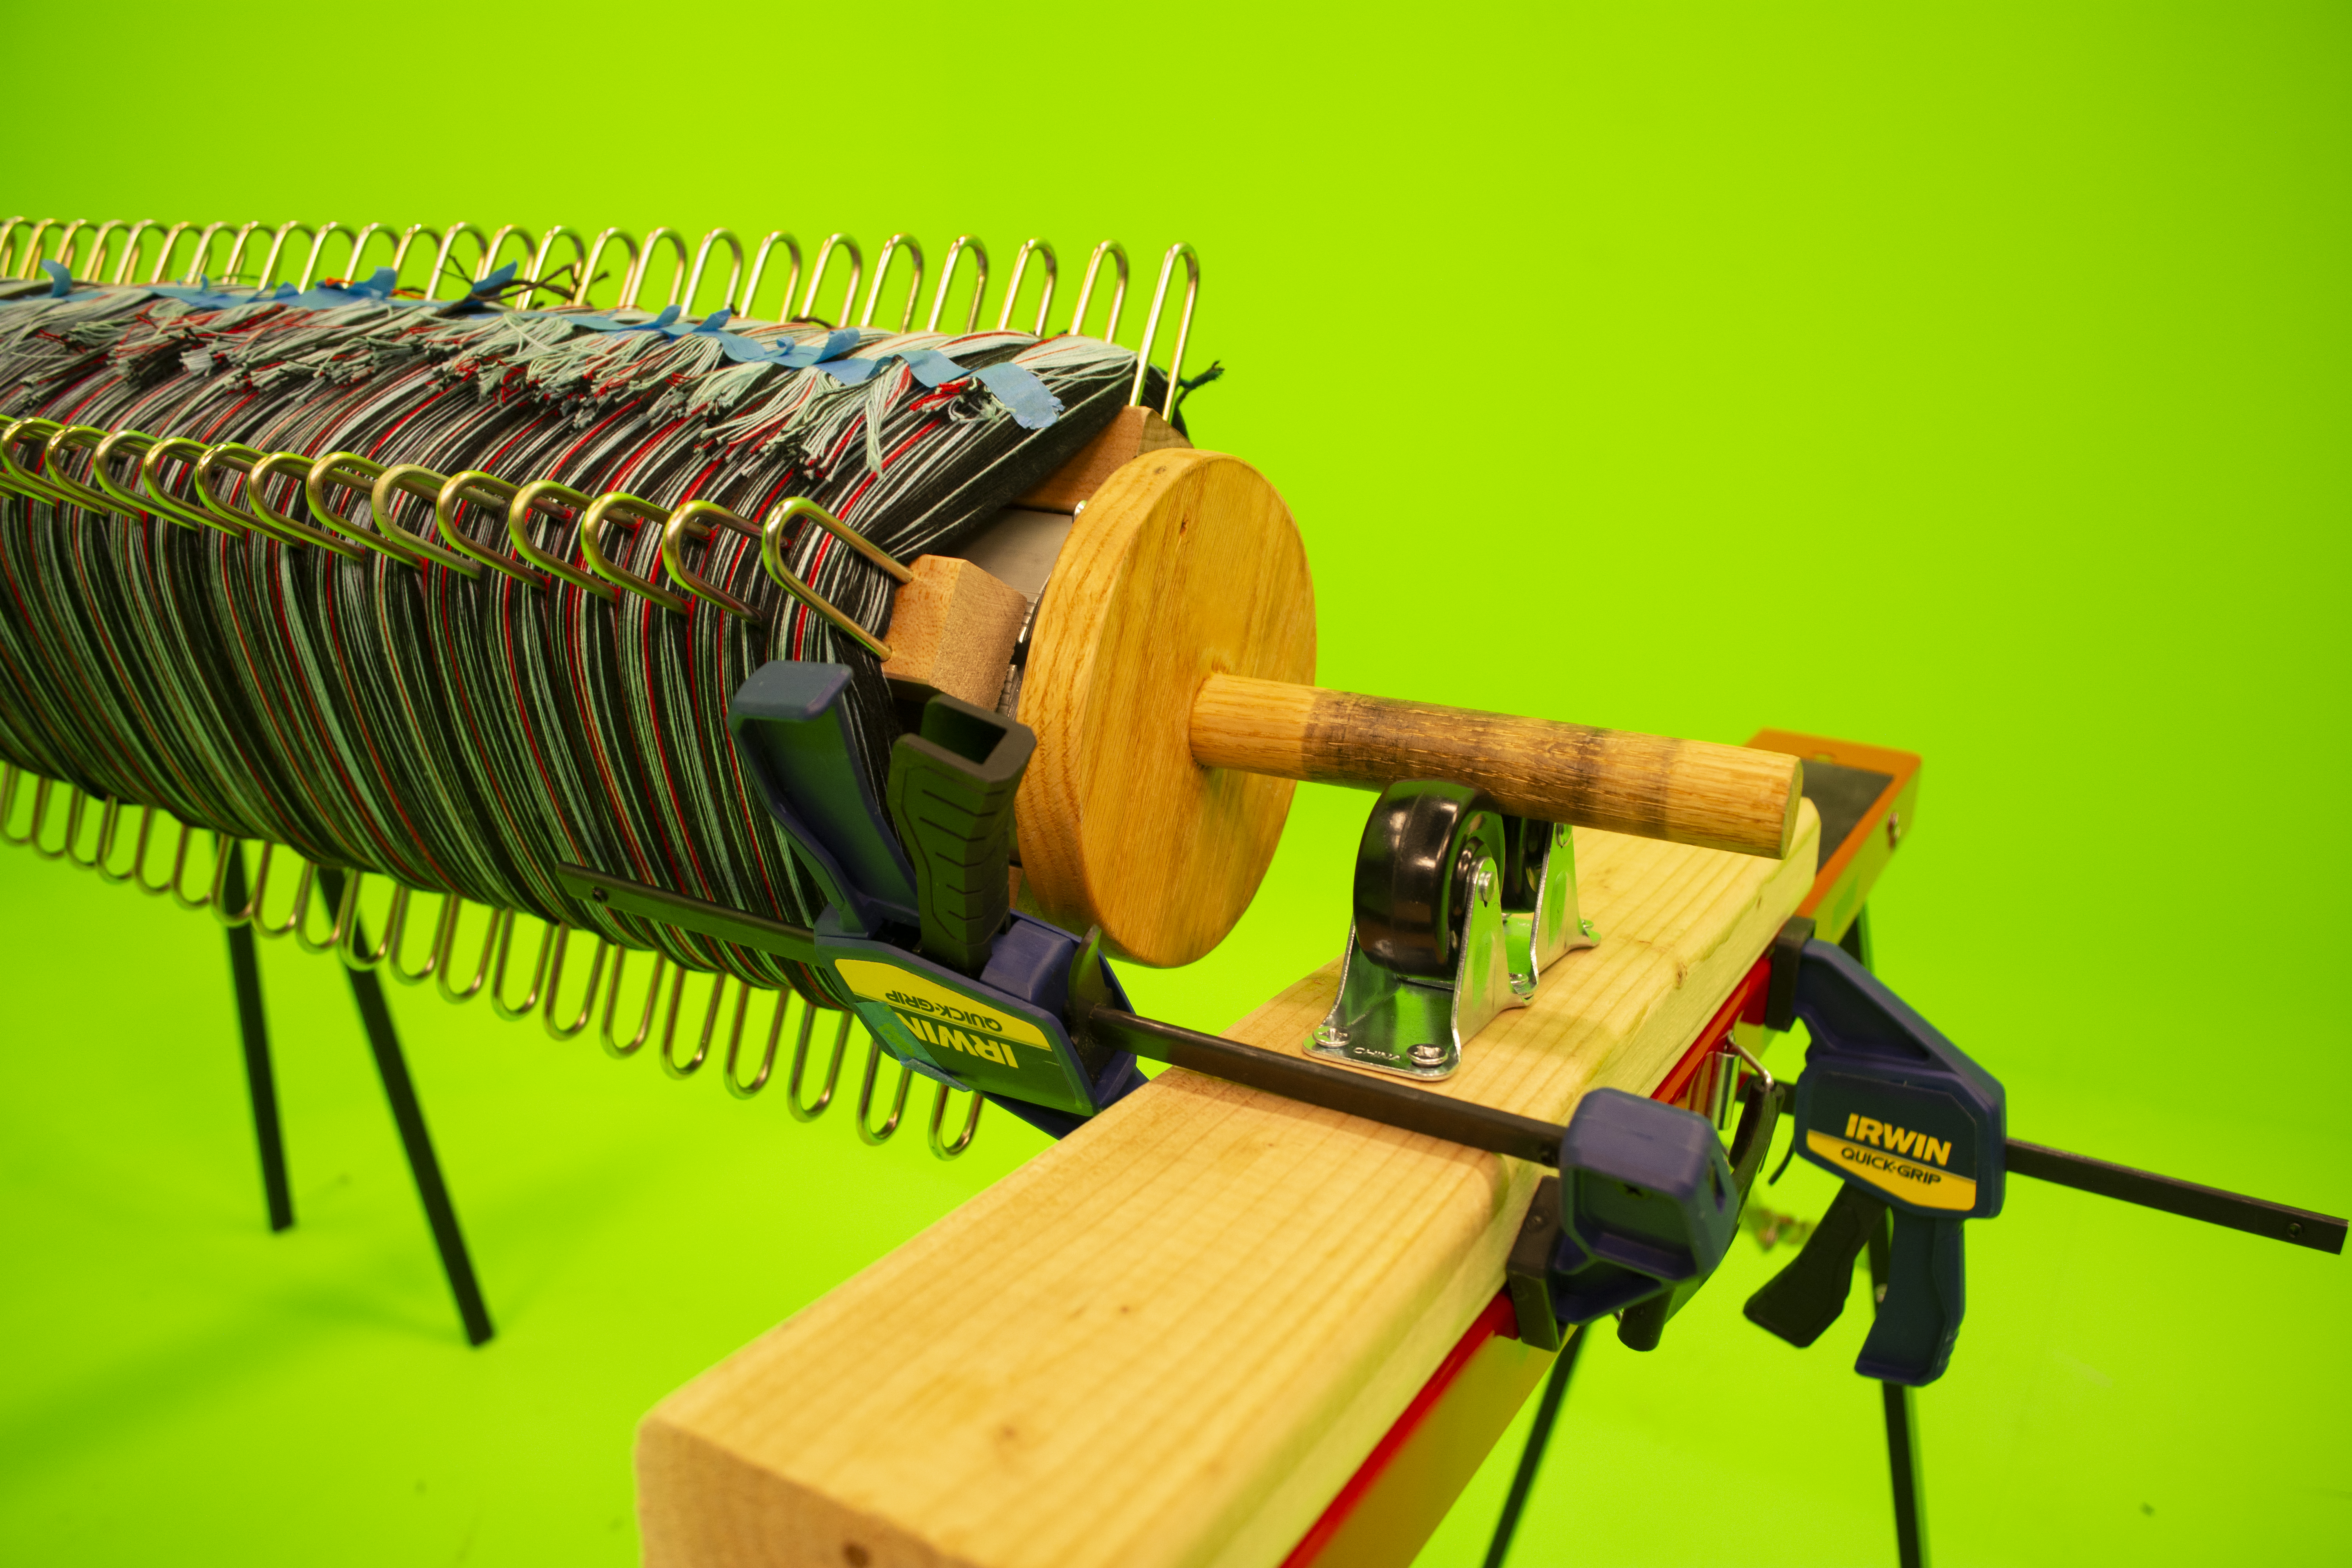
3. Set up your back beam
❊ it is helpful to have two or 3 clamps close at hand in case you need to stop the beam from moving, put something down, etc.
❊Make apron cords : cut a 3-yard length of yarn and use it to measure the rest of them: you should have one string for each inch of your width of warp. We have 44 inches to warp: I started on the right-most end of my beam but if you are left-handed maybe you want to start from the left. The long apron cords will make it possible to weave until the very end of your warp, drastically reducing the amount of waste yarn
❊ You should have the phalanges attachments installed on your beam. Use the slider attachments (not pictured here) on top of the phalanges on each to ensure that you don’t place threads outside of the inch segment. If you don’t have the slider attachments, you can still warp, but you should go slow and double check that your threads are being placed in the correct inch segment with each beam rotation.
❊ Fold the apron string in half and place it over the beam with the two ends facing away from you. Make a lark's head knot by slipping them through the looped side of the cord and pull taught. You should be able to lock the string into place: if you find that it won't hold when you're turning the beam, try flipping the string. It should catch on itself when the beam turns away from you.
❊ Make sure that the apron string is centered in the inch segment. The goal of this process is to have the warps laying flush and flat on top of each other in each inch. For this to happen, it is important to make sure that any knots you make (like the knot attaching the apron cords to the warps) are arranged so that they lay flat: if necessary, slide the apron cords so that the knots lay in the grooves of the back beam. There should be no bumps or anomalies.
❊ Once you have determined the placement of the first apron string, use painters’ tape on the beam to mark where the lark’s head knot is: each following apron string should be in the same place. If the apron strings are all the same length, the warp should begin and end in the same place on the beam. A few inches’ margin of error is okay! But the more variability of lengths, the more waste will be produced.
❊ After you’ve made the lark’s head knot, wind the apron cord onto the beam within the first inch segment. For the apron cord turns (and in turn the warps) to be all the same height, making a mound of string within the inch should be avoided: rather than rolling each turn of apron string on top of itself, each following turn’s worth of apron cord should lay next to the preceding turn: like the threading of a screw.
❊ Once you finish rolling the 1.5-yard apron cord onto the beam (remember? it’s folded in half now), tie the two ends of the cord together using an overhand knot.
❊ Take the ends of the warps, which have been guided through the tensioning arrangement, and tie an overhand knot to secure them all together.
❊ Now slip the warp knot through the 2 tied-together apron cord threads: split the warp segment and create another lark’s head knot attaching the warps to the apron cord by looping the warps around the black knot after going through the apron strings.
❊ Give the apron cord and the warps a tug to test and make sure they don’t come out under tension. Don’t overthink this: just make sure that they’re securely attached, and each segment is the same as the last. Once the warps are attached, begin turning the beam! Just like the knot that attached the apron cord to the beam, ensure that the knot attaching the apron cord to the warps lays in the groove of the beam so that a bump isn’t formed on the beam: abnormalities will cause tension issues while weaving.
❊ Give the apron cord and the warps a tug to test and make sure they don’t come out under tension. Don’t overthink this: just make sure that they’re securely attached, and each segment is the same as the last. Once the warps are attached, begin turning the beam! Just like the knot that attached the apron cord to the beam, ensure that the knot attaching the apron cord to the warps lays in the groove of the beam so that a bump isn’t formed on the beam: abnormalities will cause tension issues while weaving.
4. Begin Beaming
❊At this point: double check the tension box yard counter to ensure it is reset to 0 (or its starting point). Slowly wind onto the beam, being very careful not to lose an errant thread: every single thread must be in its rightful inch segment. If you miss one or accidentally twist your warp inch segment: unwind and redo the turn.
❊ We need: consistent tension that isn’t too taut. If you lose tension or mess up or a thread breaks and you realize too late, feel confident and okay with reversing.
❊ Using the dent reed comb at all times will ensure that you don’t accidentally twist the warps. Any twist that is not caught will be a permanent fixture while weaving: if you’ve woven on a TC2 with twisted warps, you know it’s very annoying. Continue to push the rigid heddle or paddle back as it approaches the beam.
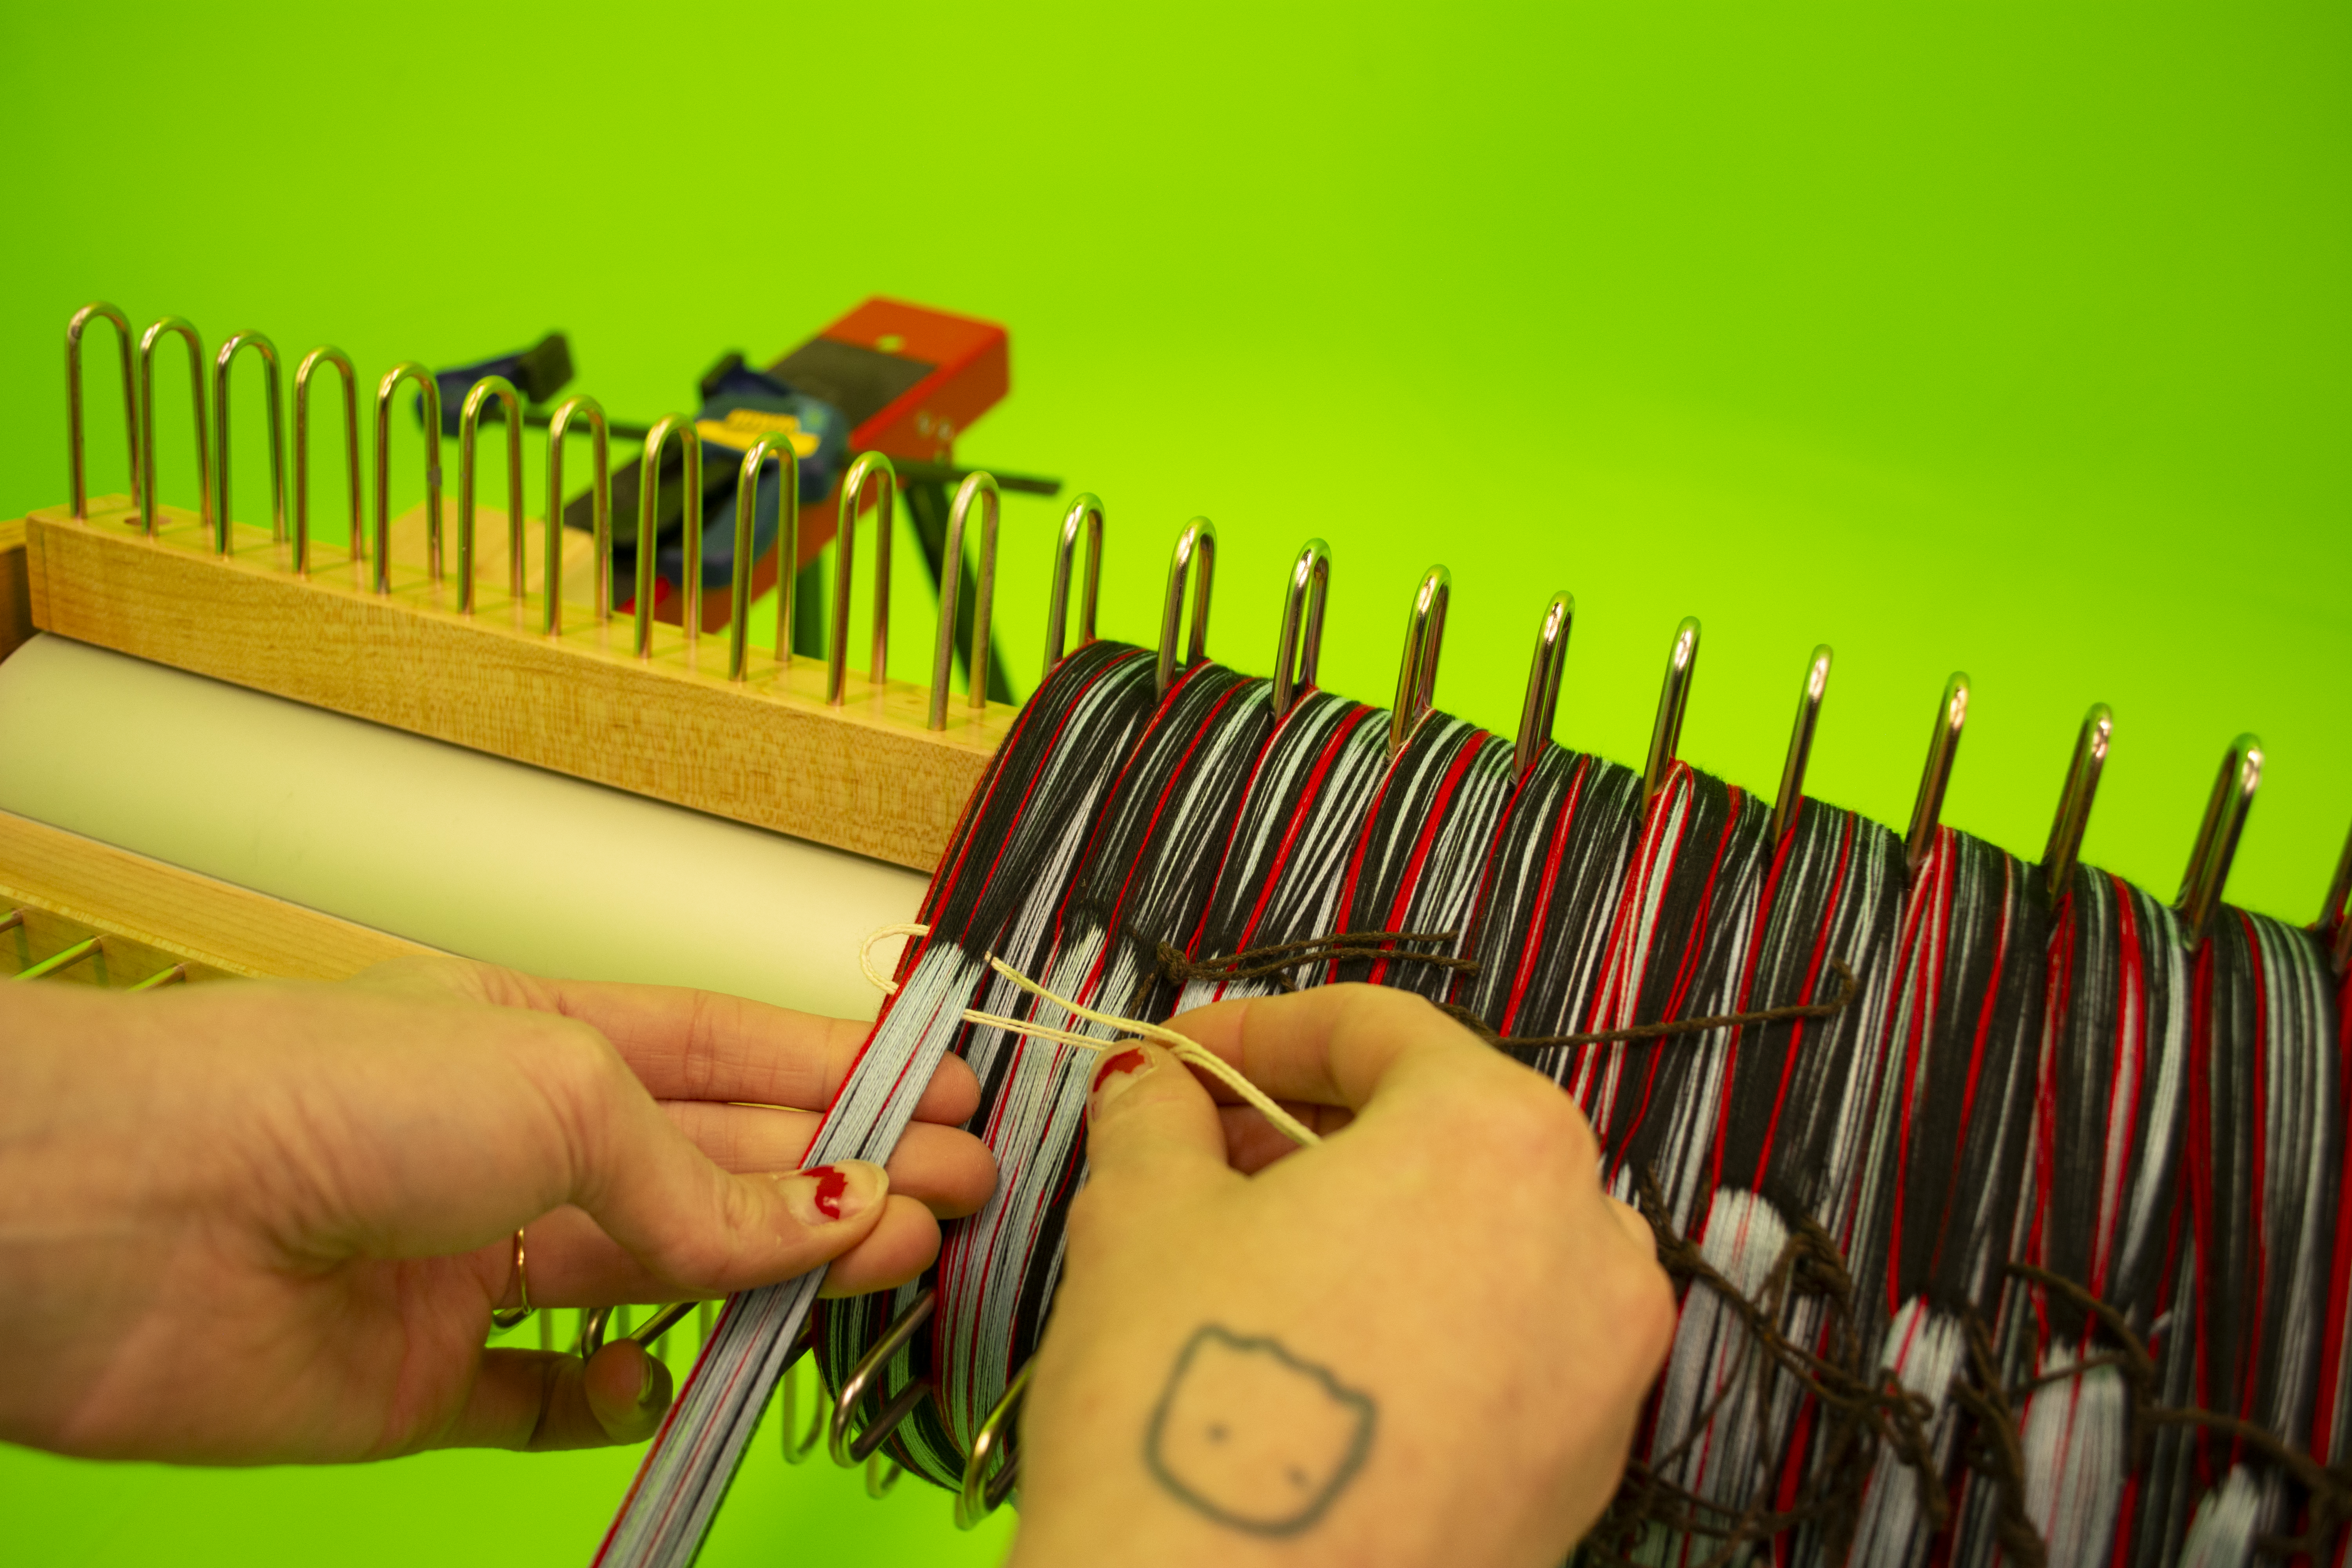
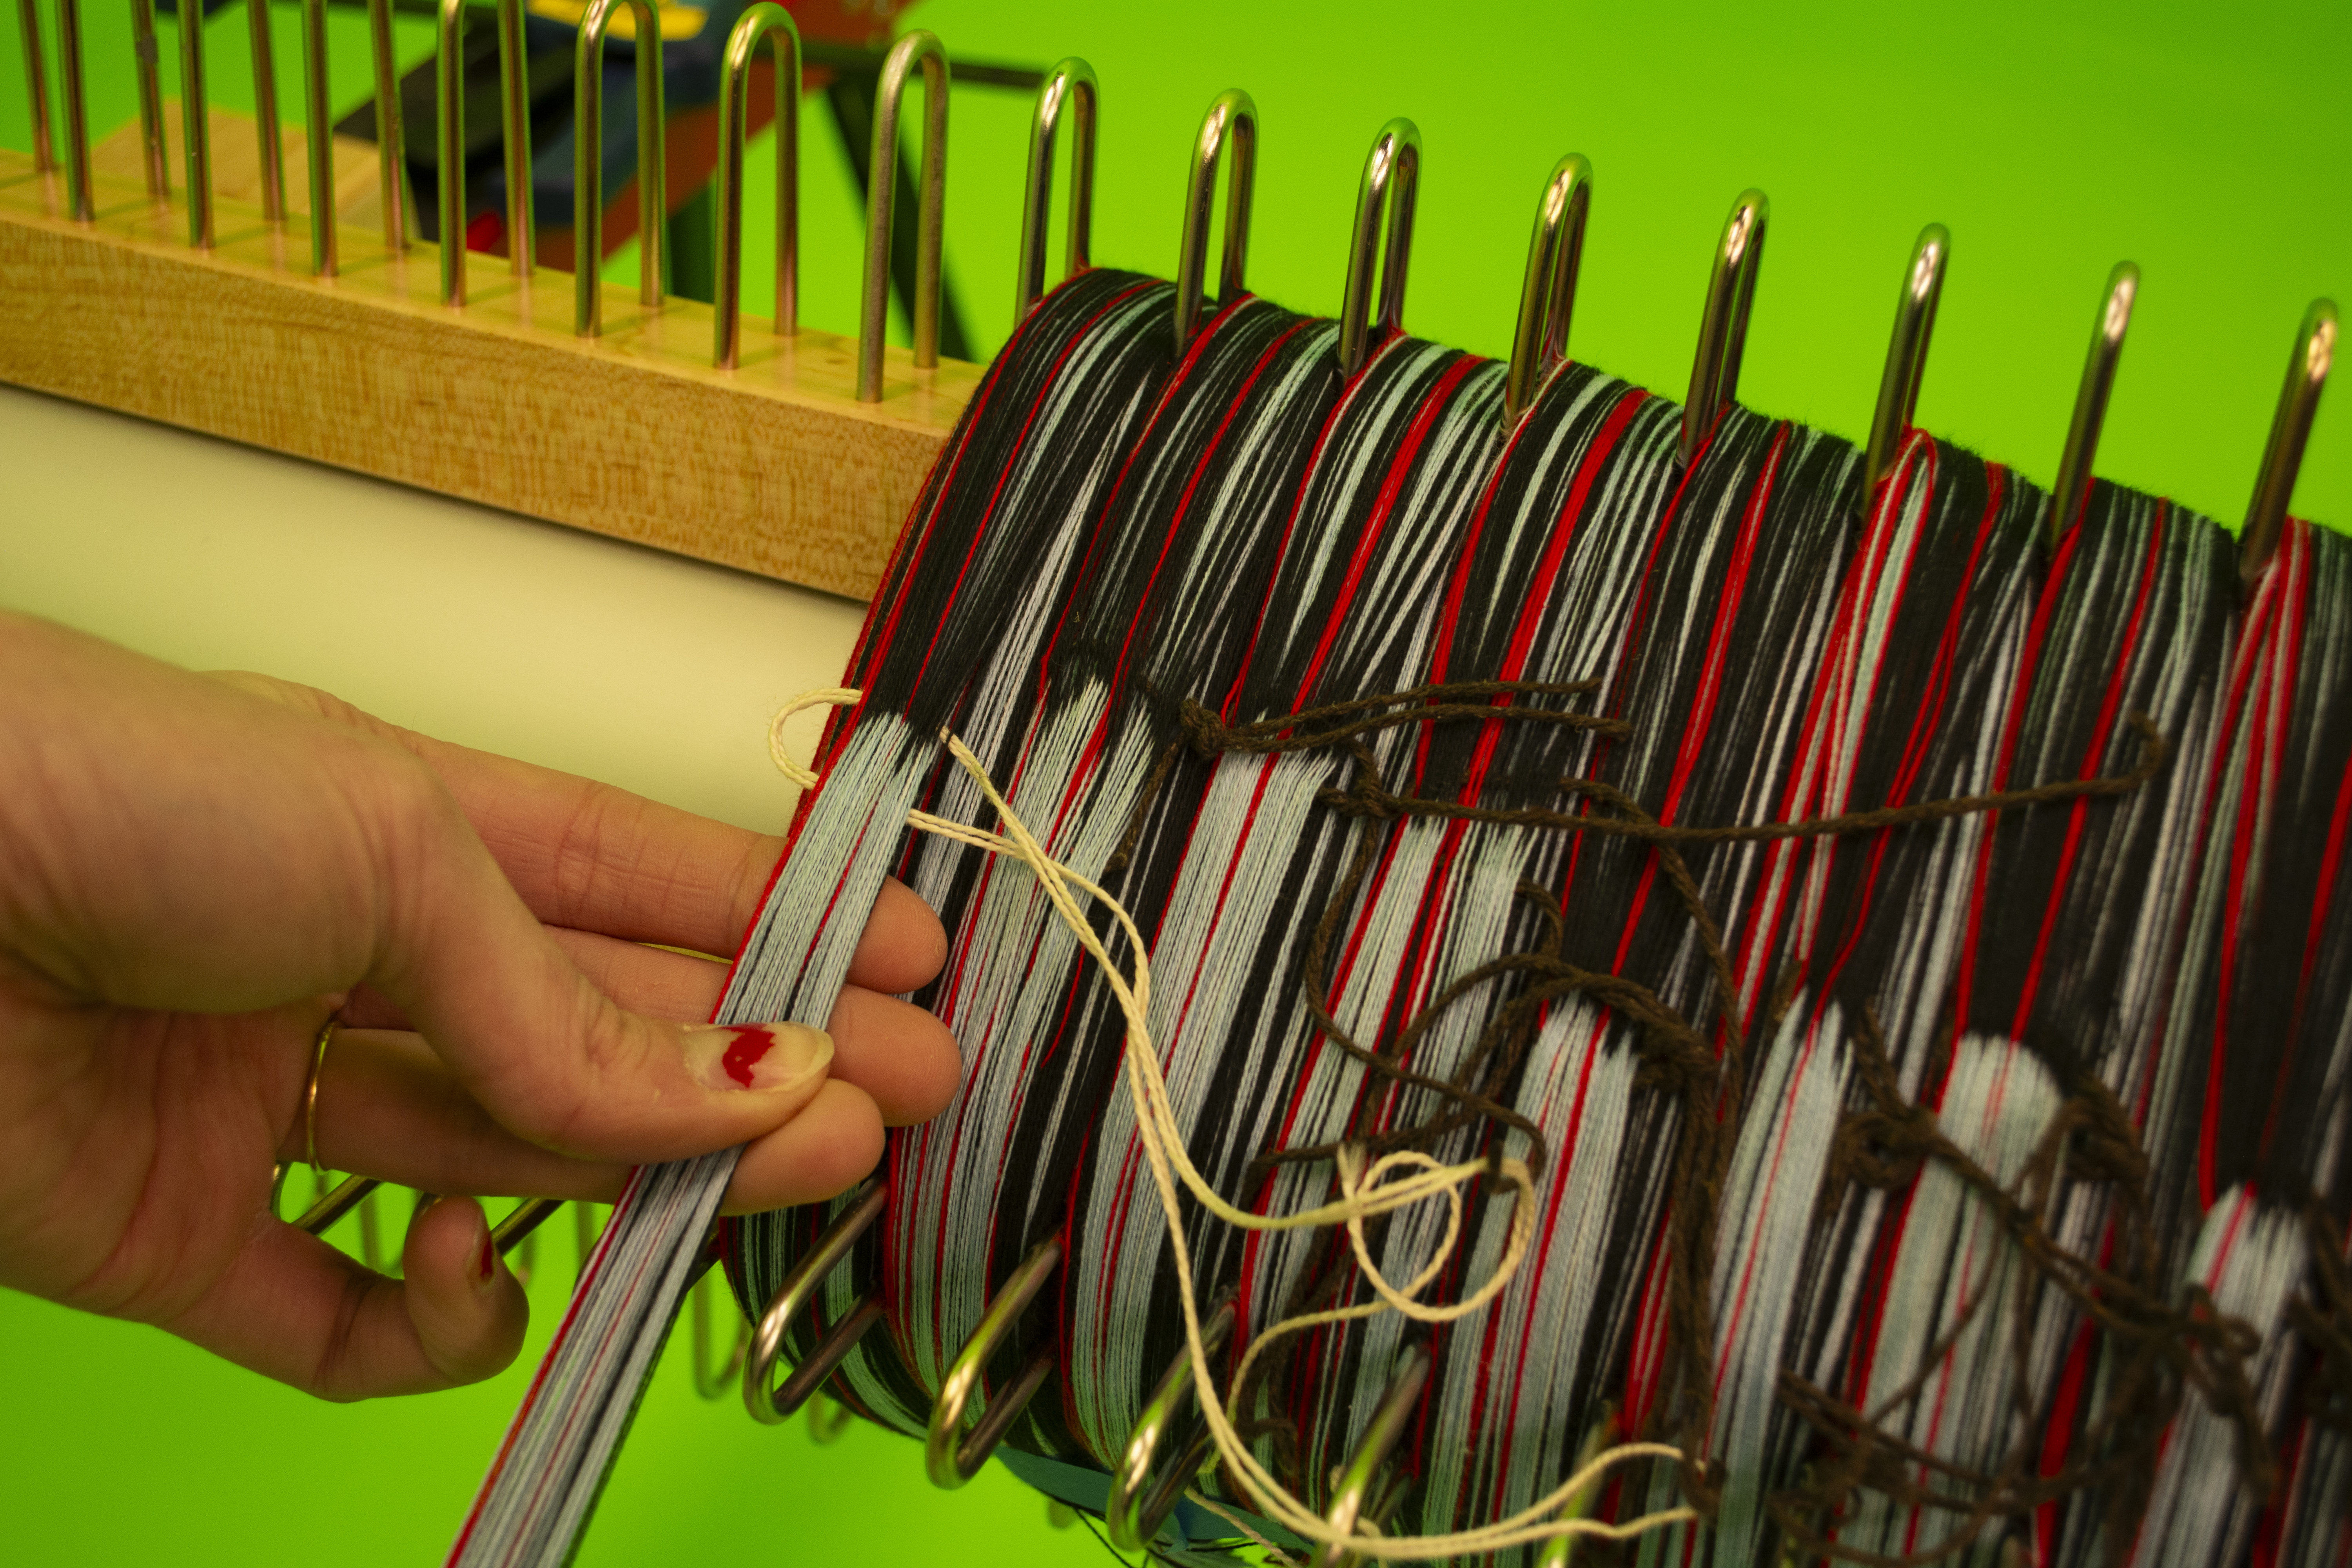
❊ Wind until you reach the desired length of your warp: At UDL we used a Japanese thread counter using meters, and wound on about 20.7 meters of warp (or about 22.6 yards)
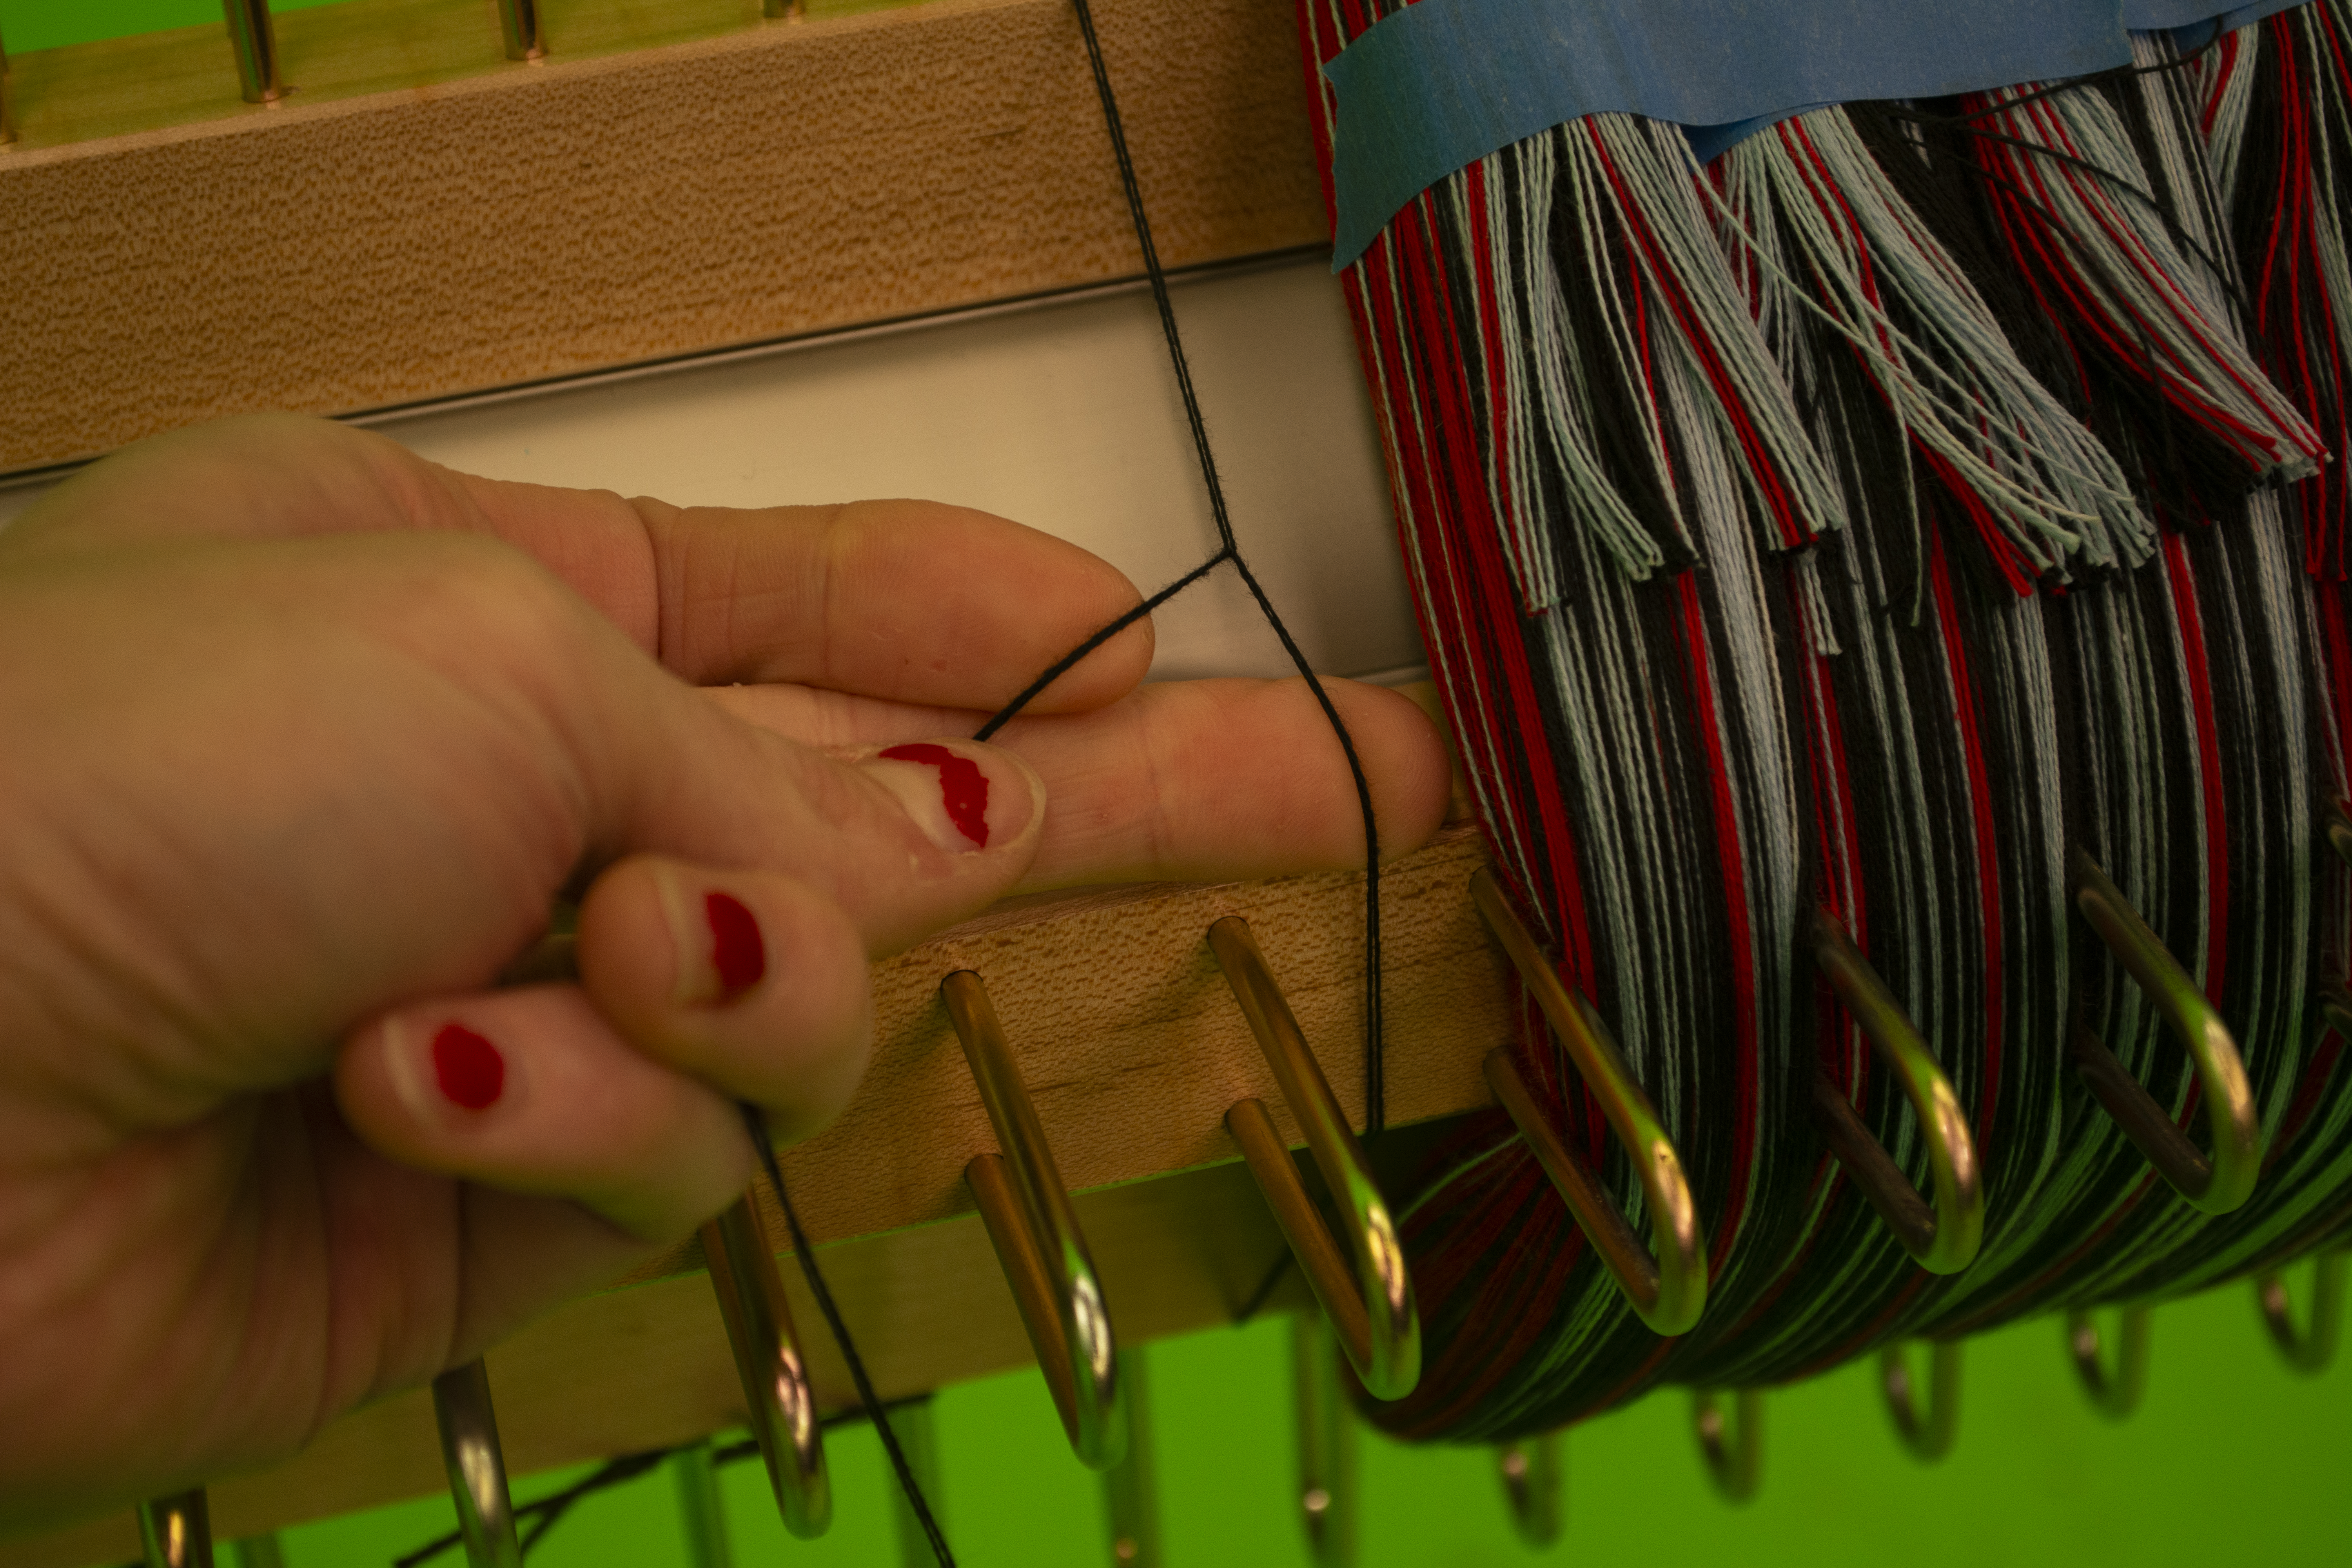
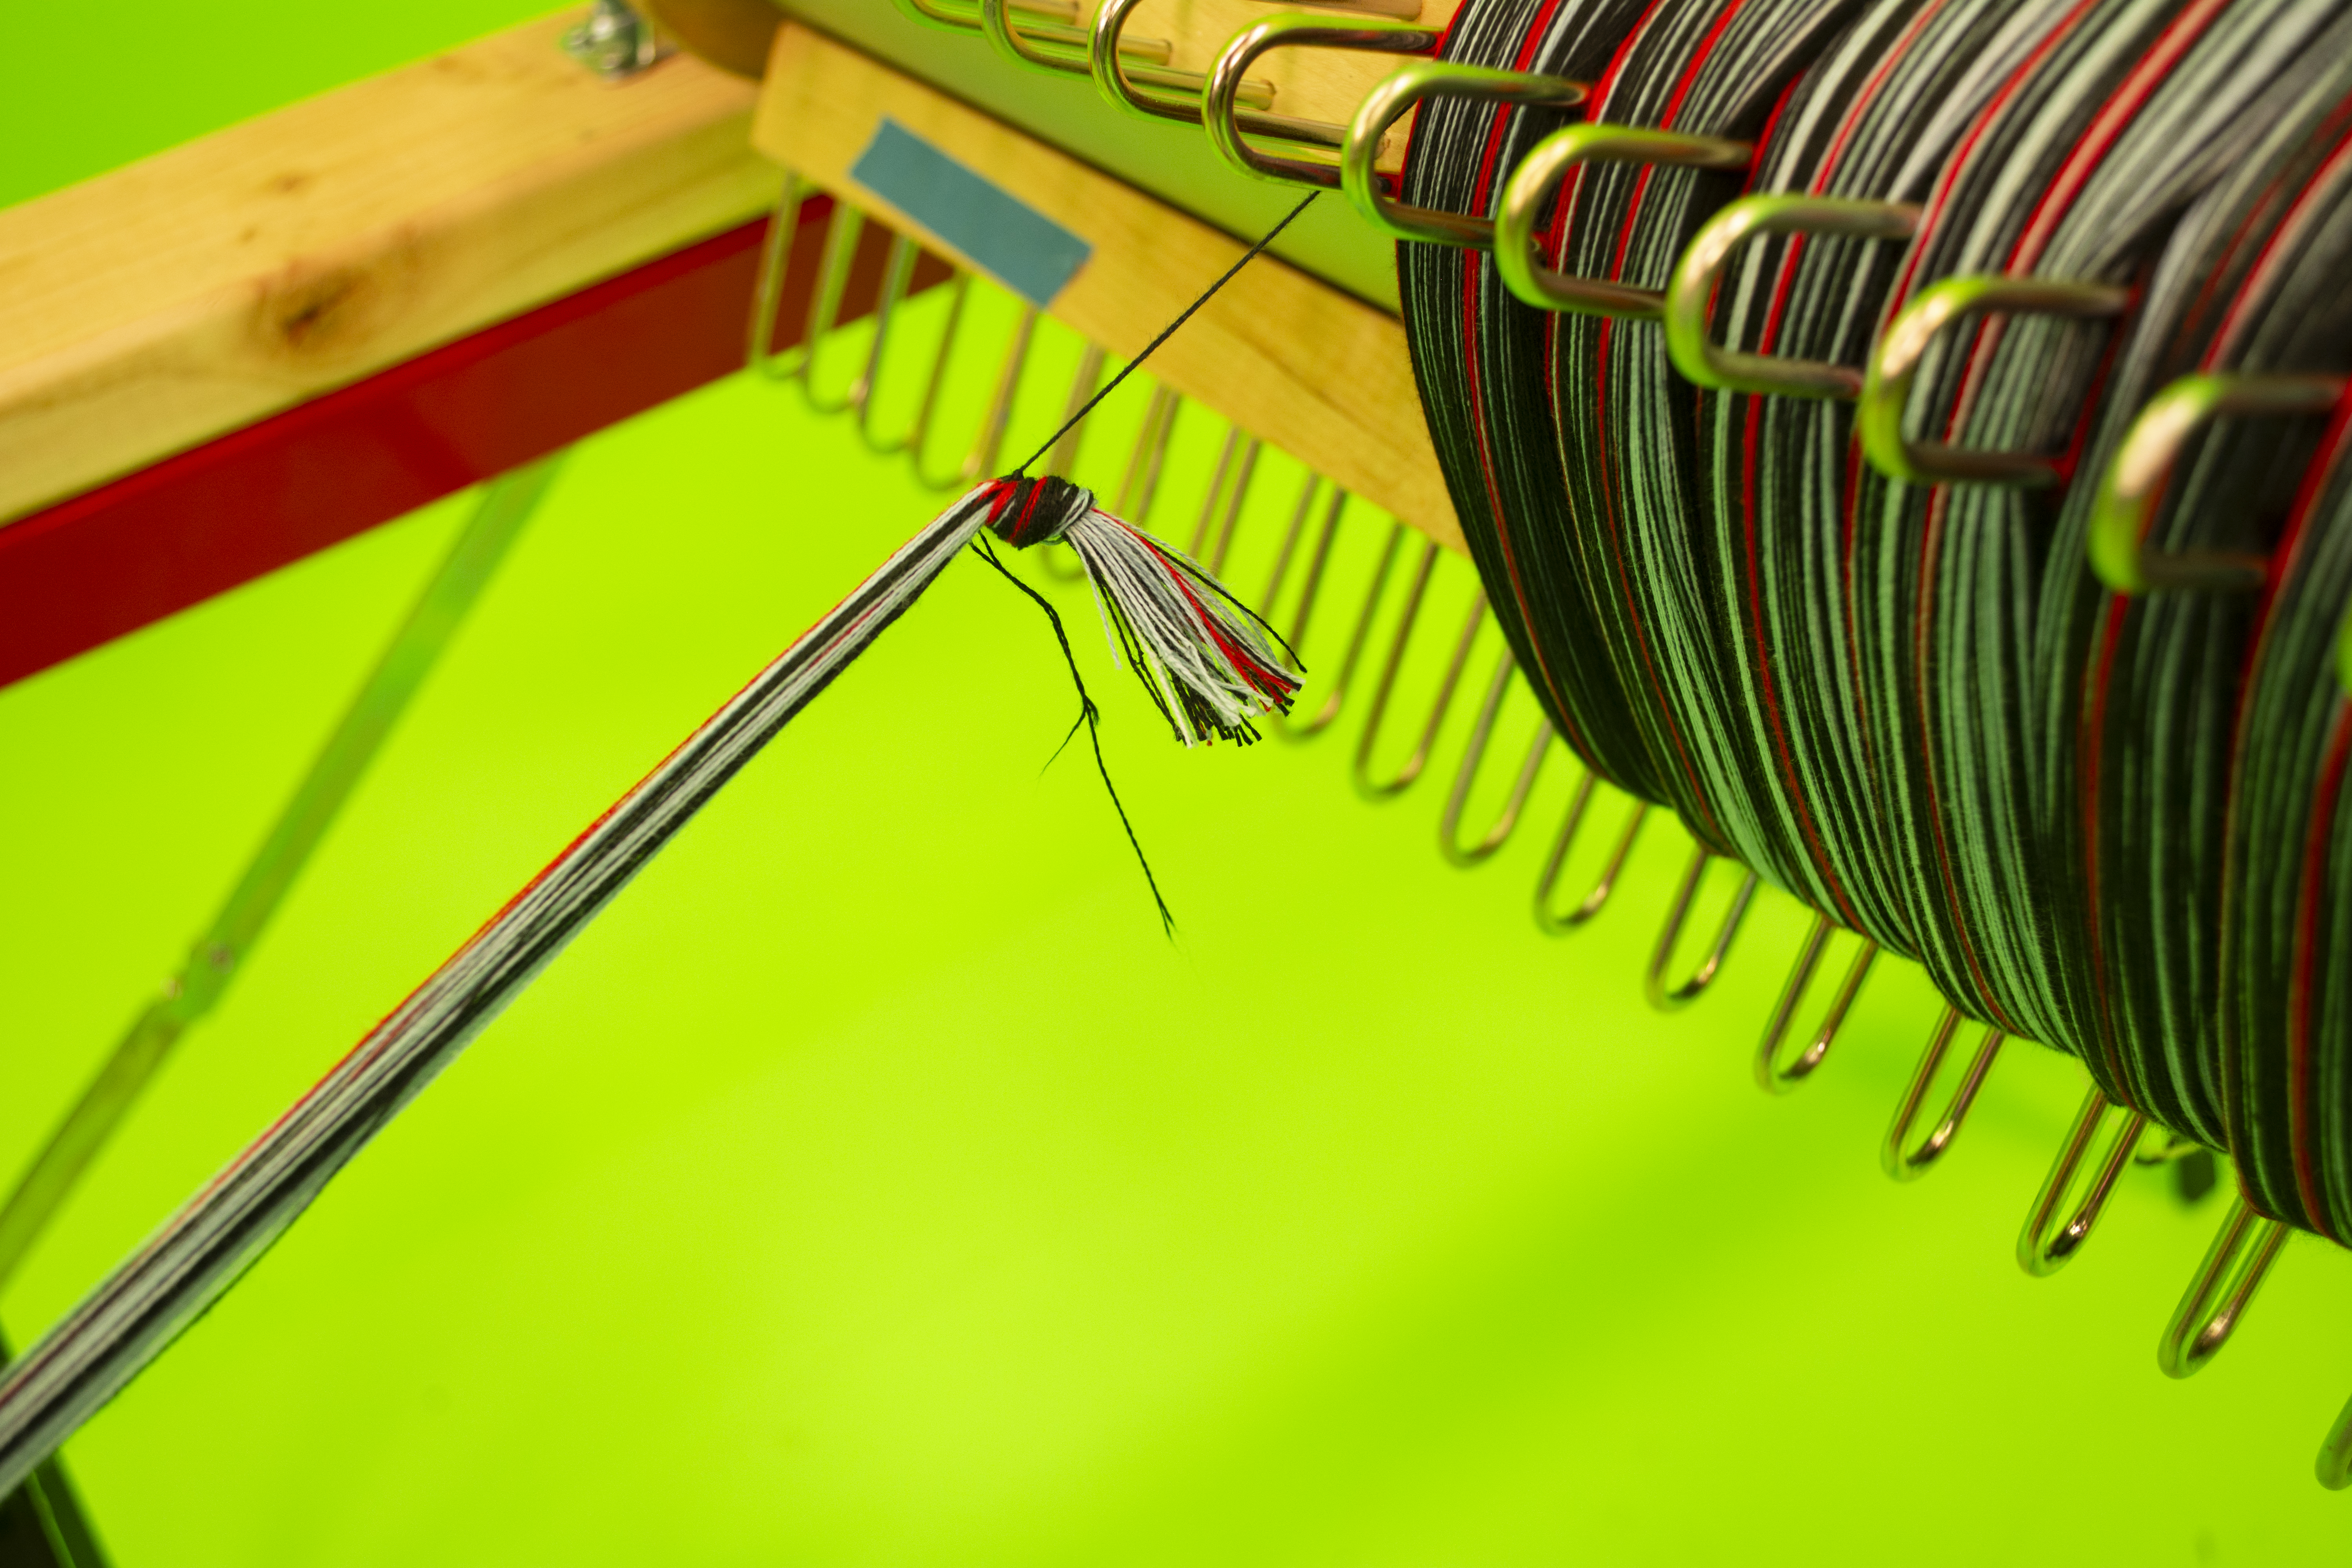
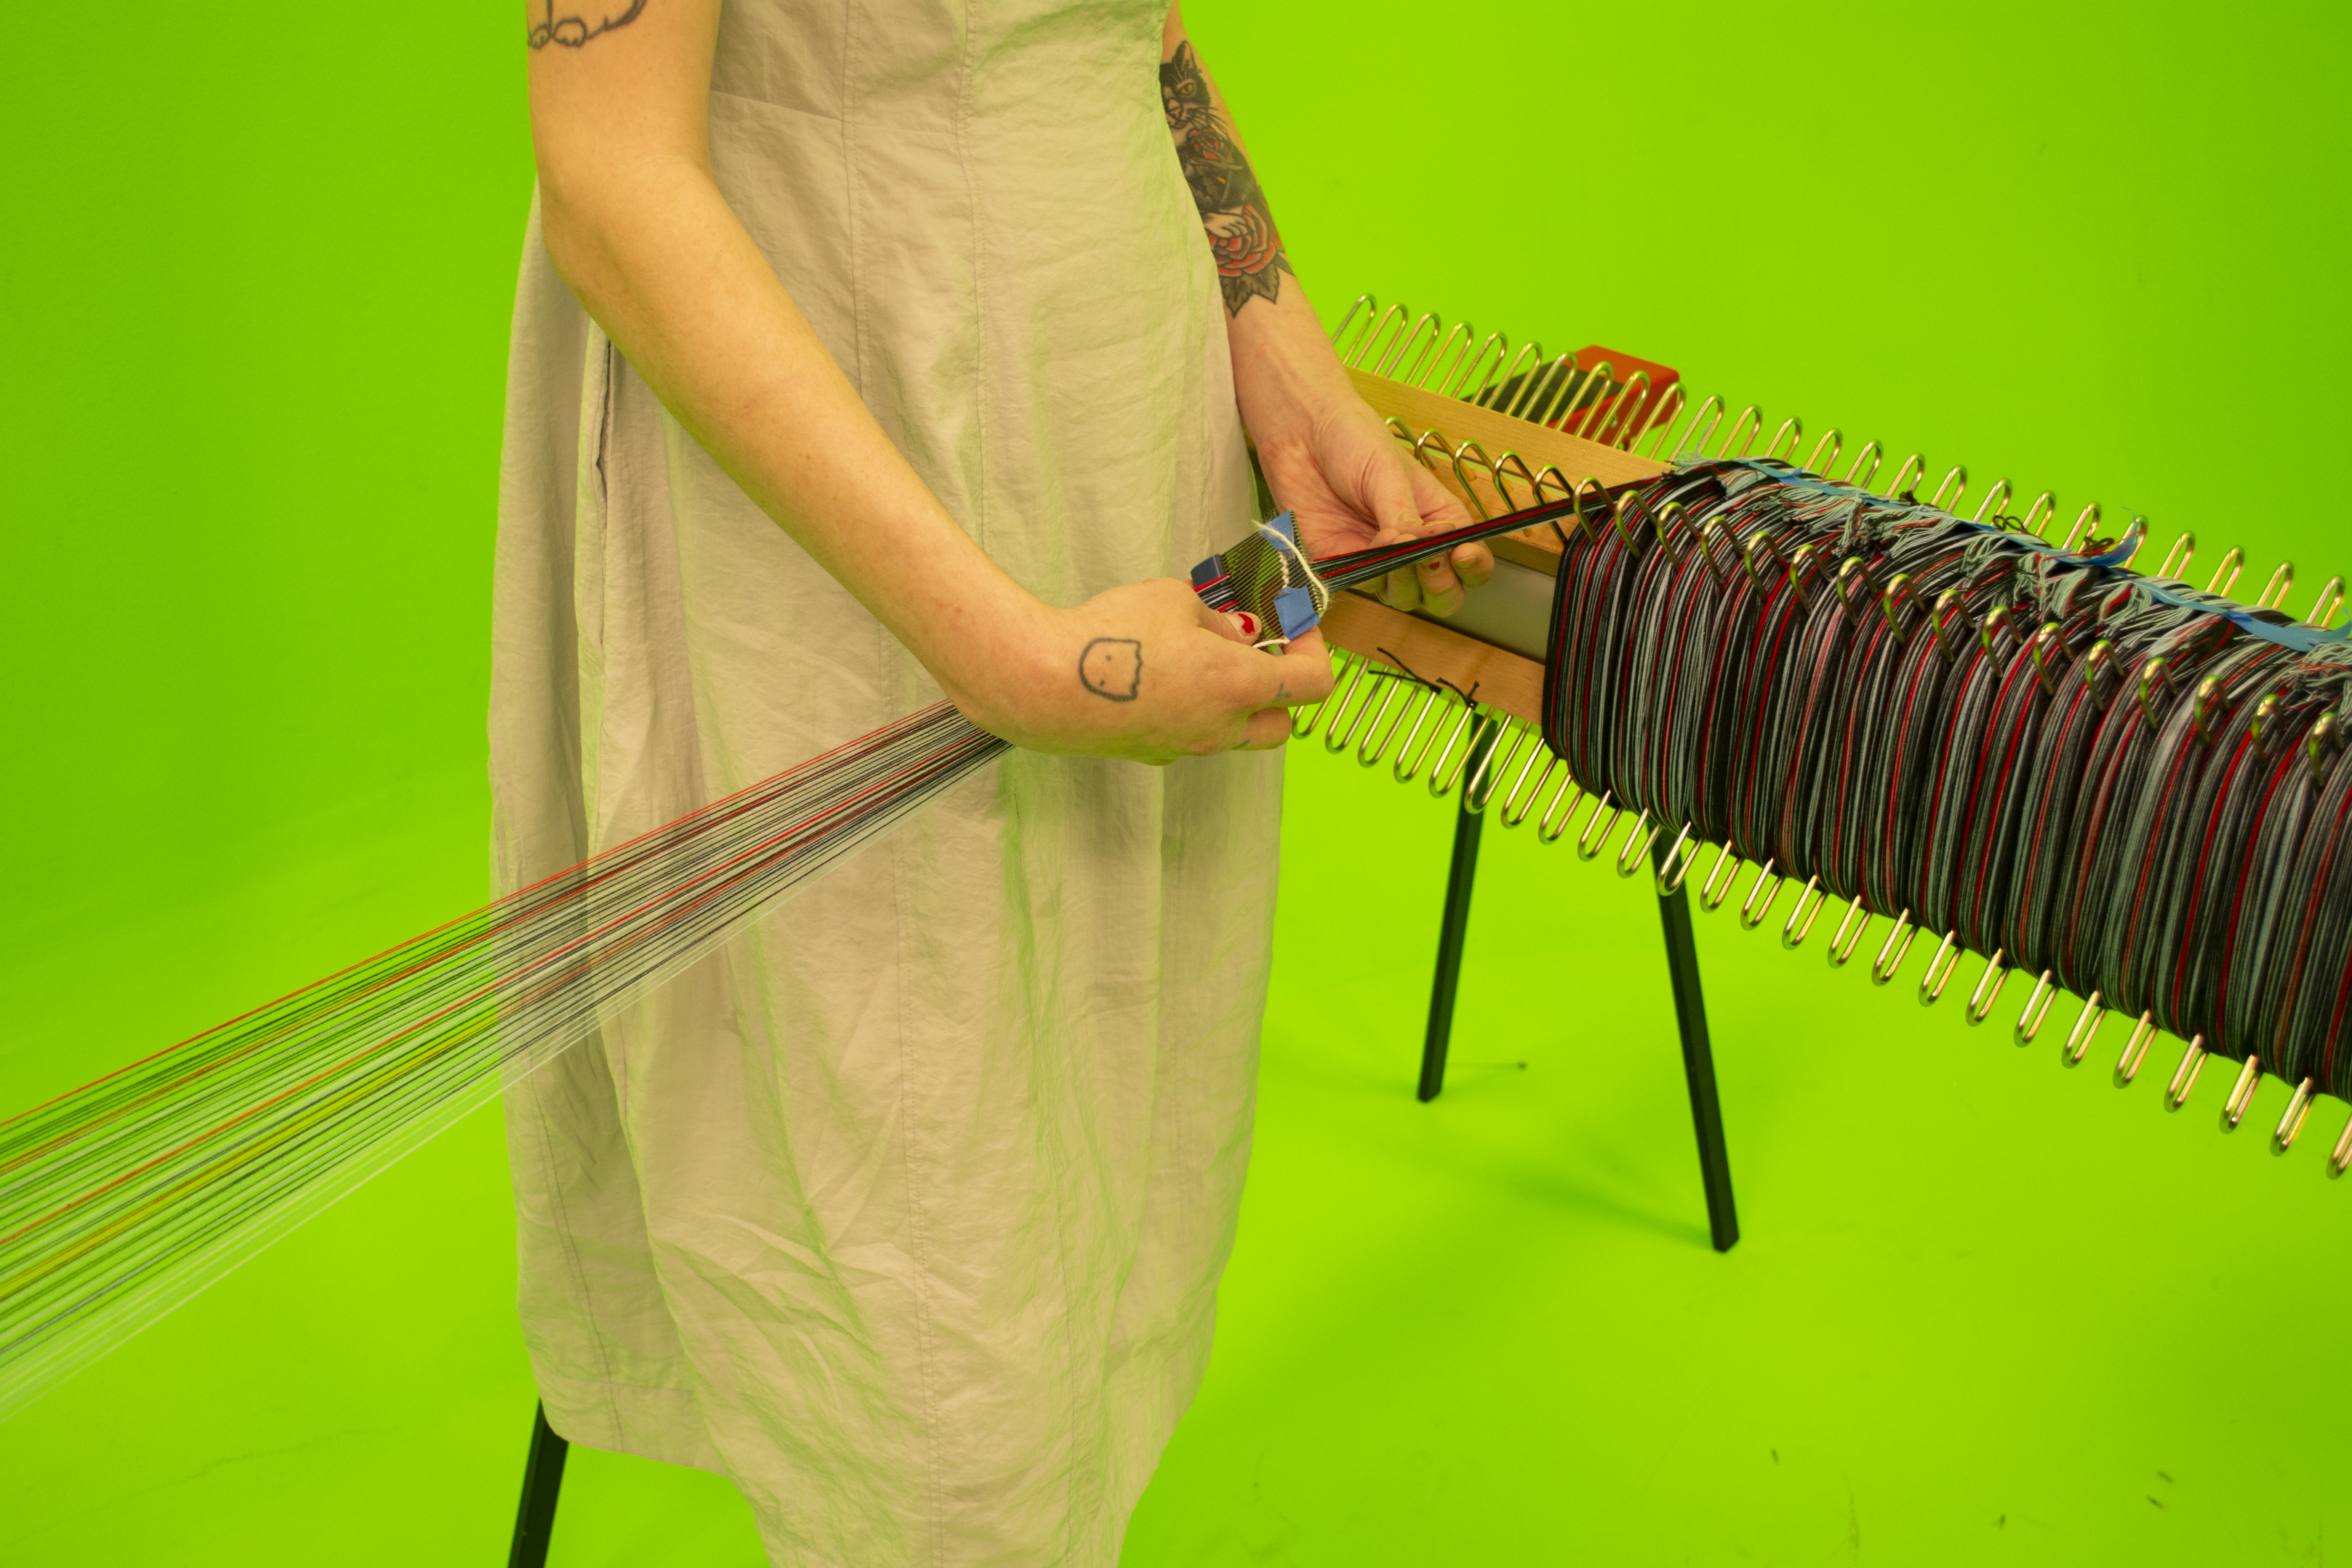
5. Make the Cross
❊ Once you finish winding on your first inch of warp, use a clamp to secure the beam. Cut about a 10-ft length of contrasting-colored scrap yarn.
❊ Now, with the warp yarns under tension, use the slot-and-hole reed and pull up to make the first half of your cross. Use one hand to reach into the cross/shed and catch the lifted threads, being very careful not to miss one or pick up and extras. If you are using an end-on-end, or every other, thread color sequence like us (except for our red stripes), you should see only see one of the warp colors lift in your cross.
❊The dent reed comb should be close to the slot and hole dent reed, because you will need to catch the cross in front of the dent reed comb. Because our dent reed comb is a size 12 EPI and was threaded 5-per-dent, we had to coax the cross out. After you have the lifted threads, place the scrap yarn where your hand is, and gently guide the thread to the beam so that it is laying on the top of the beam in in between each thread. All of these steps are infinitely easier under tension, or resistance.
❊This cross will be the end of your warp. I give myself about a half yard margin of error when considering the thread between the yard counter and the beam…but you can be precise, if desired.
❊Now, again under tension, push the slot-and-hole reed down, and do the same, using your hand to preserve the other half of the cross and making sure to catch it in front of the other reed.
❊Secure the scrap yarn by tying an overhand knot and trimming the excess tail. I like to make sure that this scrap yarn knot on the right side of my inch segment, so that it doesn’t get in the way of the next segment.
❊Secure the scrap yarn by tying an overhand knot and trimming the excess tail. I like to make sure that this scrap yarn knot on the right side of my inch segment, so that it doesn’t get in the way of the next segment.
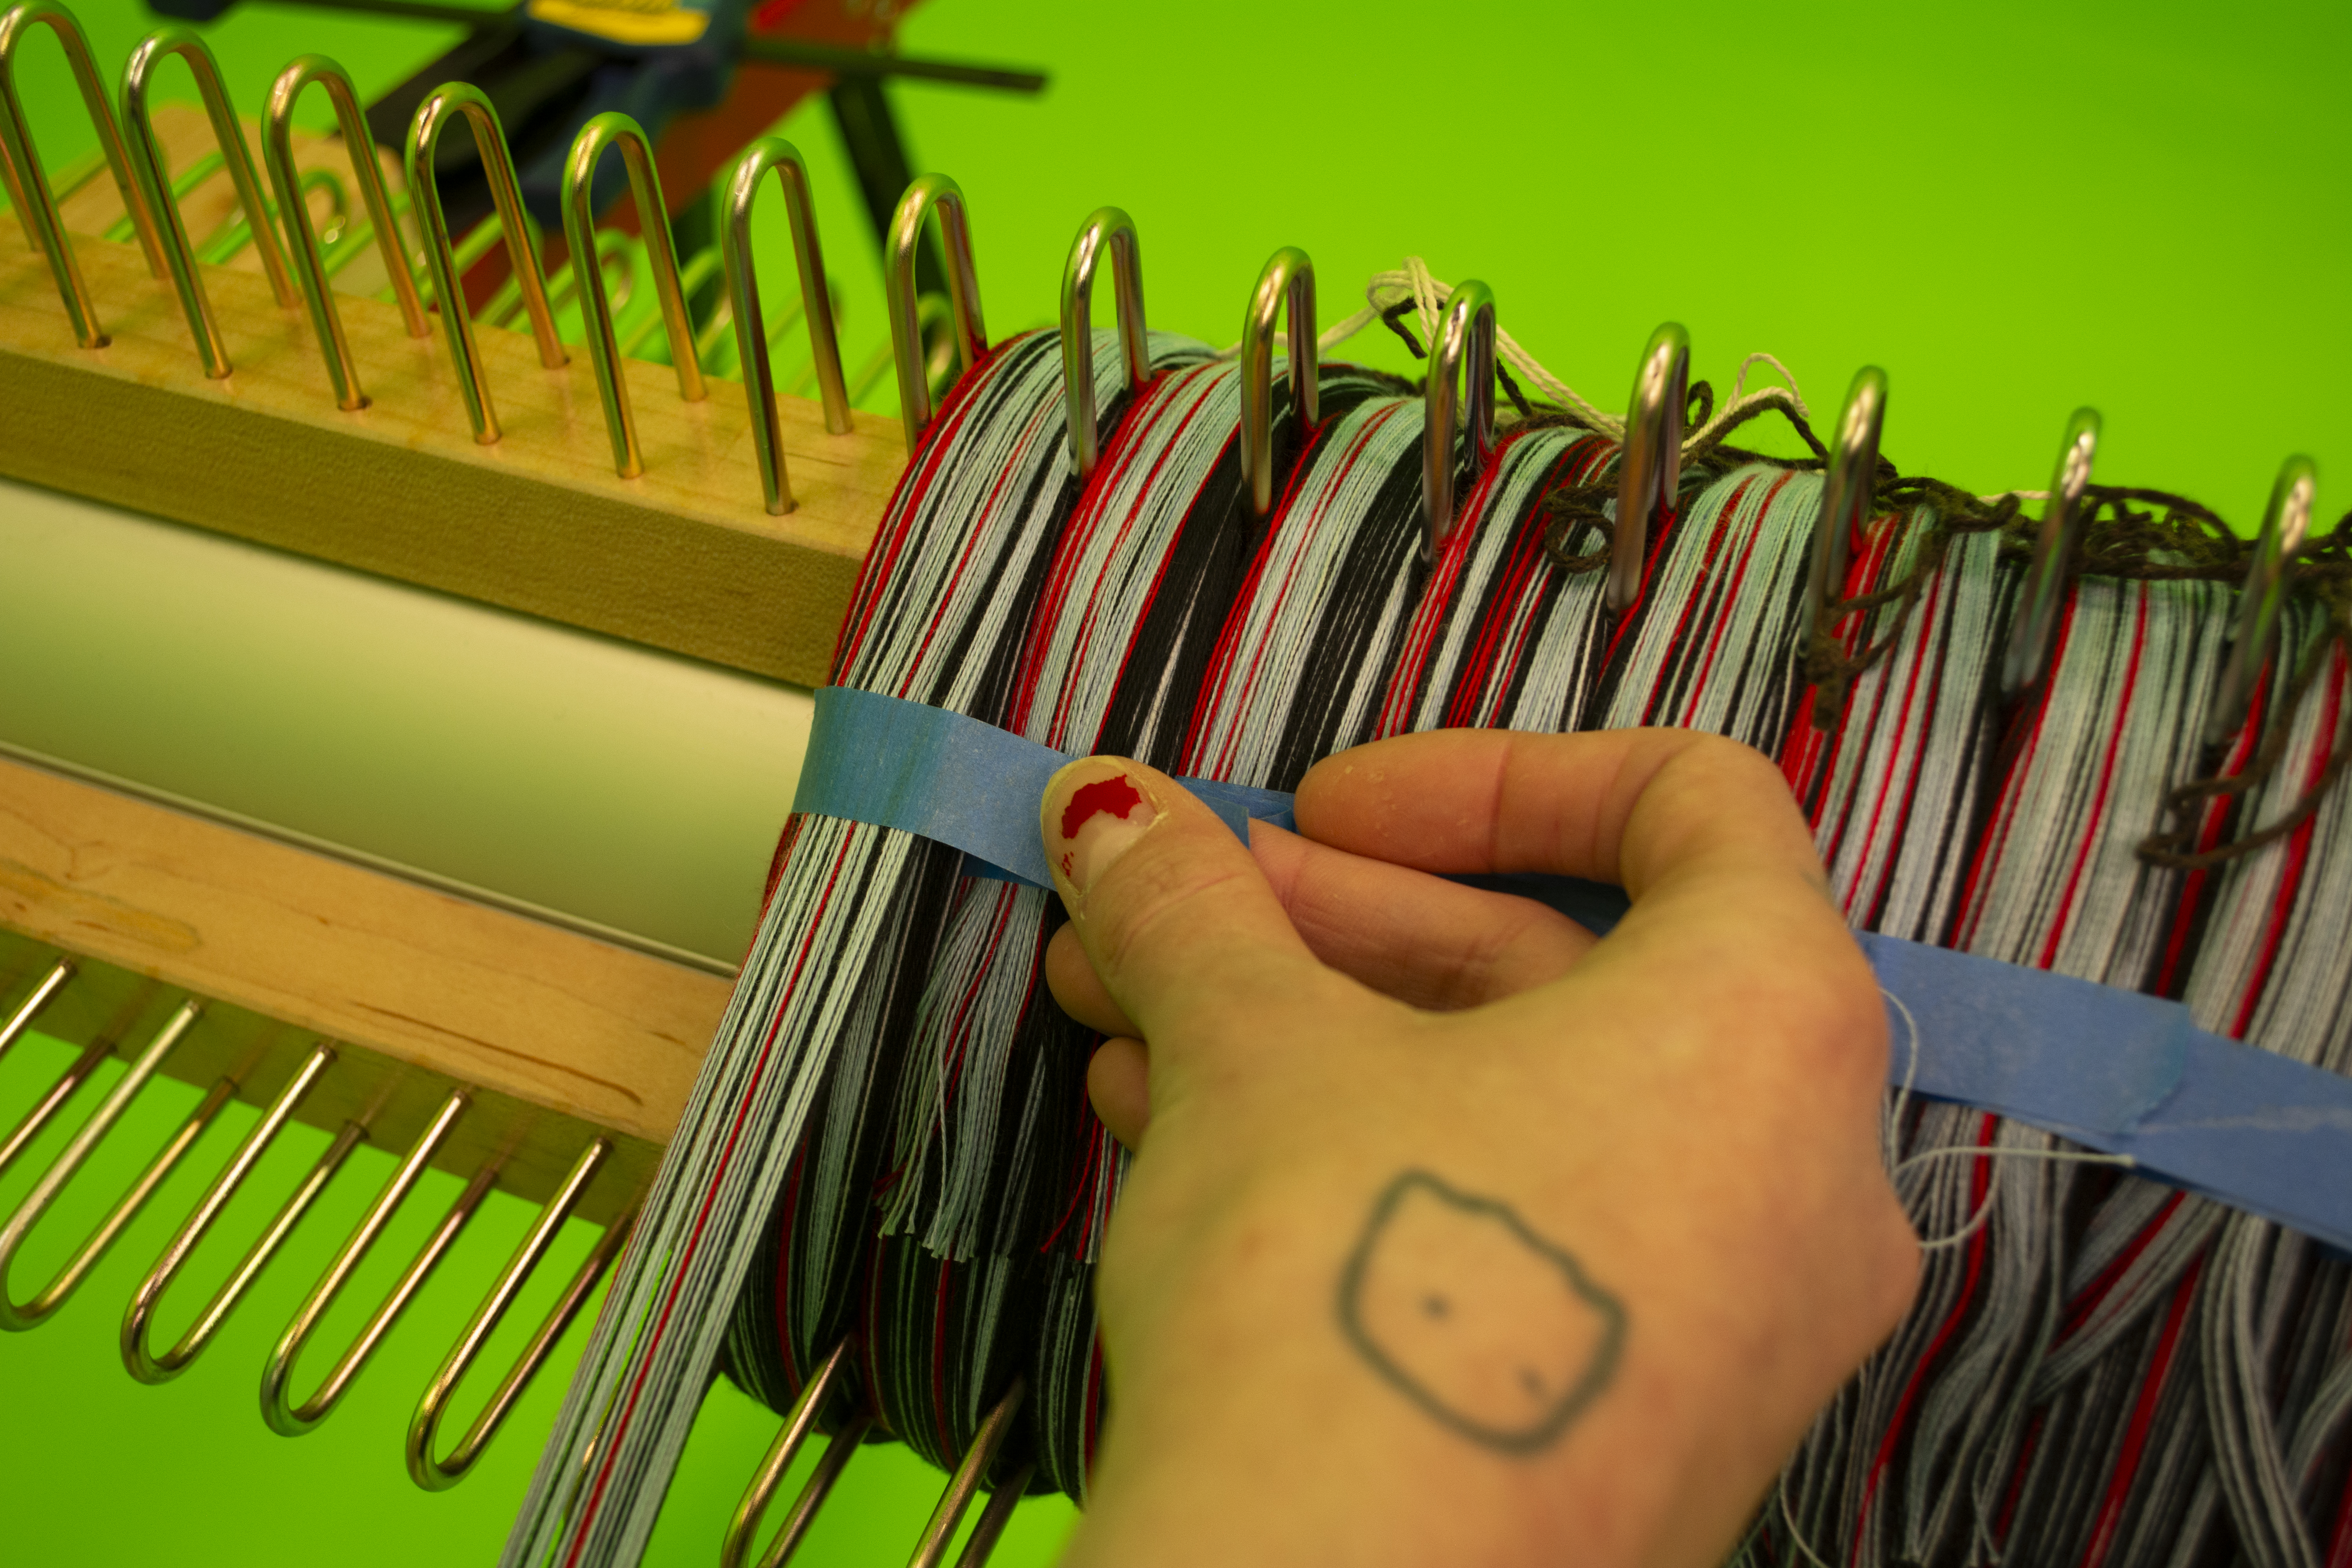
6. Cut off and repeat
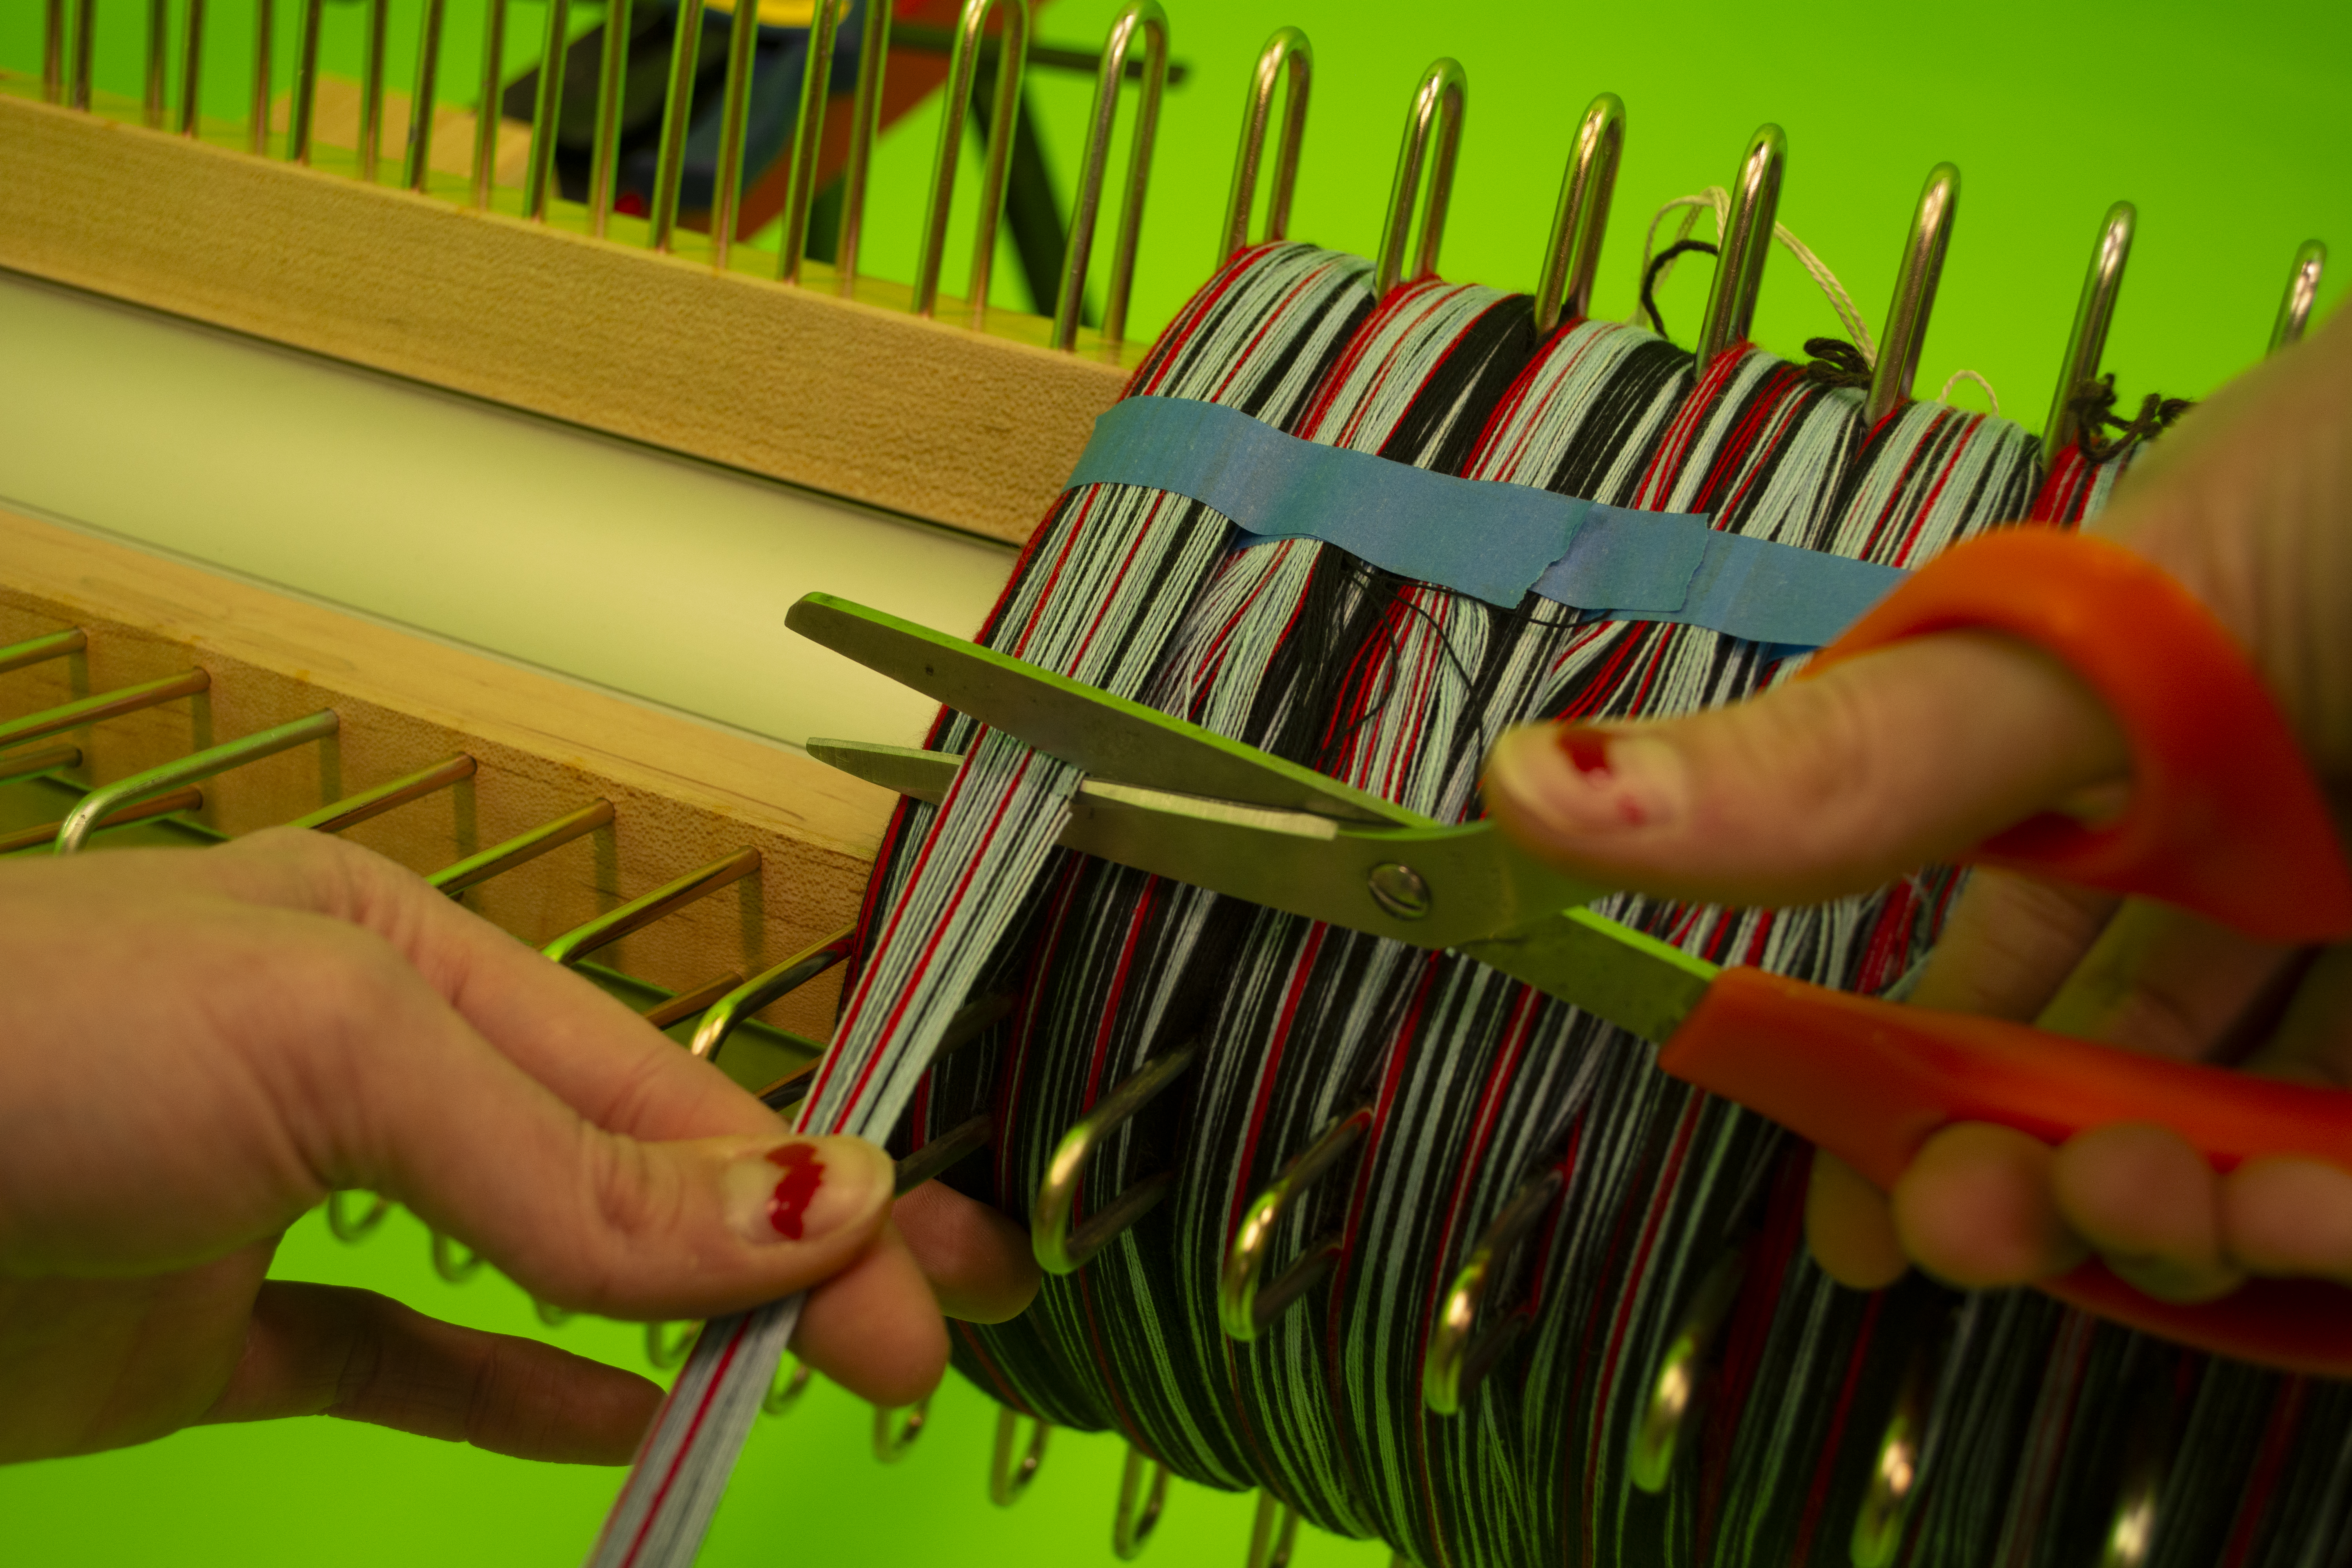
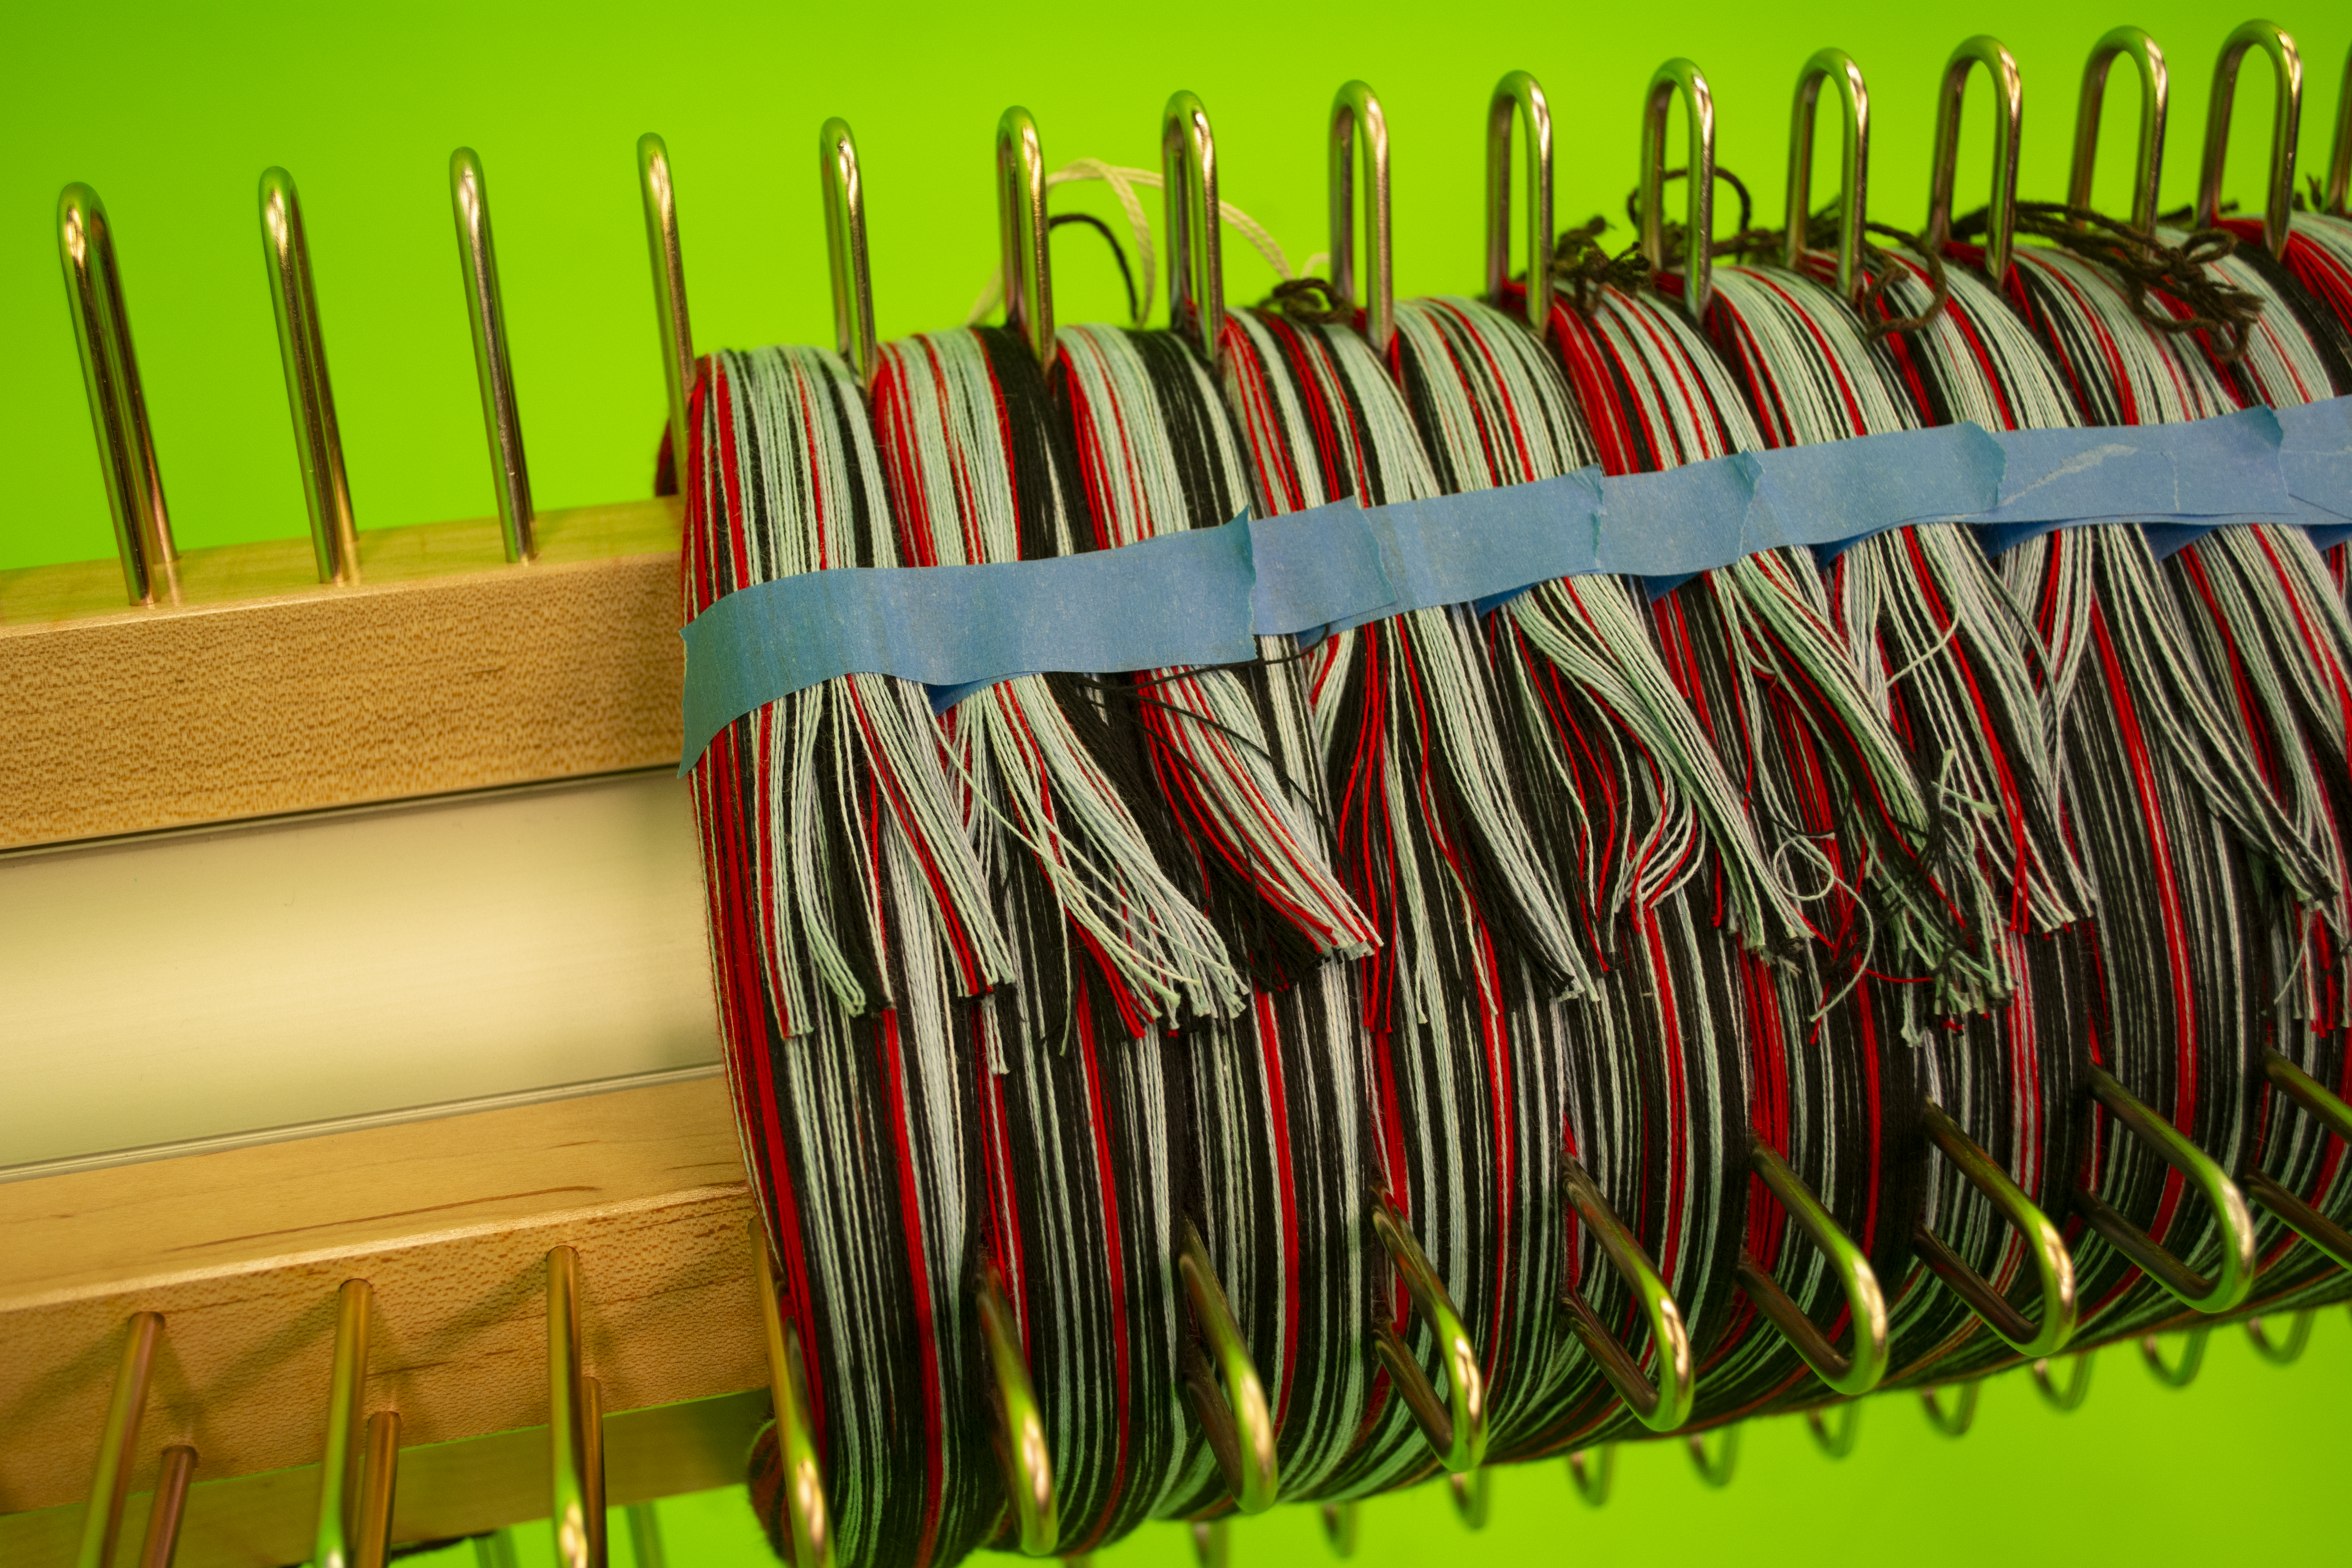
Use painter’s tape to secure the warp segment before cutting.
❊ Continue this process until you have completely covered your back beam in beautiful, even, uniform threads
❊ Continue this process until you have completely covered your back beam in beautiful, even, uniform threads
7. Troubles
❊ If you need to refill the warp yarn spools during the process, take special caution not to let the end of the warp thread leave the spool and the tension box: it’s not fun to rethread the warps through the reeds, tension box, or the creel in the correct order once you get started. If you must: take extra pains to rethread the replacement warp in its rightful place. Failure to complete this step will result in snags and breaks, leading to knots in your warp while weaving.
Which sucks.
❊That being said: some knots in your warp are inevitable, and especially while learning the process for the first time. If a thread snaps while you are warping, remain calm:
Which sucks.
❊That being said: some knots in your warp are inevitable, and especially while learning the process for the first time. If a thread snaps while you are warping, remain calm:
- Secure the back beam with a clamp and find the two ends of the warp thread. Tie them together using an overhand knot. You should be able to FEEL unusual tension before a thread snaps: there is a cause for every effect. Troubleshoot if you are encountering frequent snapping threads, or threads keep snagging on each other or the creel.
- The most common cause of snapped threads is the warp thread getting caught on its metal rod of the creel: the guide strings that we set up on the creel(s) should minimize this issue, though. If you skipped that step, take some time to put them on. Future you will thank you. Adjust the tension on them too, if that’s not helping.
❊If you are still encountering snapping threads, the next trouble you may have encountered is inaccurate positioning of the creels. Try to realign the creels so that the thread leads to the tension box in 25% or 30% angles.
❊ The other common error and the most annoying to correct is the order of threads. Use your eyes and your fingers to follow threads from the spools to the tension box, ensuring that (facing the creels with the beam behind you,) the top left-most spool is leading to the left-most dent in the tension box, the next top left-most spool is threaded through the next, and then the next row in the same way: left, middle, right, like reading and writing English, until you reach the bottom right spool, the last one.
❊ If you do encounter threads not in the correct placement, it may be easiest to snip a thread in an incorrect place and just retying on and correcting the knot while weaving.
Chapter 5: On Designing with AdaCAD
Laura Devendorf
AdaCAD is an experimental workspace that applies parametric design to weave structure development. Where Photoshop will have you select interlacements in a free-hand fashion, AdaCAD is going to ask you to specify the instructions systematically using a “dataflow”. A dataflow tells AdaCAD how to combine information in specific ways to create drafts that can then be easily manipulated.
Open AdaCAD
So, let’s start by opening https://adacad.org in one tab of your browser and https://docs.adacad.org in the other. You’ll do your design work in adacad.org and you can use docs.adacad.org to find more help and references for the interface. If you are feeling overwhelmed already, head on over to the “Learn” tab in docs.adacad.org to watch some introduction videos to the interface.
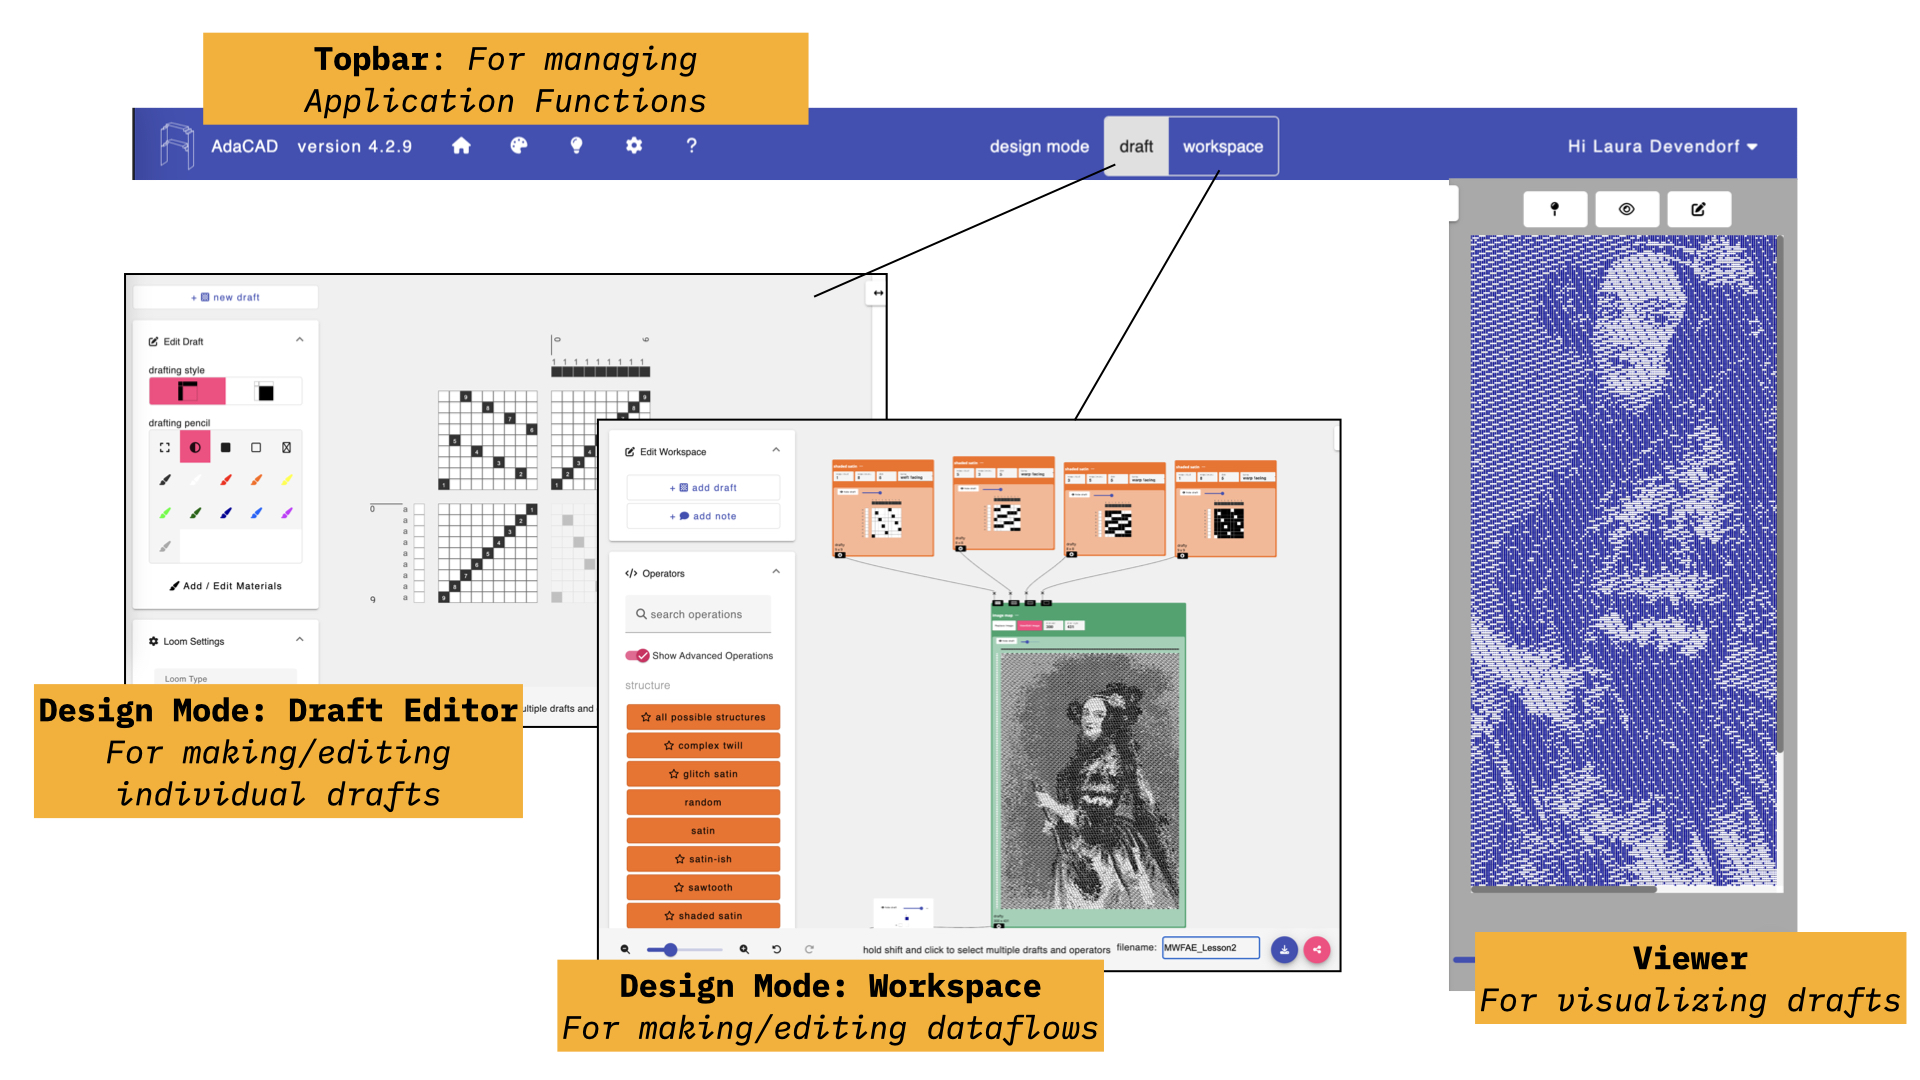
When you open adacad.org, you’ll see a blank interface with a top bar, a viewer on the right, and a workspace as the primary view. AdaCAD supports two modes of drafting, one in the “workspace” view where you connect little draft-making operations together, and a “draft” view where you can draft using a point and click point paper interface. You can toggle between the two modes at any time by clicking either design mode: “Workspace” or “Draft” in the topbar.
Defining Warp and Weft Systems
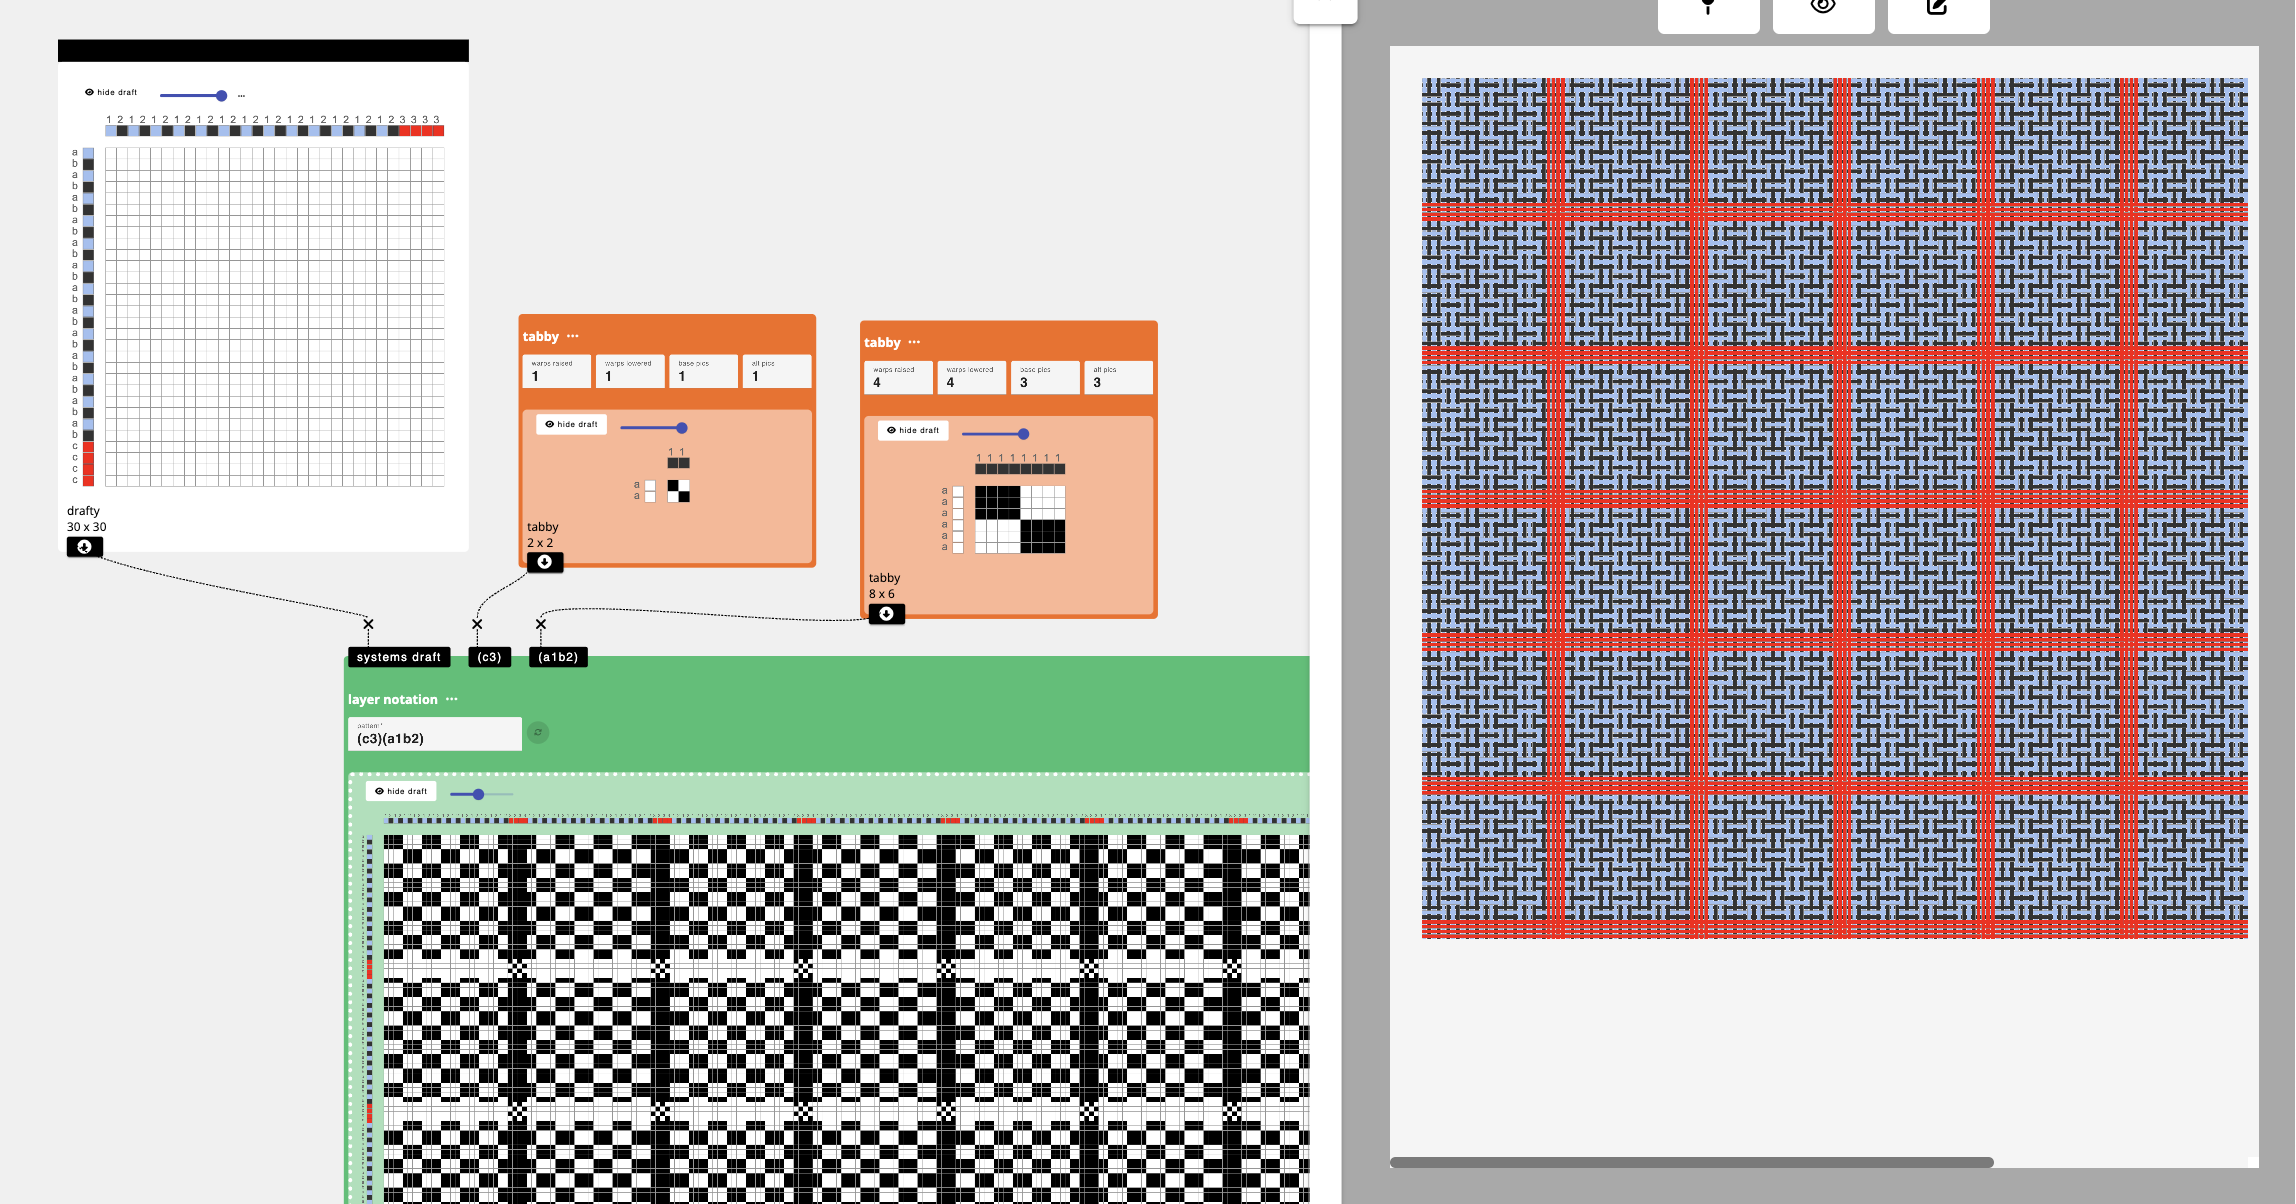
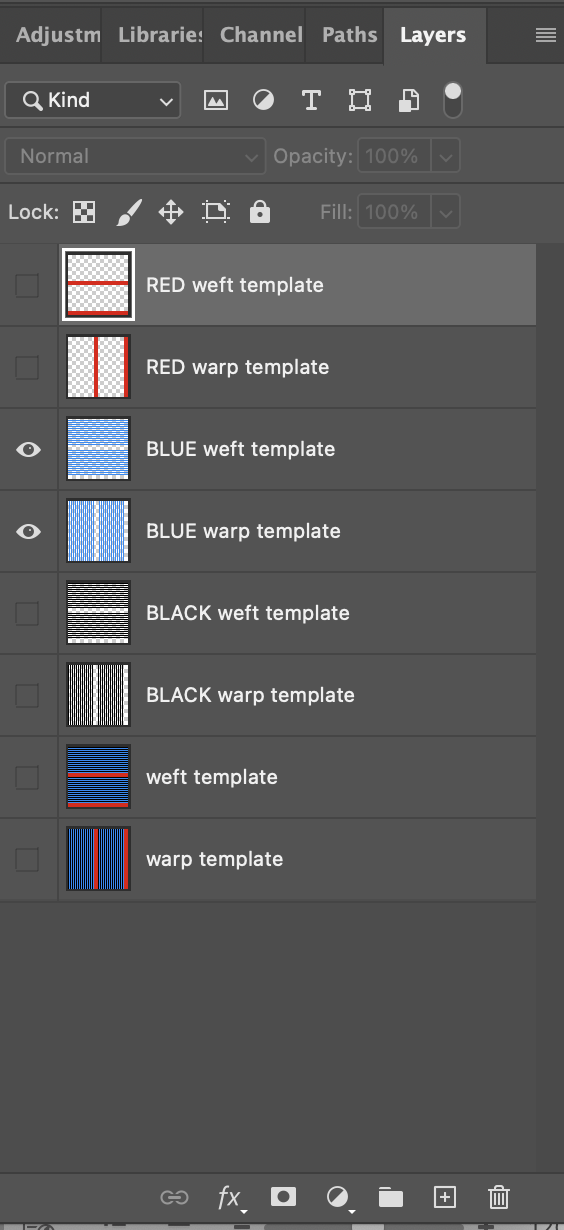
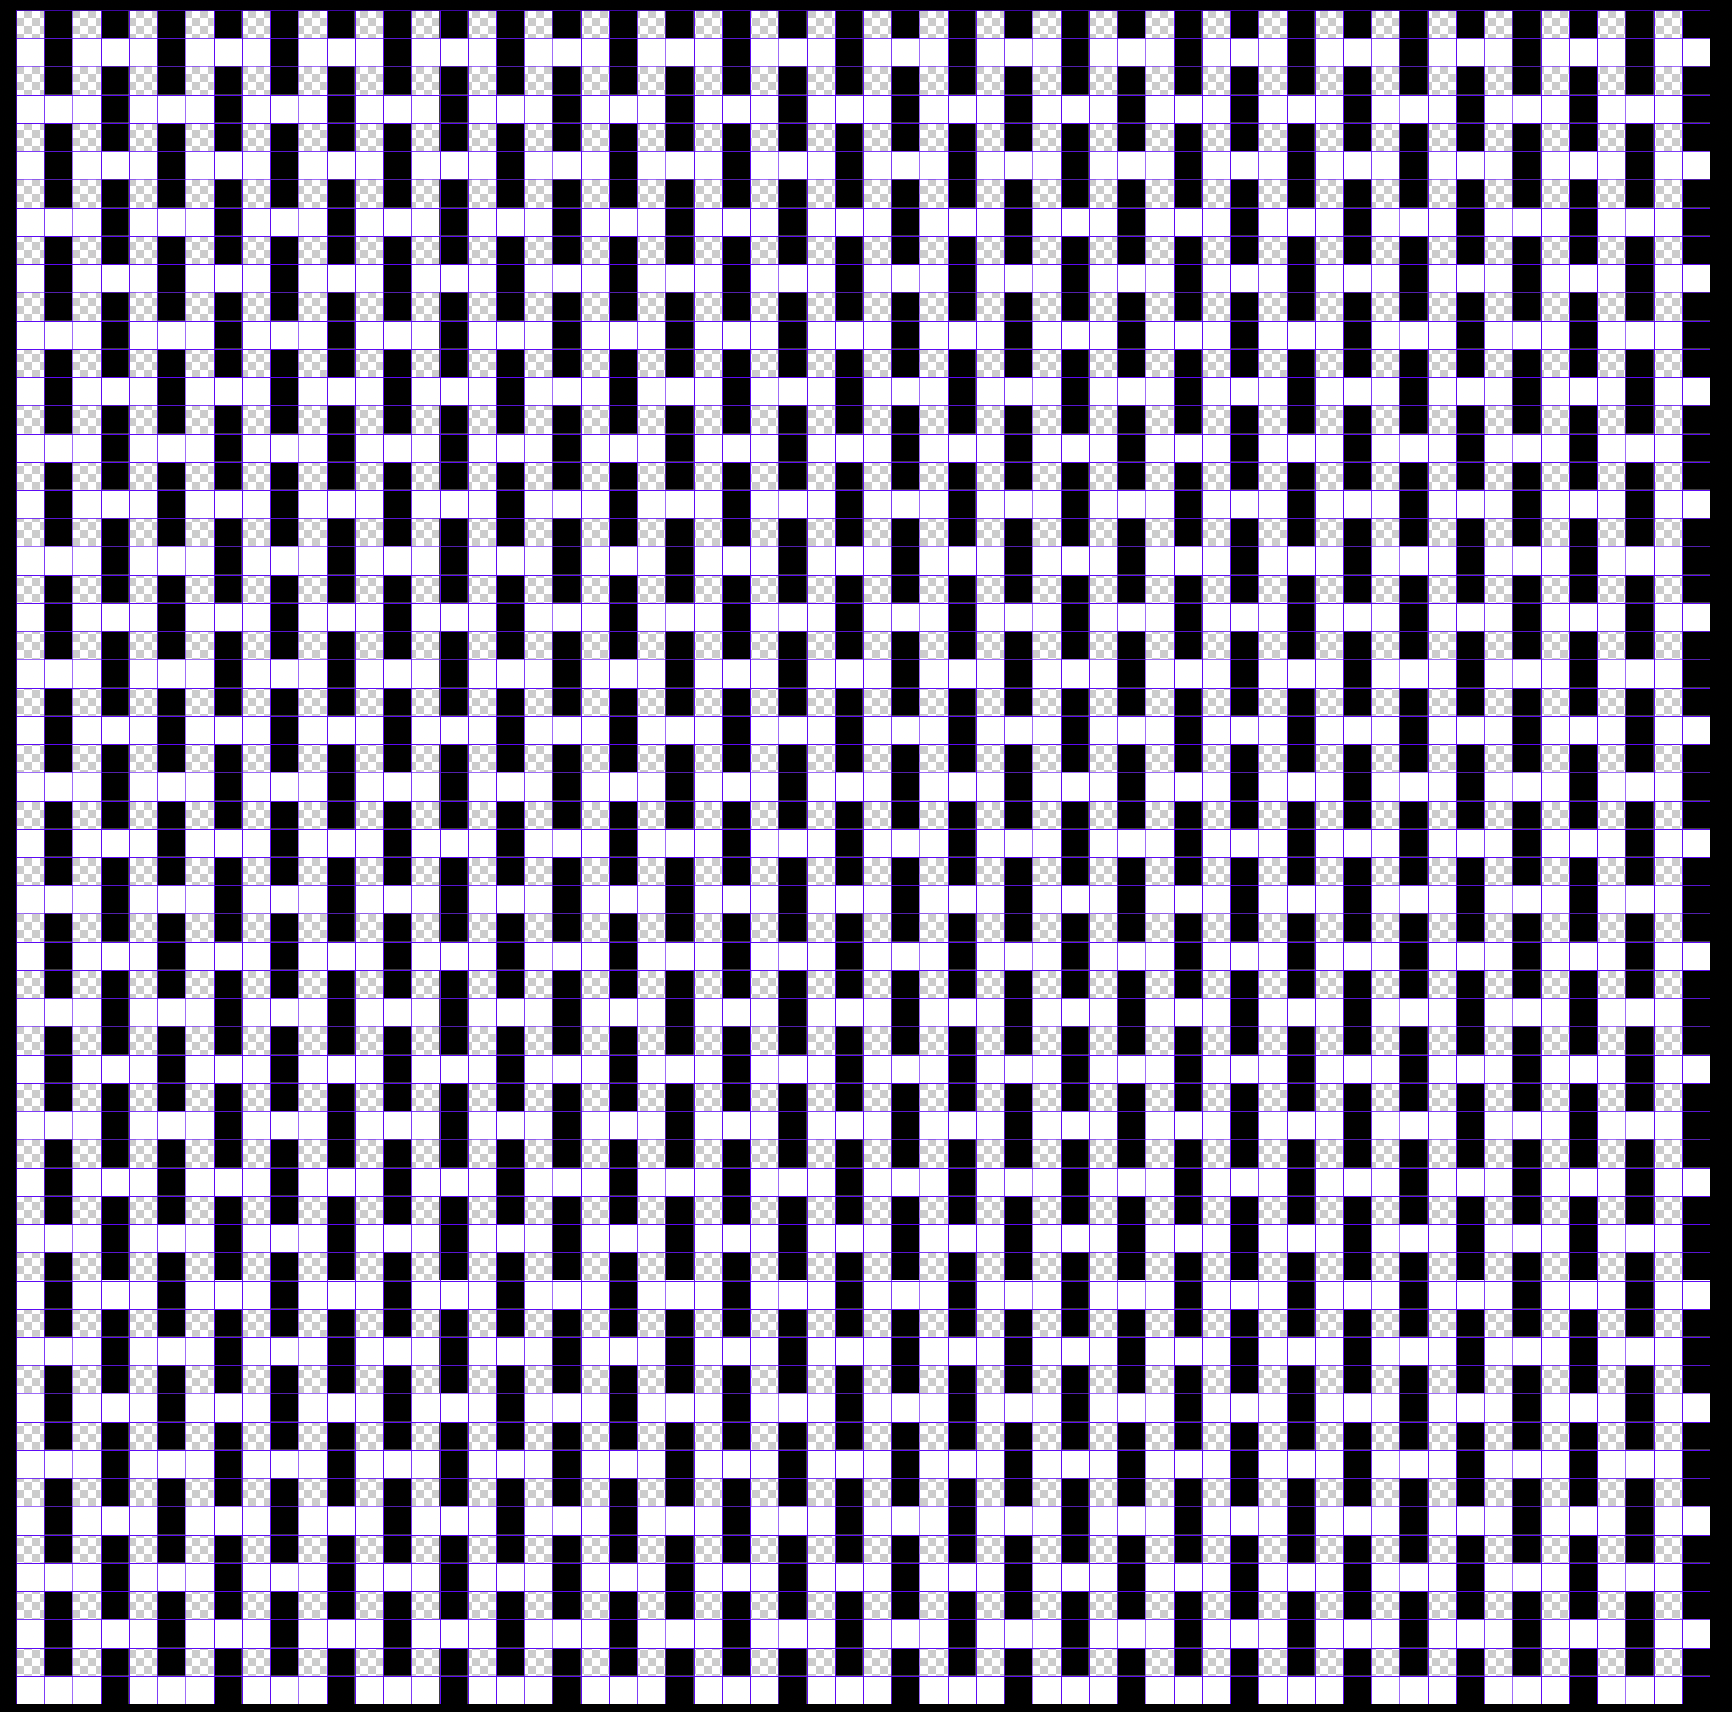
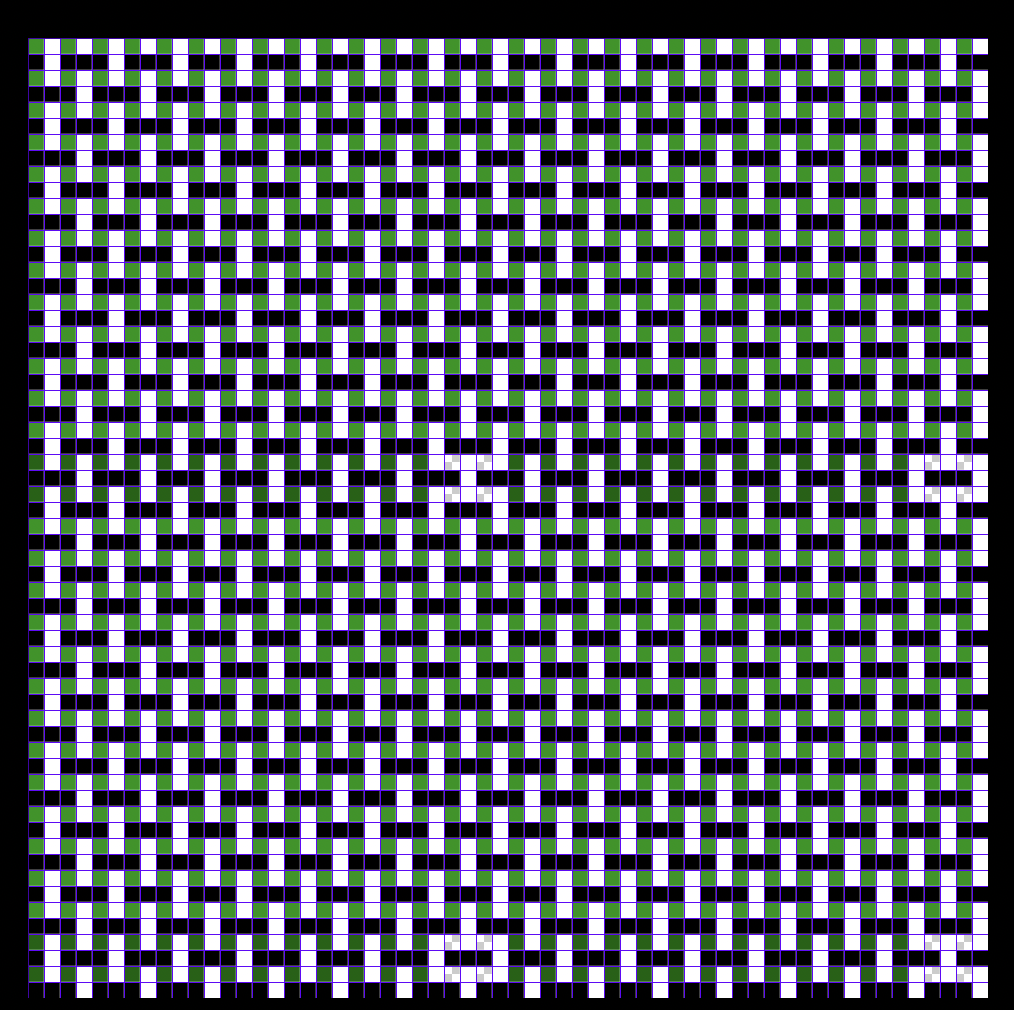
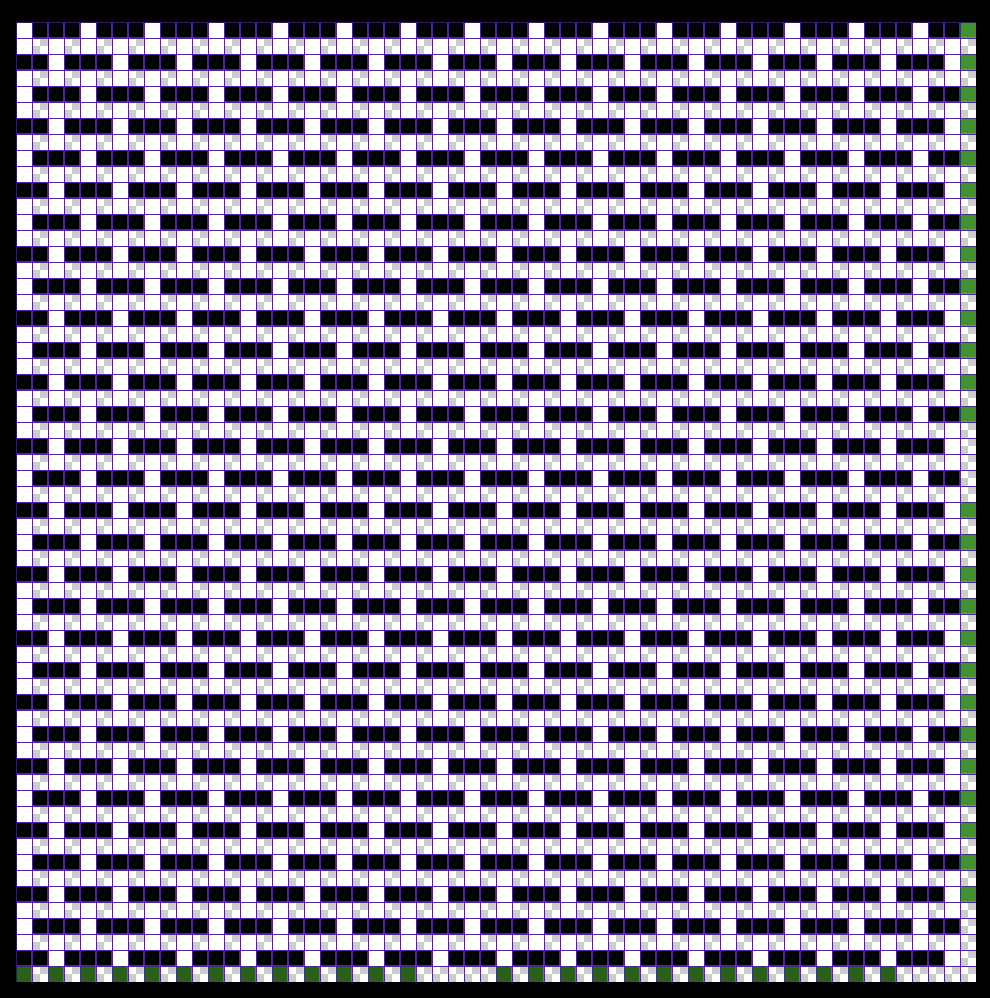
I think that the easiest way to work with multiple warp and weft colors and layers in AdaCAD is to think of the warp and weft as “systems”. For instance, in the image below, we assign all the red warps to system 1, and orange warps to system 2. We can think of the weft in systems too. Here we assign dark blue to system ‘a’ and light blue to ‘b’.We do this grouping of systems to tell AdaCAD that we want to associate these warps and wefts into groupings. Then, we can use these groupings to tell AdaCAD that we want to assign one kind of structure (let's say tabby) to systems 1 and a, and another to 2 and b. Conceptually, this lets us think of our draft as a collection of logical groups of warps and wefts, rather than treating each warp and weft as an individual or discrete unit. For an analogy, where Poppy uses warp and weft templates in Photoshop to split out logical groups (e.g. blue yarns, red yarns, etc) before assigning structures, AdaCAD uses systems to do the same thing (and as we’ll see in a minute, we’ll use operations to add structures to the different groupings).

If we have a draft that specifies the relationship of warps and wefts to systems, then we can make use of AdaCAD’s Layer Notation and Assign Draft to System operations.
→ Layer Notation
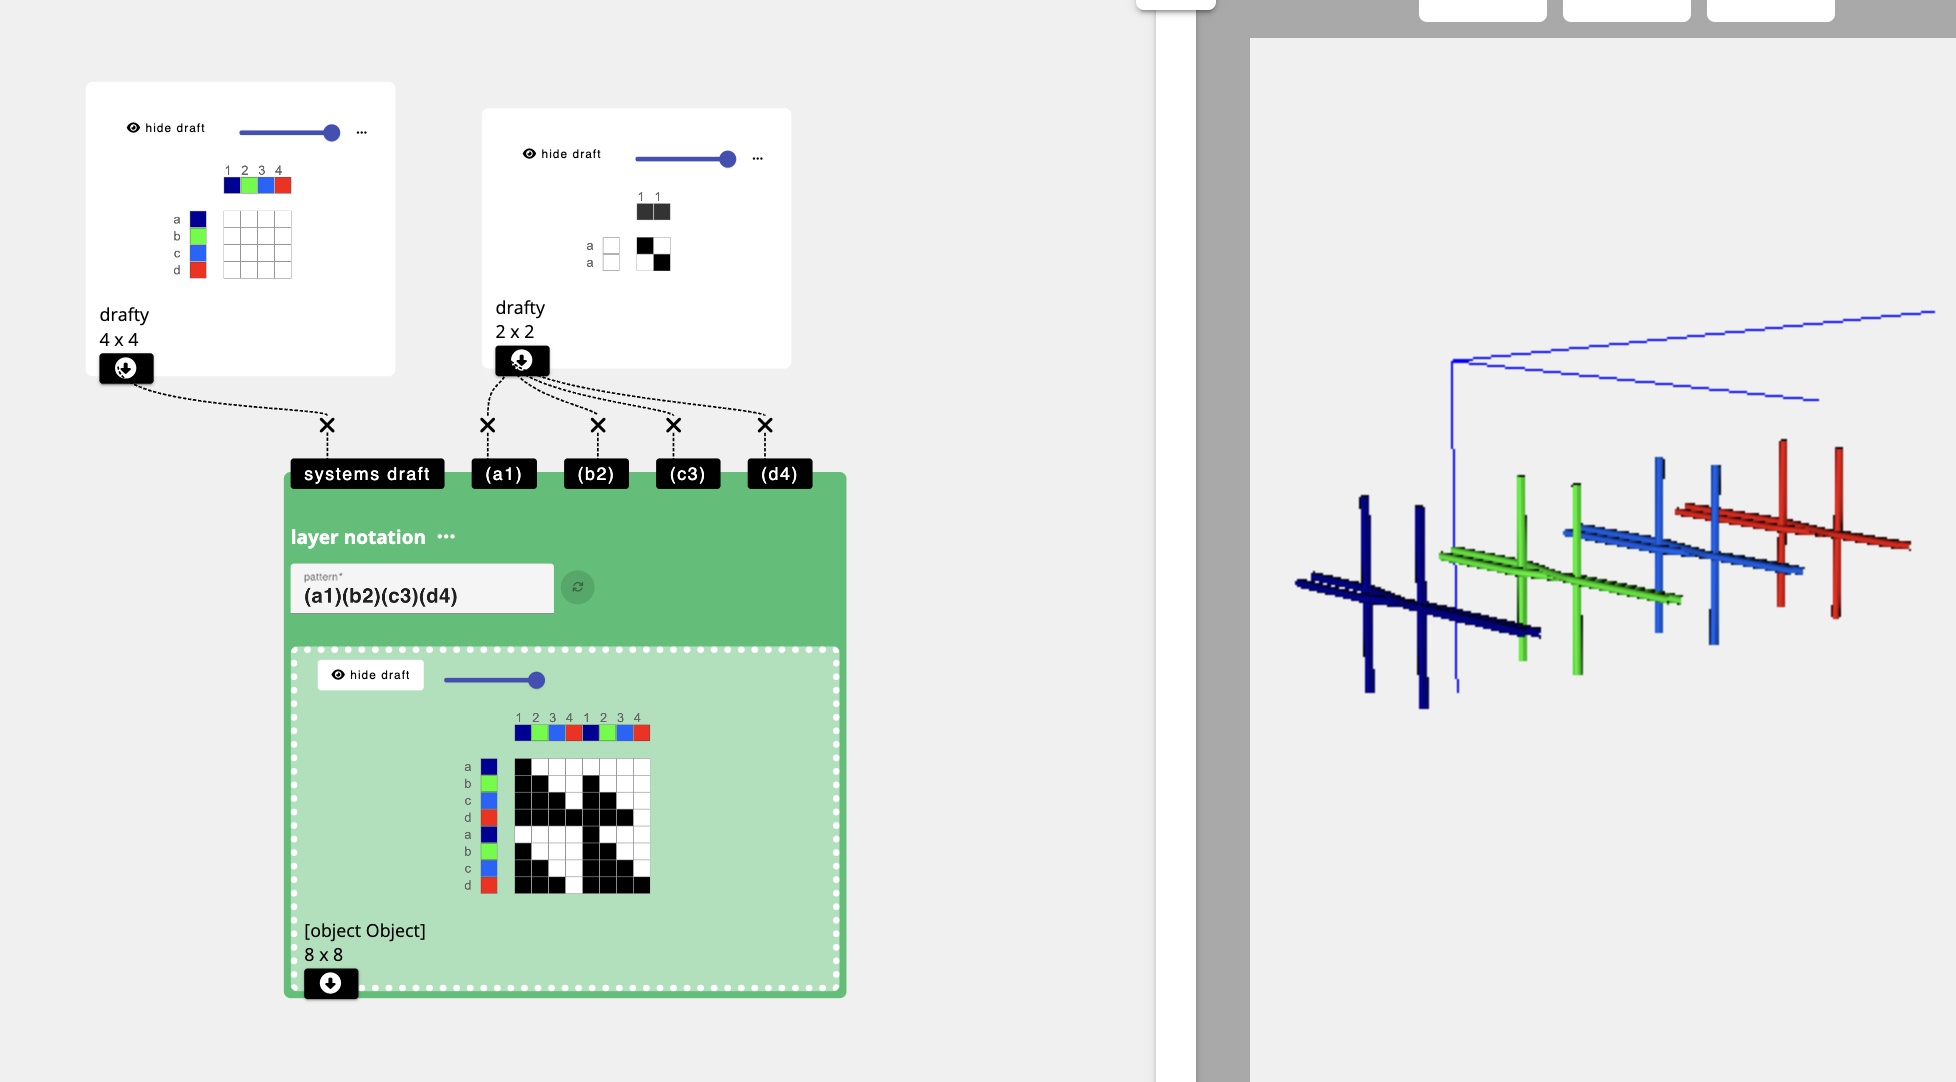
To explain the general concept of the Layer Notation operation, consider the example below. In this example, we have provided the operation with a map of the systems’ this draft will be using (warp systems 1, 2, 3, 4 and weft systems a, b, c, d). We can then describe the relationships between those groups to the layer notation operation by providing it with the text “(a1)(b2)(c3)(d4)”.
In layer notation, each ( ) group describes a unique layer and the warp and weft system codes in that ( ) describe the warp and weft systems that will form that layer.
So “(a1)(b2)(c3)(d4)” means that we are creating a 4 layer cloth. For each layer group, AdaCAD produces an “Inlet”. The draft that is connected to the inlet will be assigned to that inlet's associated layer group. In the example below, tabby is added to all the inlets, thereby producing a draft that will produce a four layer cloth with a tabby structure on each layer.
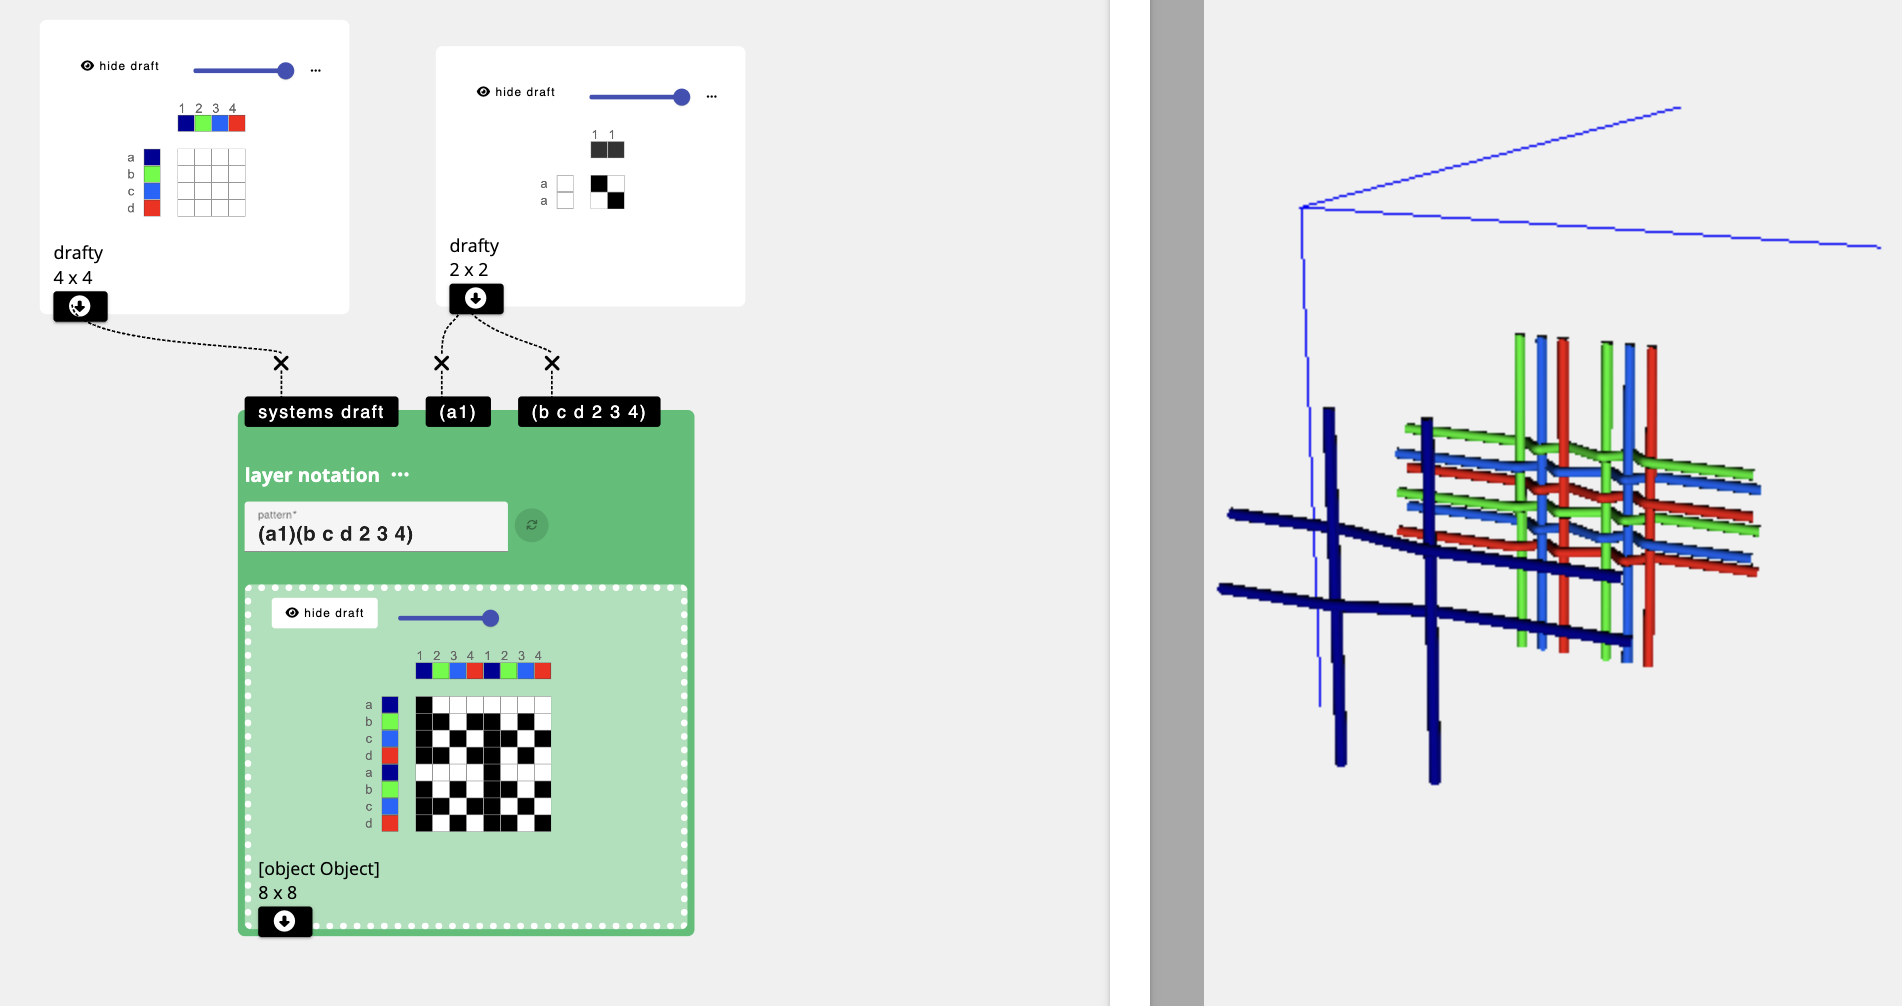
Maybe you have four systems but only want two layers. You’re in luck, you can group systems into different layer groups by wrapping them in ( ). In the example below we use the text (a1)(b c d 2 3 4), which tells AdaCAD to make the structures used on a1 separate into a layer above the structure used on warp and wefts 2 3 4 and b c and d.
The best way to learn is to play.
Try some new combinations.
See what happens.
Break things.
Try some new combinations.
See what happens.
Break things.
→ Assign Draft to System
The layer notation function is amazing for creating cloth with, well, layers. But sometimes we want to work with systems without necessarily using those systems to form distinct layer groups. Or, we want even more fine detailed control about how and where layers form. Enter the “Assign Draft to System” Operation
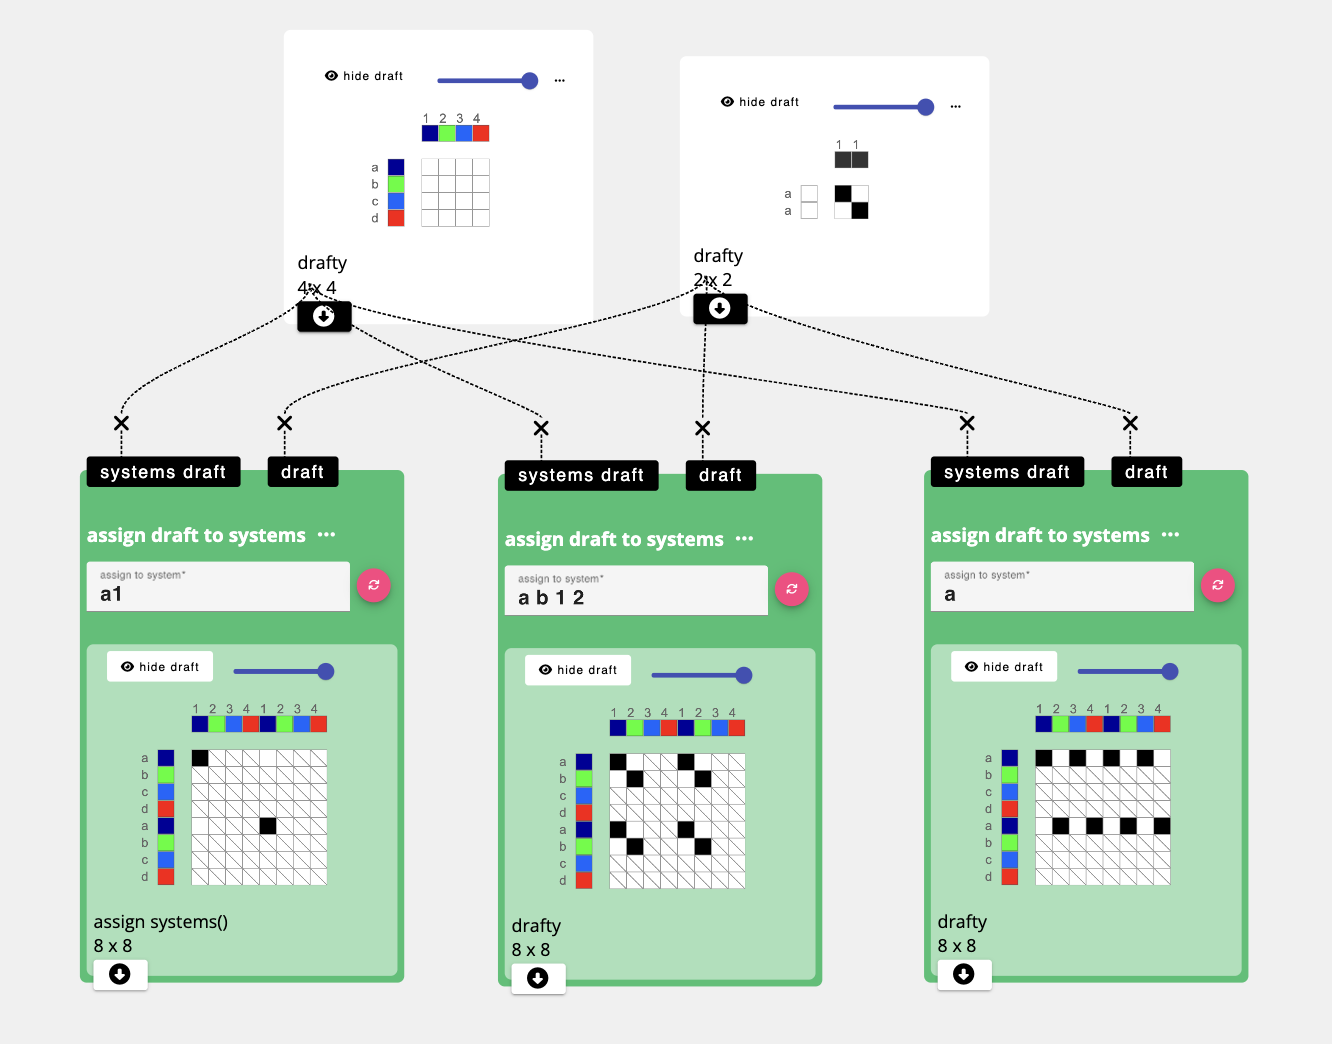
Just like ‘Layer notation’, in ‘assign draft to systems’, we also provide the operation with a draft that represents how the warps and wefts are grouped into systems. We also give it a line of text, only this text doesn’t use and ( ). Instead, you just type a letter and number (or multiple letters and numbers). Whichever draft you connect to the “draft” inlet, will then be repeated over all the interlacements associated with those letters and numbers.
When you want to combine multiple drafts assigned to systems together, you pop them all into a “overlay multiple” operation to fuse them into a single draft.
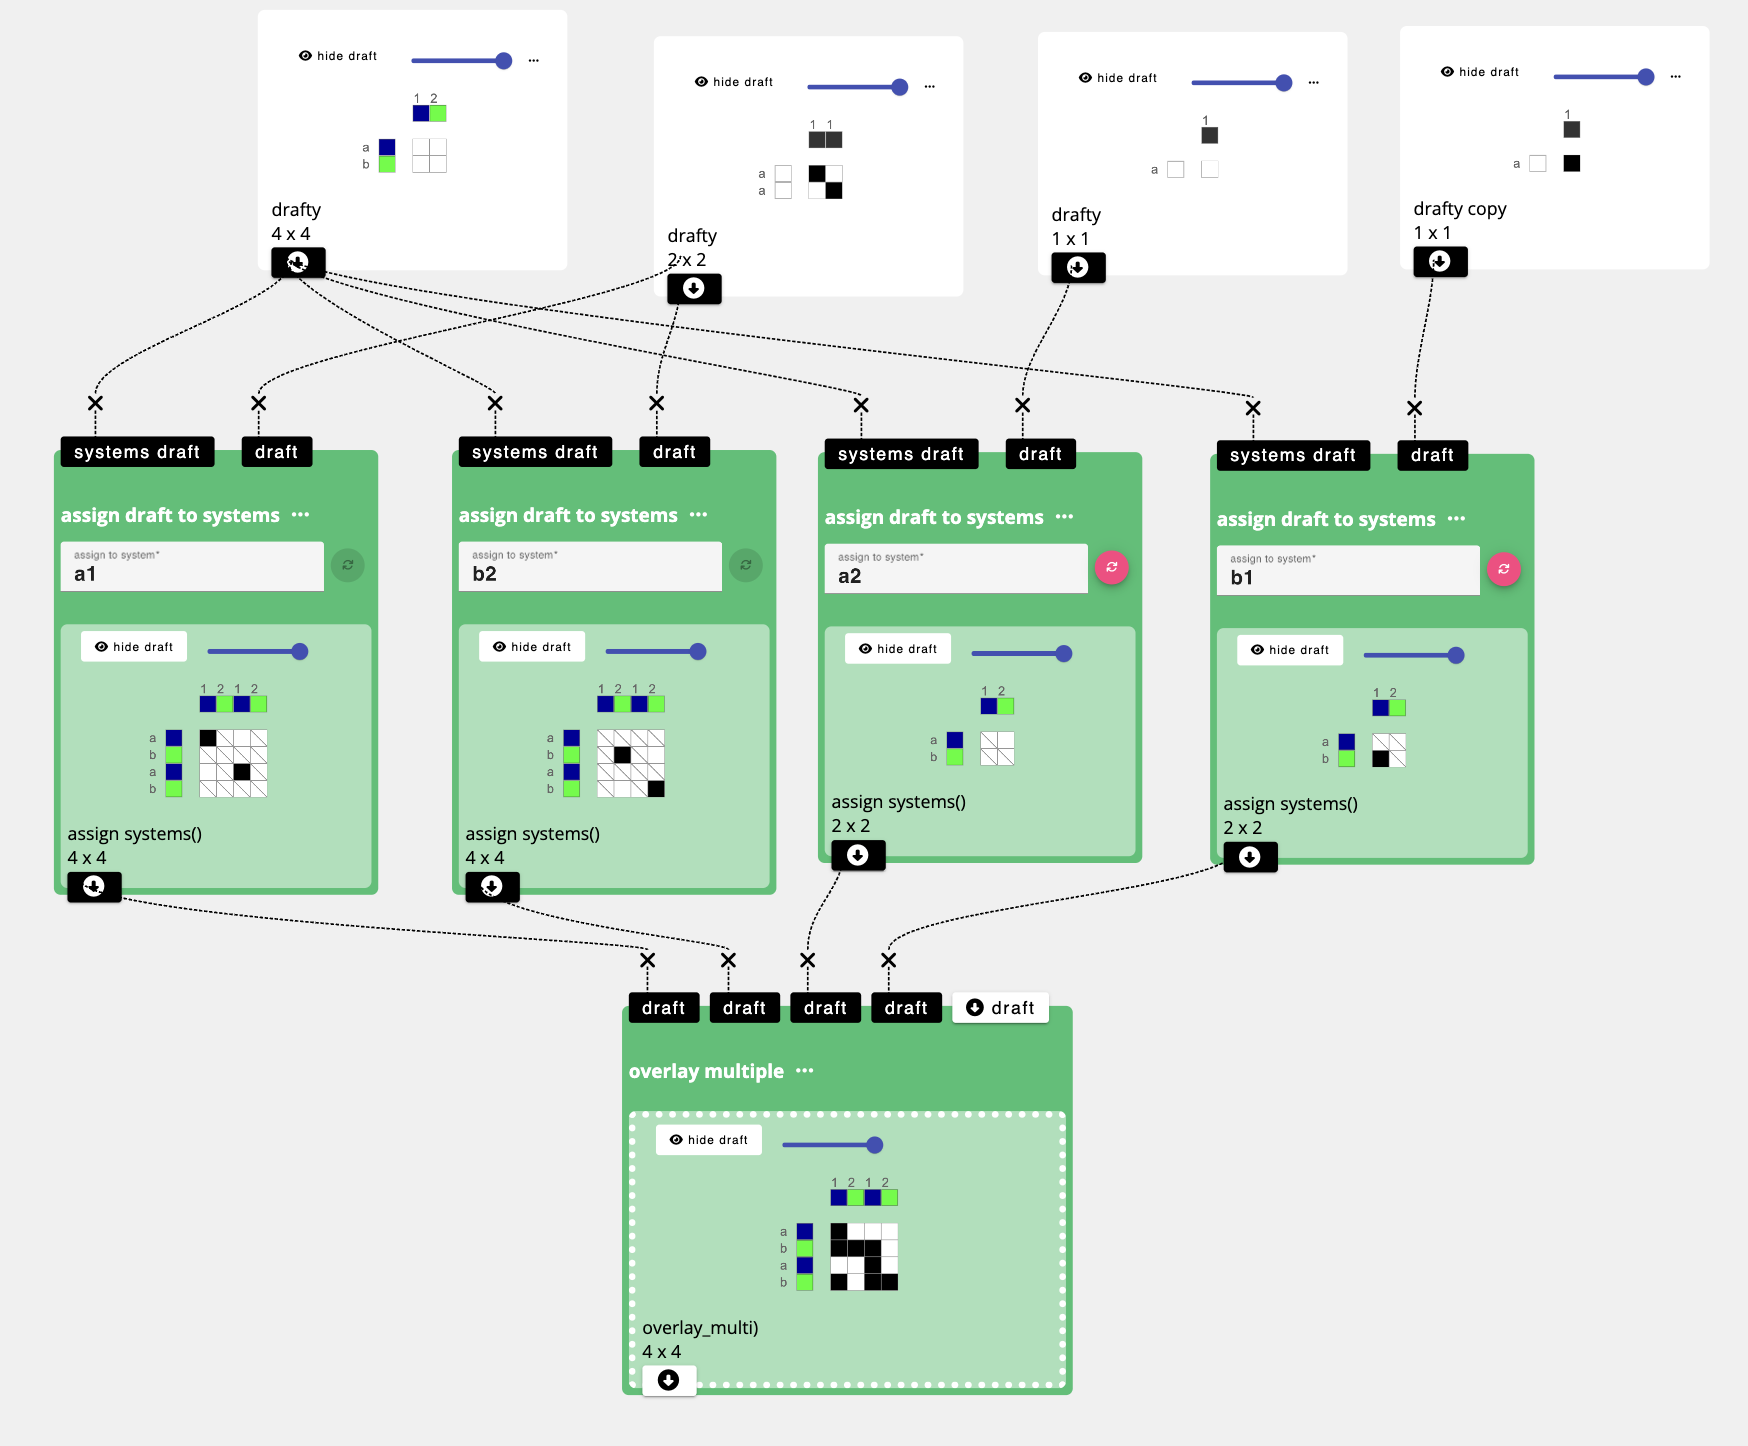
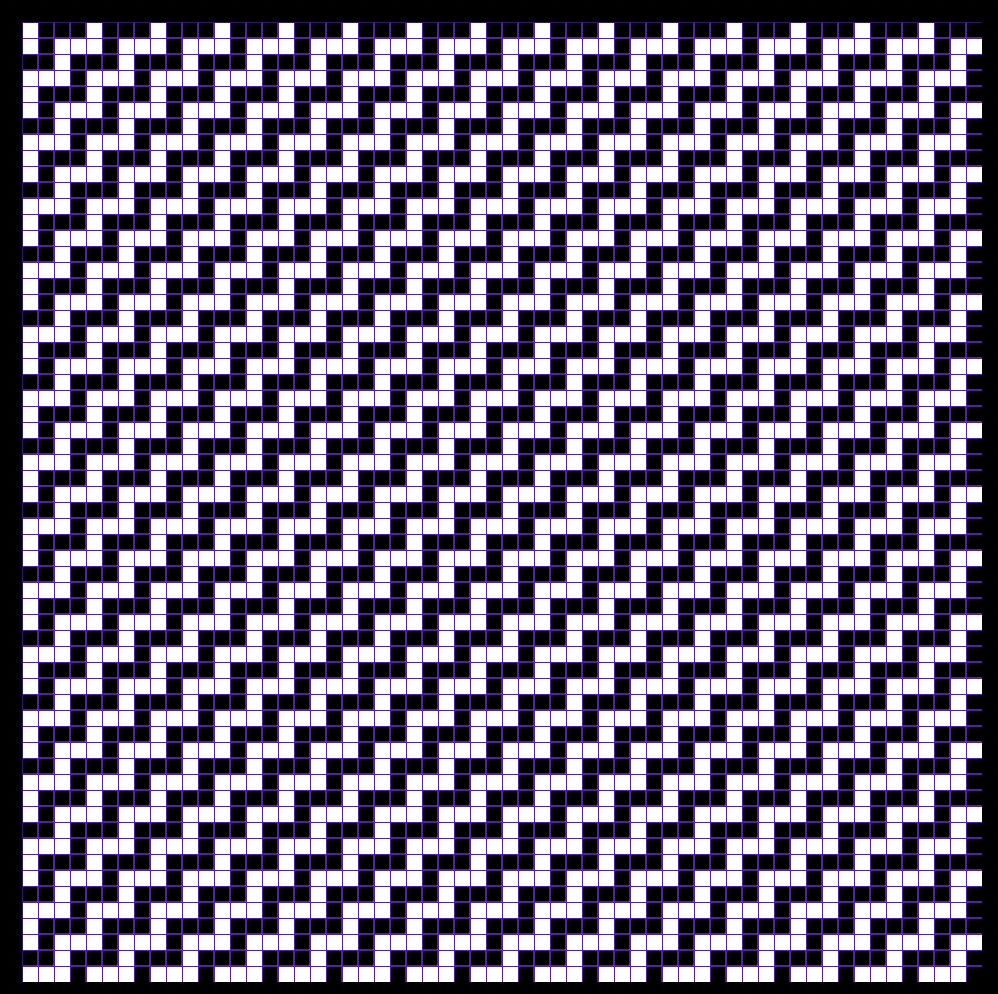
What we’ve done here is assign drafts to each unique grouping of warp and weft systems a b 1 and 2. Then, we stitched them all together with an overlay multiple. to make a single draft composed of all the different system units. Oh look! It’s a double weave!
Let’s get down to warp business
With this broader concept in mind, we can now follow step by step guide to designing double layer cloth that plays with our unique warp coloring.
Go to your tab with AdaCAD.org loaded and make sure the design mode says “workspace”
dawdle on over to the left sidebar and click “add draft”
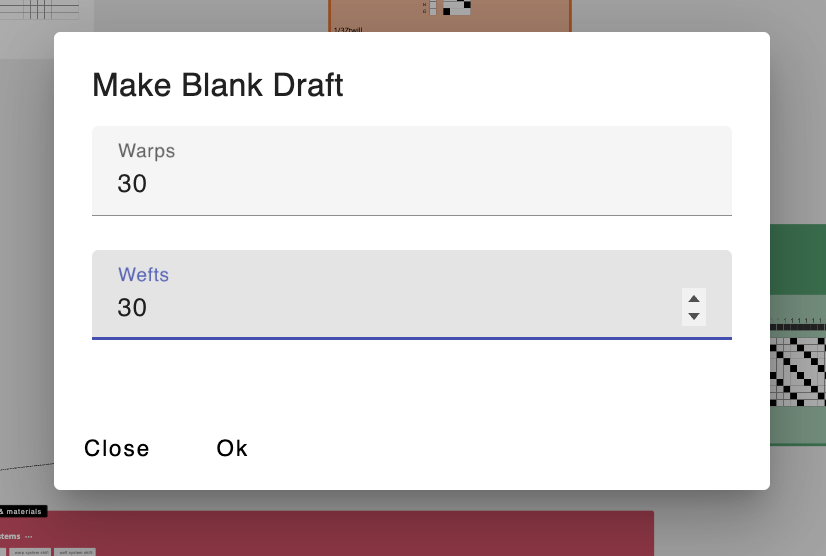
When prompted for the number of warps and wefts in the draft you are adding, type 30 and 30 (note that this is the size of our repeating color sequence.
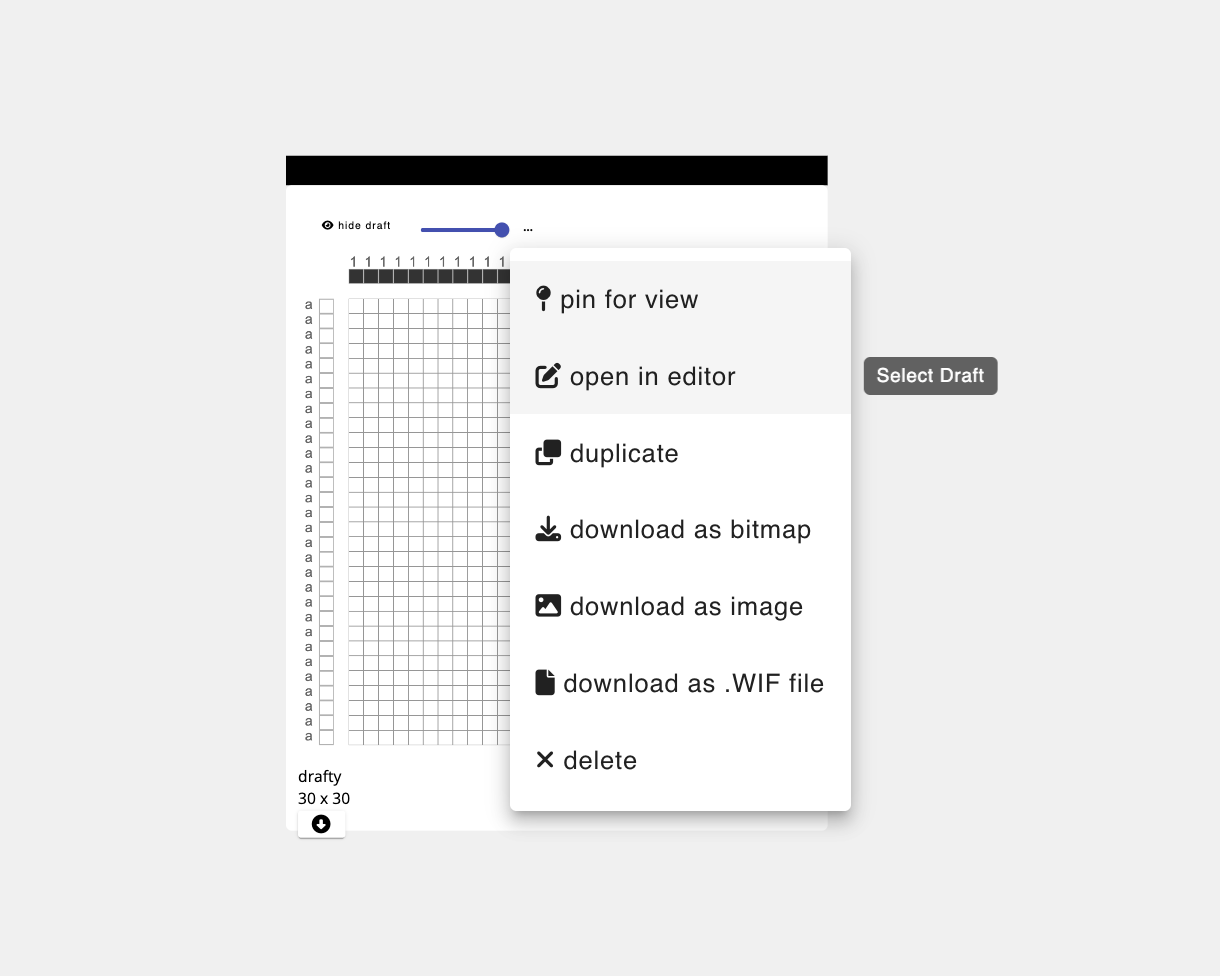
After adding your warp and wefts, and selecting Ok, AdaCAD will drop a new blank draft onto the workspace. To edit this draft in more details, double-click it and then select “open in editor”

And voila, you’ll see the draft in the draft editor. When you get there, just make sure your loom type, which can be adjusted in the left sidebar, is set to “Jacquard”...
...and then select a color from the drafting pencil tab.
If you click the colored squares on the warp with this colored pencil, you’ll assign that color to the respective warp. Repeat the process for each color in your sequence. When it looks like the image below, you have finished assigning the colors!
If you click the colored squares on the warp with this colored pencil, you’ll assign that color to the respective warp. Repeat the process for each color in your sequence. When it looks like the image below, you have finished assigning the colors!
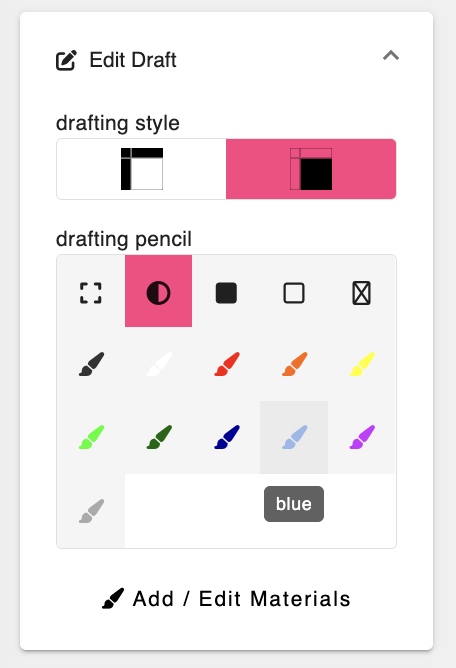
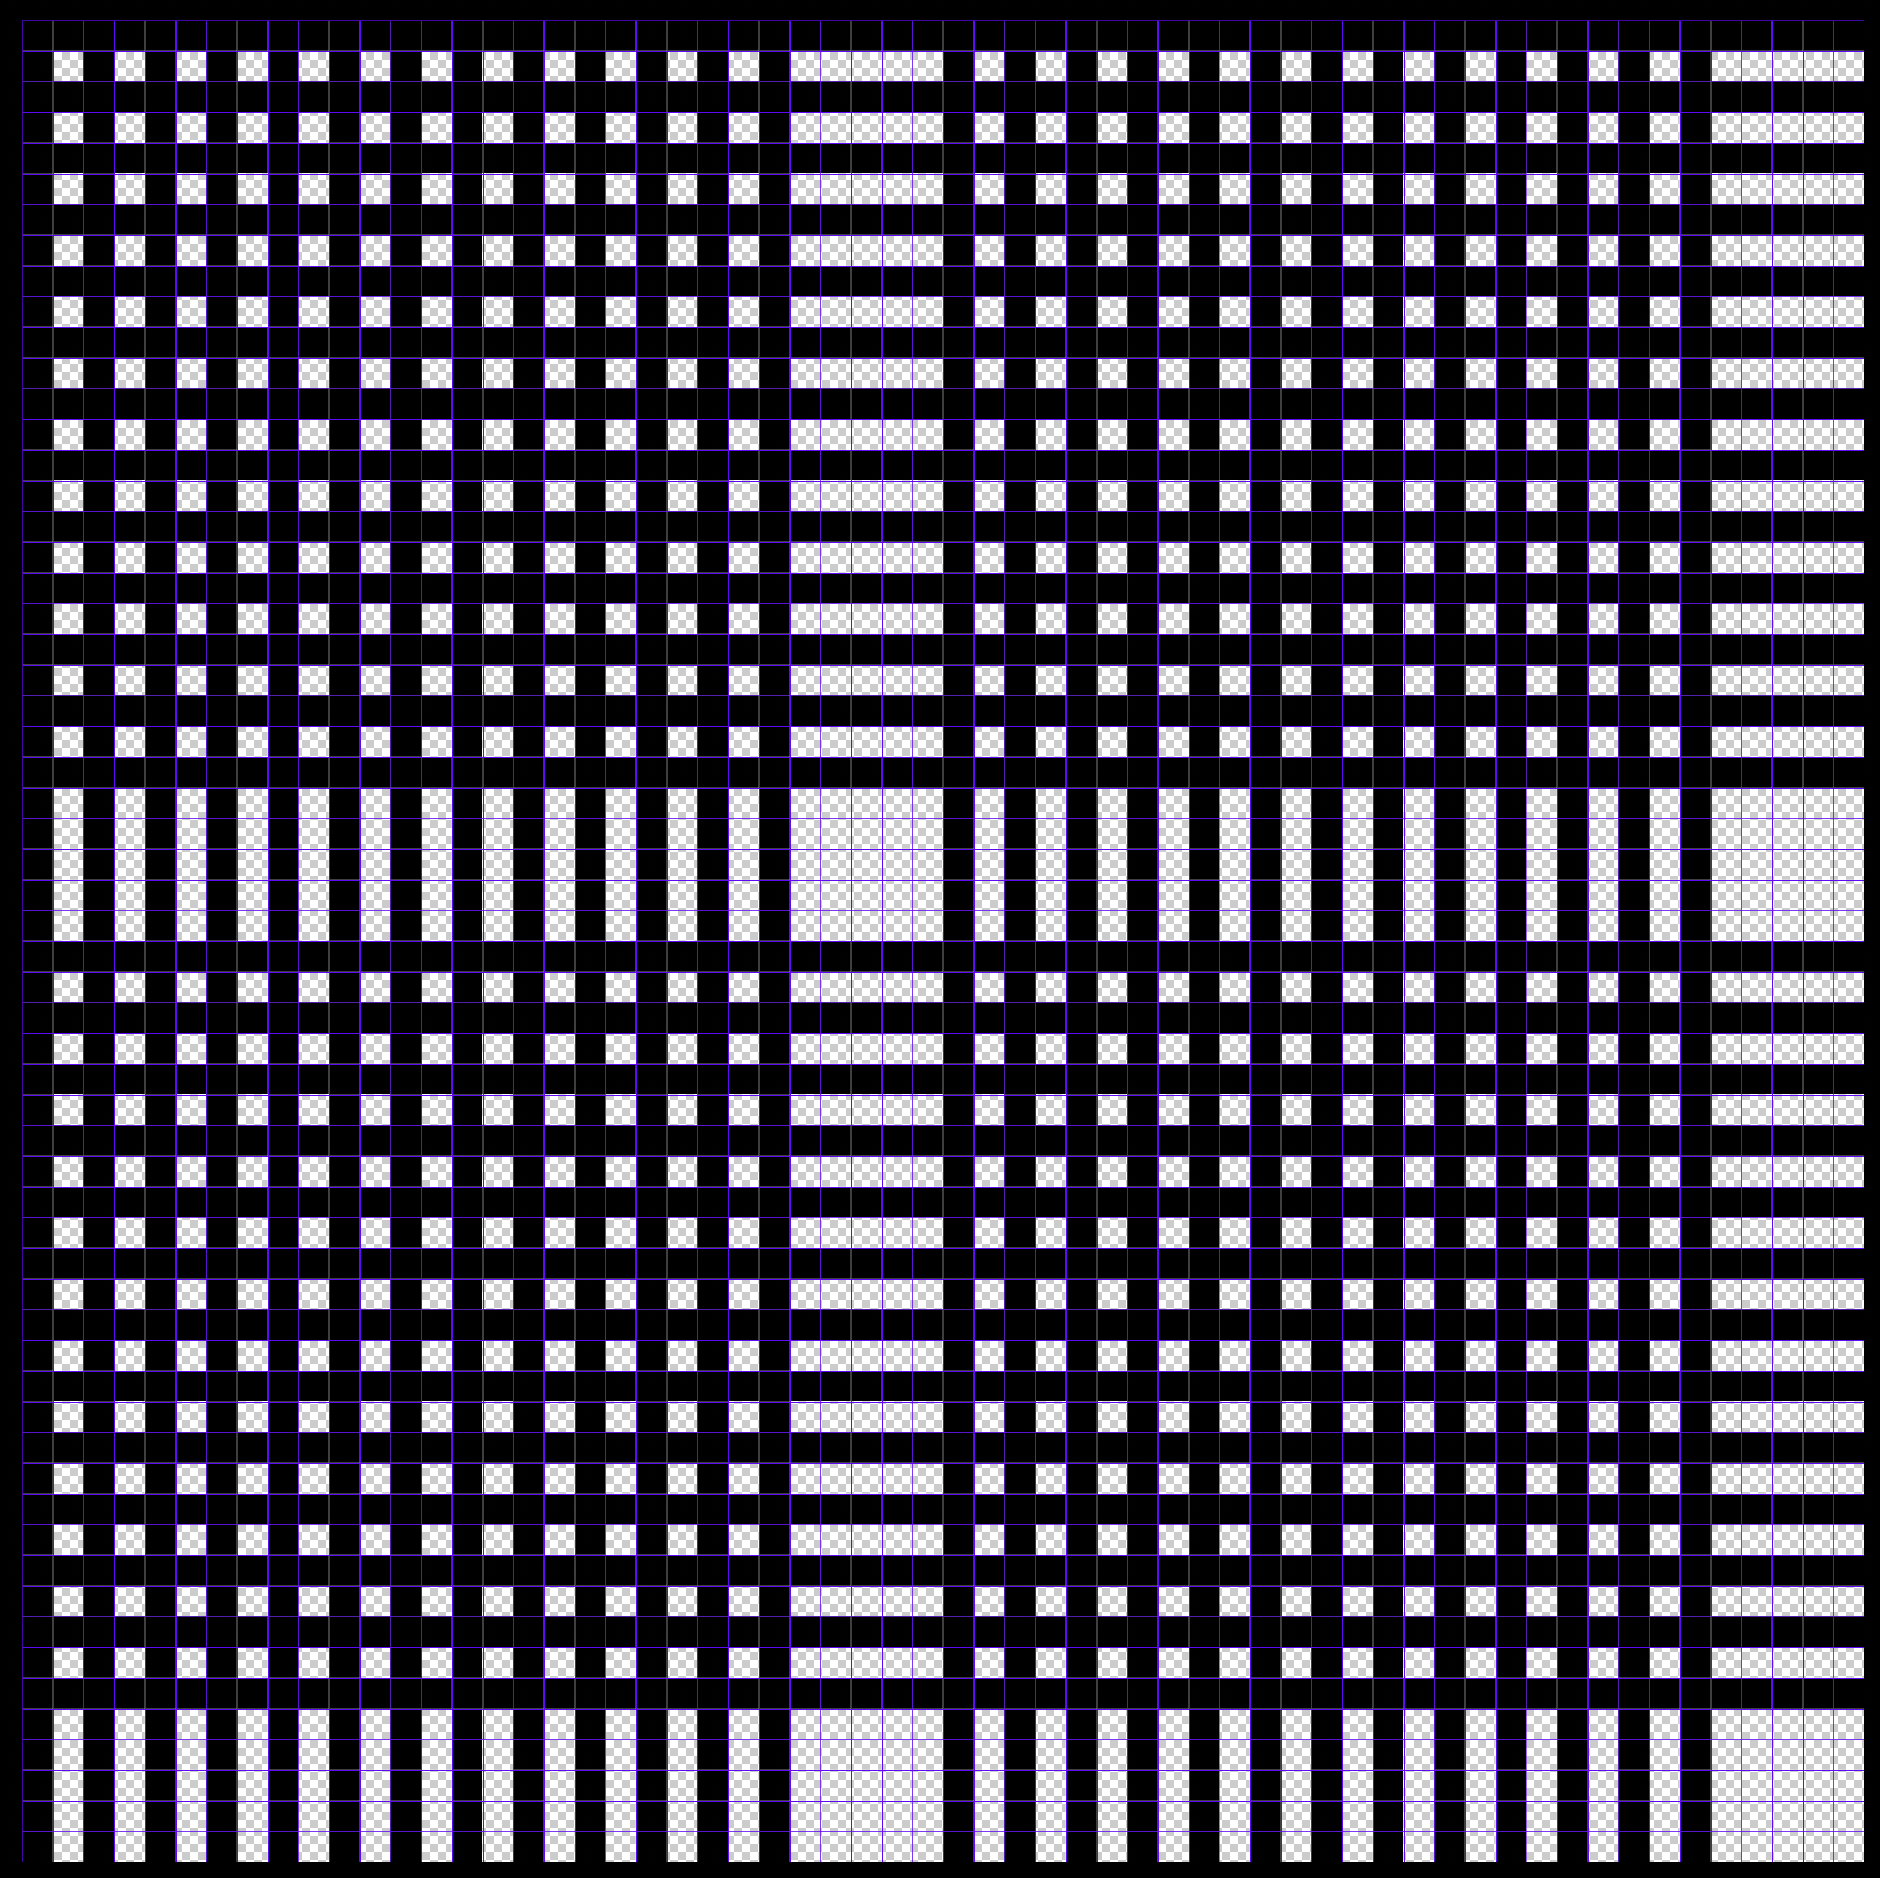
Now it’s time to assign the systems. You see the little numbers above the colored warp boxes? Those define the system to which this warp belongs. Click on the number to increment up to the next available warp system number. See if you can click the warps so they follow this pattern:
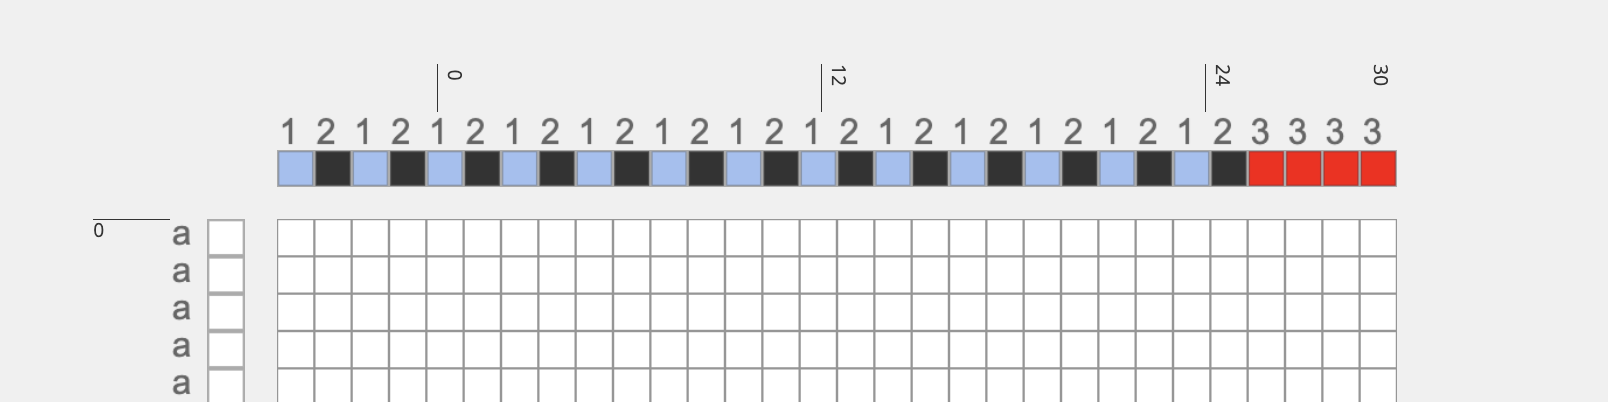
So what we have here is every blue warp assigned to 1, black assigned to 2, and red assigned to 3.
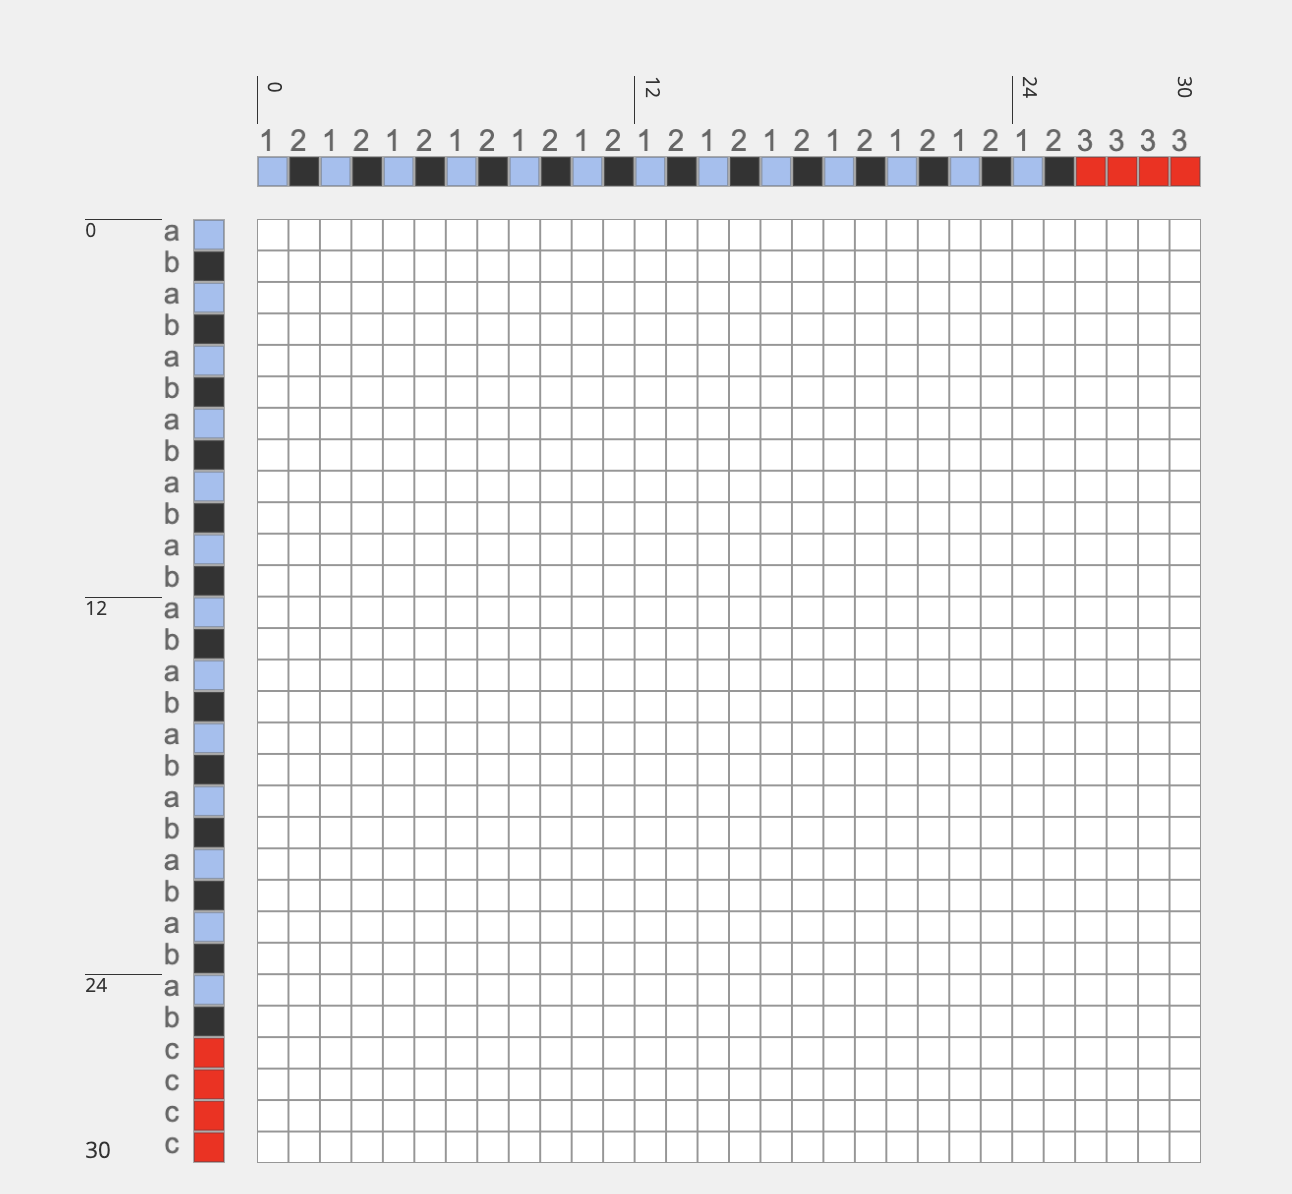
← Repeat the exact same process along the weft until your completed warp and weft system template draft looks like this
Now, toggle back over to the workspace (remember, you can do this by hitting the “workspace” button next to “design modes:” in the top bar.
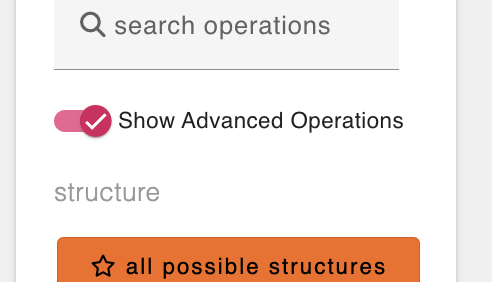
Once you are back in the workspace, it’s time to assign structures to our warp and weft systems template using operations. This kind of drafting is considered “advanced” in AdaCAD so make sure you set the toggle next to “show advanced operations” to on.
Once you are back in the workspace, it’s time to assign structures to our warp and weft systems template using operations. This kind of drafting is considered “advanced” in AdaCAD so make sure you set the toggle next to “show advanced operations” to on.
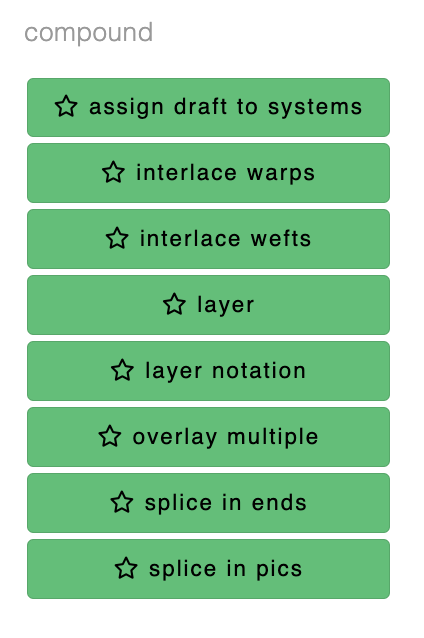
Scroll down the operations list to the section of green operations under the “compound” header. Click on the “layer notation” operation to drop it into your workspace.
Now, connect the outlet of the systems draft you made by clicking the down arrow attached to the systems draft. Connect it to the “systems draft” inlet of the layer notation operation by clicking the inlet labeled “systems draft”. By doing this, you have told the layer notation operation to use the systems draft you created as a template for your design.
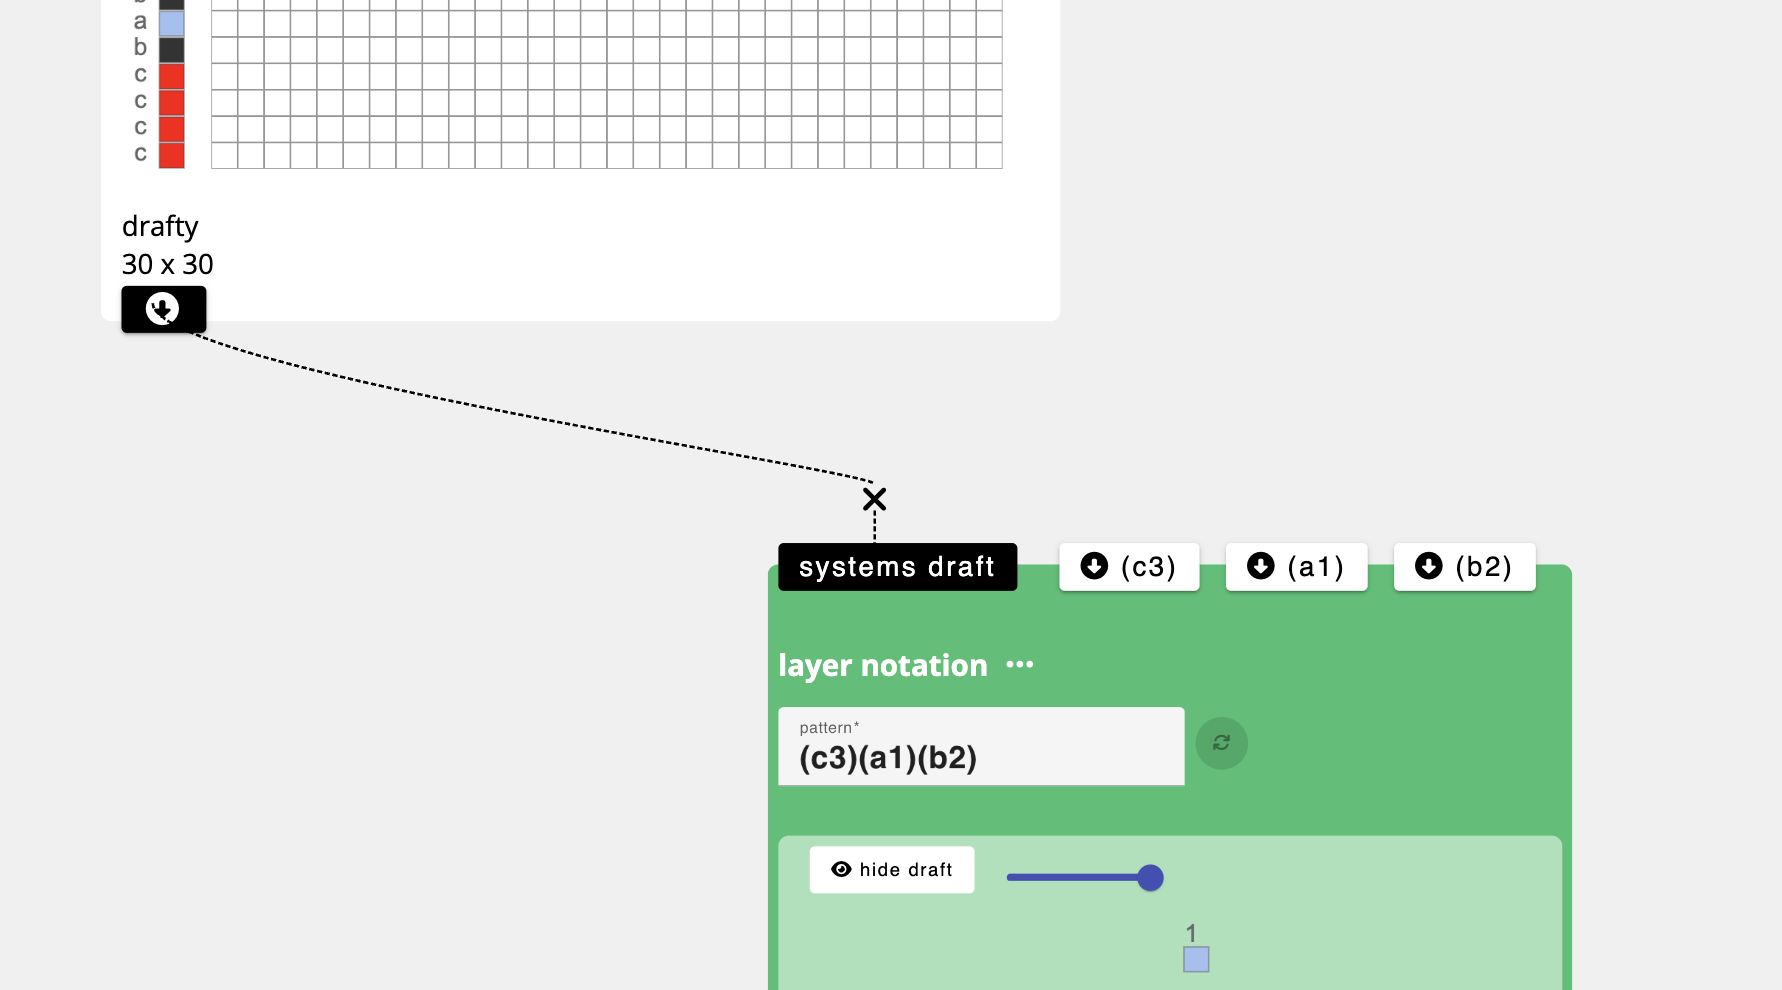
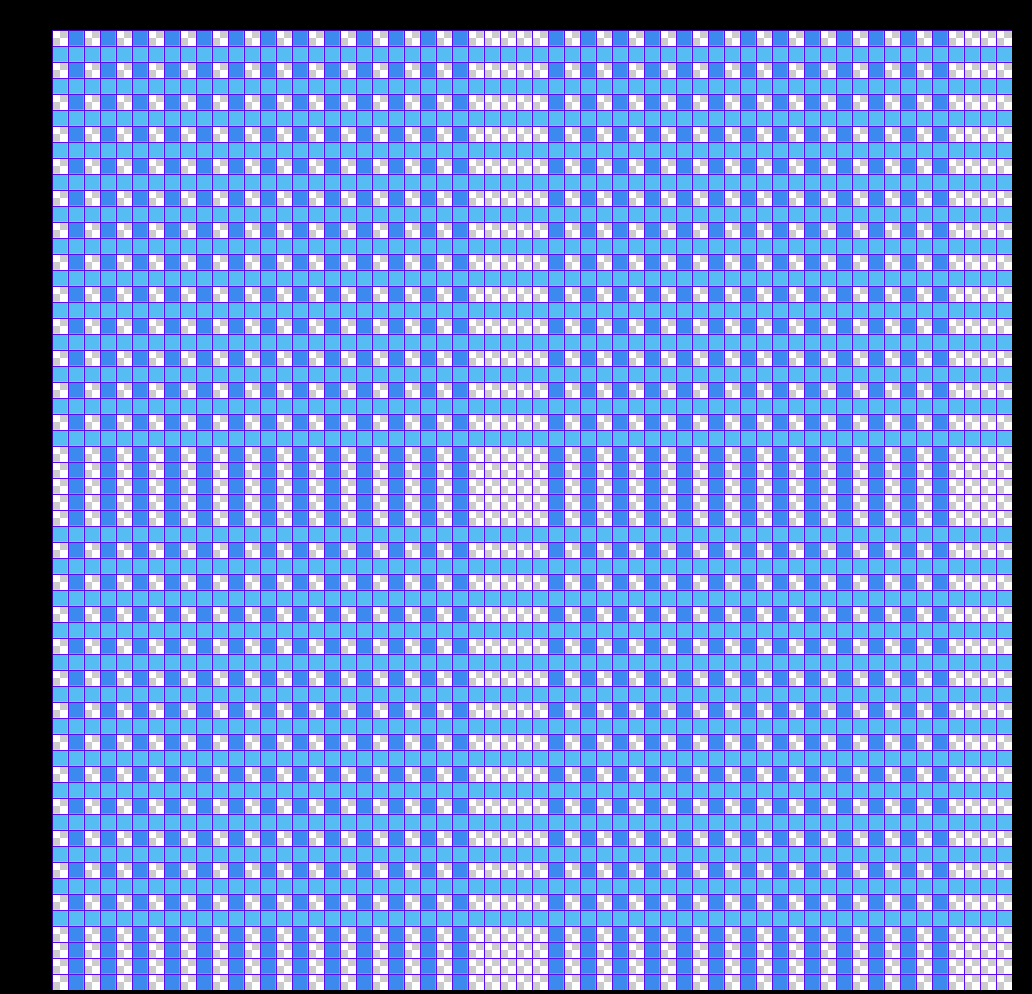
Since layer notation expects some relationship between your systems and the layers in the cloth, you need to enter a line of text that corresponds with your layer relationship. Here I entered “(c3)(a1)(b2)”, meaning, all the red yarns (c and 3) are going to form a top layer, all the blue yarns (a and 1) are going to form the second layer, and all the black (b and 2) will form the bottom. When you hit the pink refresh button, you’ll see inlets appear…one for each ( ) / layer group you defined in the text string. Now, you can connect structures into those inlets. AdaCAD will handle the layers, you just need to say if you want a tabby, twill or whatever in that layer. Let’s use twills for fun.
Select the “twill” operation from the category of structure operations. This will pop a twill operation onto your workspace. Go ahead and click that twill 2 times so you have 2 different twill operations on your workspace. click “tabby” once, so you also have one tabby operation.
Adjust the parameters of each tabby and twill operation to your desire (or match the picture below if you like to keep things simple) and connect the outlet of each structure operation to one of the inlets of the layer notation operation. In the image below, we’ve assigned tabby to red / c3, a 3,3 S twill to the blue/a1 and a 3,3 Z twill to black/b2.
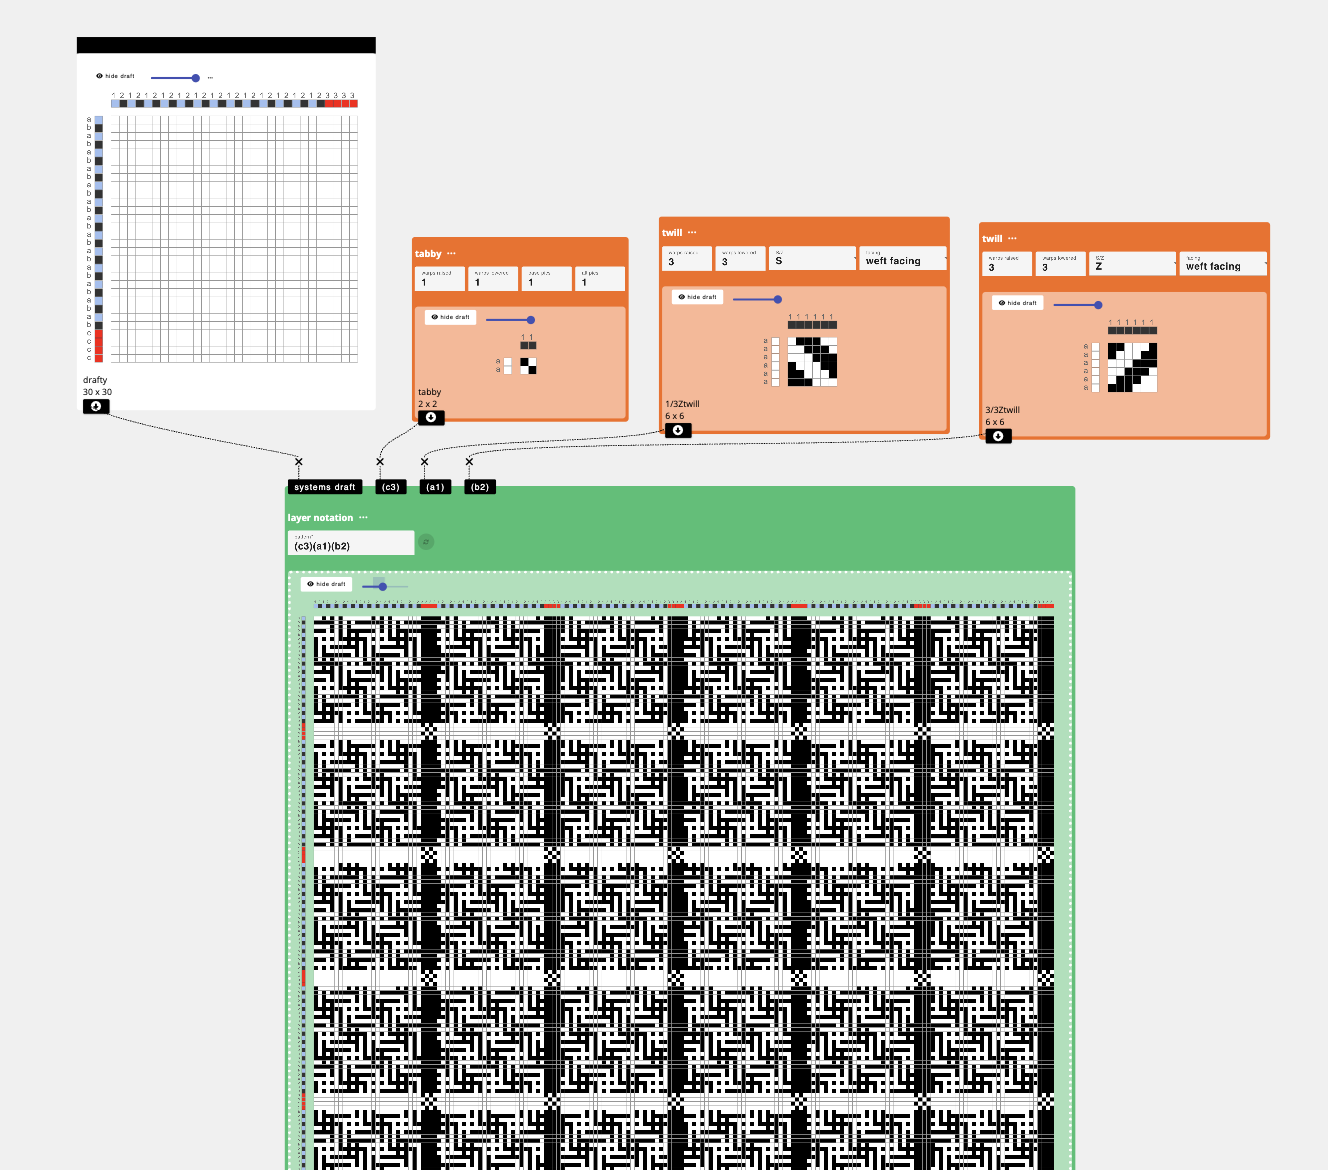
Voila, your draft has been created. Why, you might ask, is it so large? Well, AdaCAD automatically calculates how many times the pattern needs to repeat so that every component structure (e.g. the tabby and twills) will cleanly repeat when the structure is tiled.
If you want to save this structure to use later, just double click it in the workspace and select “download to BMP”. Want to change something? you can change any of the parameters and the output will update automatically. This also is true if you update the system map, say, if you want the reds to only come in every 60 wefts, you could just adjust the system map to that sequence. Want to explore different colors, go ahead and change the on your systems draft and they’ll magically update.
If you want to, say, change the pattern so that the blue and black weave on a single second layer and the reds float above, you could just change your pattern sequence to (c3)(a1 b2), hit update, and reconnect your structures like so:
Let’s have a quick test. What pattern text would you use to have:
- The red on the top, black on the second layer and blue on the bottom?
- What about all three on the same layer?
- What if you wanted the black warp to weave with the red weft on layer 1 (top as one weaves), and the blue warps to weave with the blue wefts on 2, and the red warps to weave with black wefts on layer 3?
Using “Assign Draft to Systems” to Open More Space to Play
We can also get interesting combinations of warp and weft colors via “assign draft to systems” instead of layer notation. Here, AdaCAD won’t do anything fancy splitting things into layers. Instead, it will do as it is told—just add one structure to the selected combination of warp and weft systems.
So, for our warp and weft design, you can think of our design as having 9 possible combinations of warps and wefts.
So, for our warp and weft design, you can think of our design as having 9 possible combinations of warps and wefts.
Blue Warps (1)
Black Warps (2)
Red Warps(3)
Blue Wefts (a)
a1
a2
a3
Black Wefts (b)
b1
b2
b3
Red Wefts (c)
c1
c2
c3
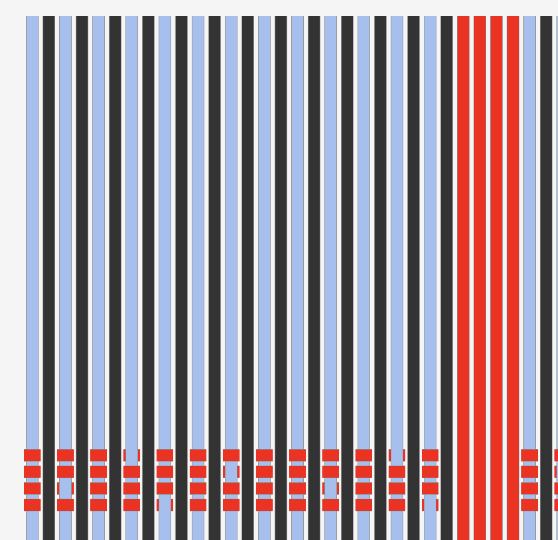
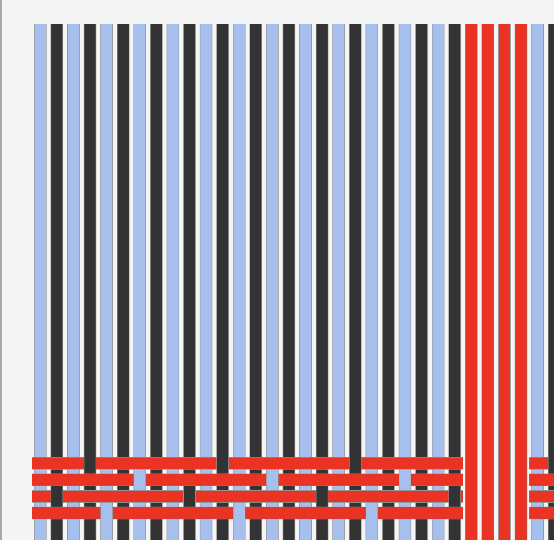
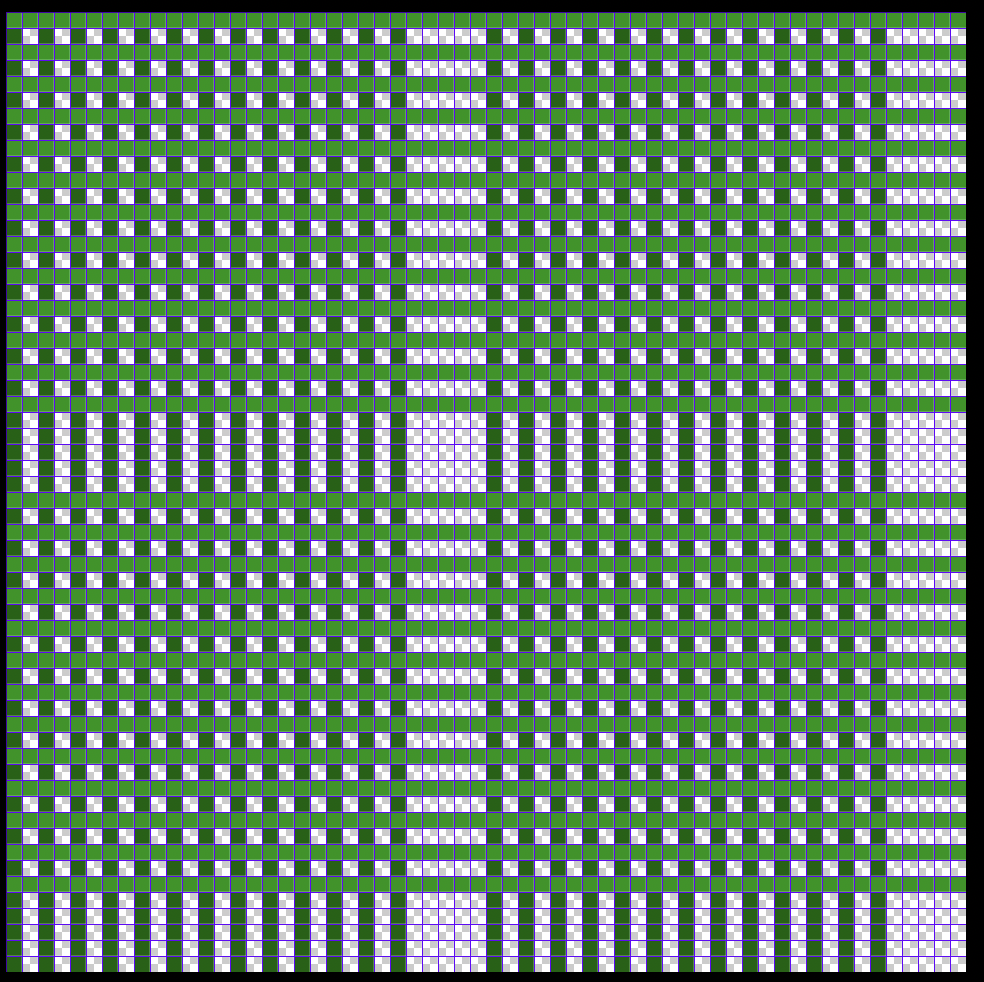
Assign draft to system lets you select a subset of these combinations to add structures. So, for instance, if we assign a satin to c1, you can see how the satin structure is applied only to the red wefts (c) and blue warps (1).
Doing the same, but changing ‘c1’ to ‘c 1 2’ will assign the satin to both the blue and black warps as seen here
I typically repeat this process by adding as many “assign draft to system” operations as required for all combinations of warp and weft systems that I need. I then merge them into a single draft using the “overlay multiple” operation. Specifically, I connect the outlets from each assign draft to system operation I created, to an inlet on just one overlay multiple operation. Any unassigned system combination will be interpreted as a warp lowered.
In the image below, I created five different assigned drafts to system operations. Each one gets the system map we created as one of the inputs. The structures as assigned as follows (from left to right)
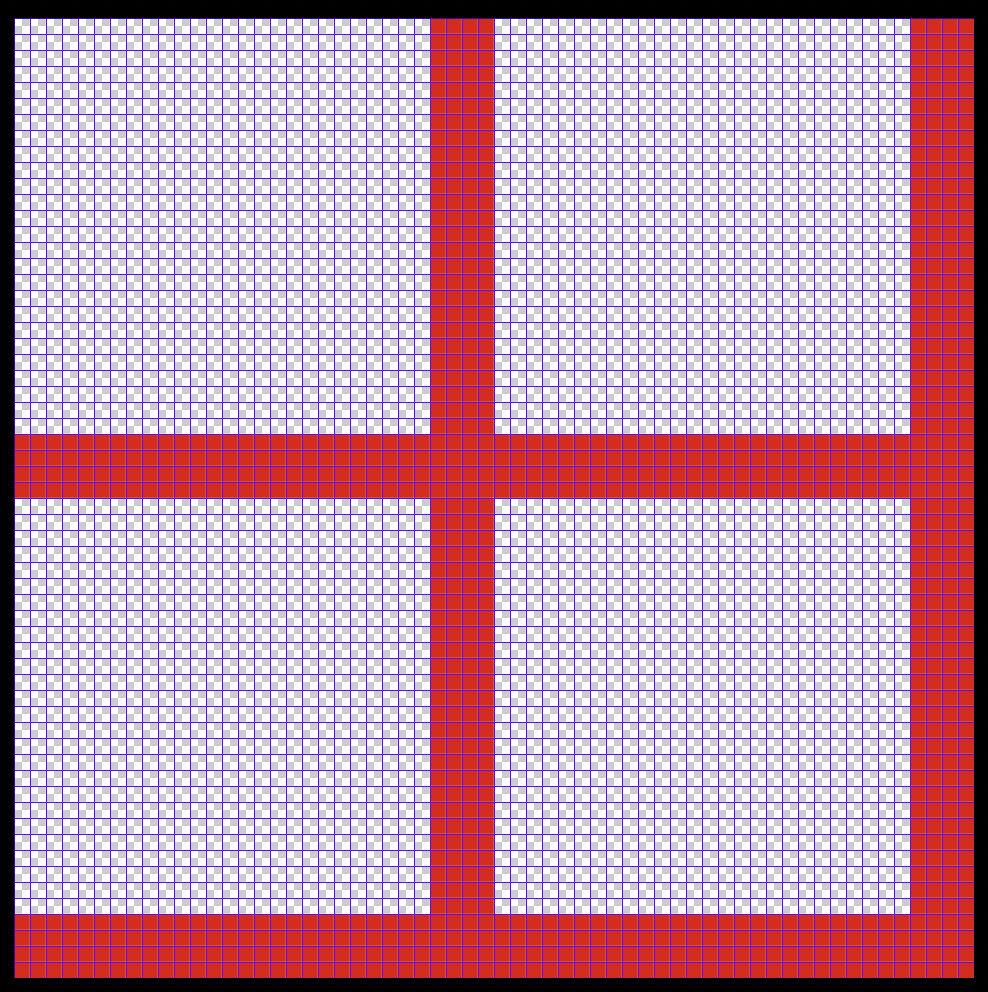
- c 1 2 - weft faced satin → I’m attempting to make the red grid lines really pop
- a b 3 - warp faced satin
- c 3 - basket
- a 1 2 - weft faced S twill → I’m attempting a two-faced twill in the big square
- b 1 2 - warp faced Z twill
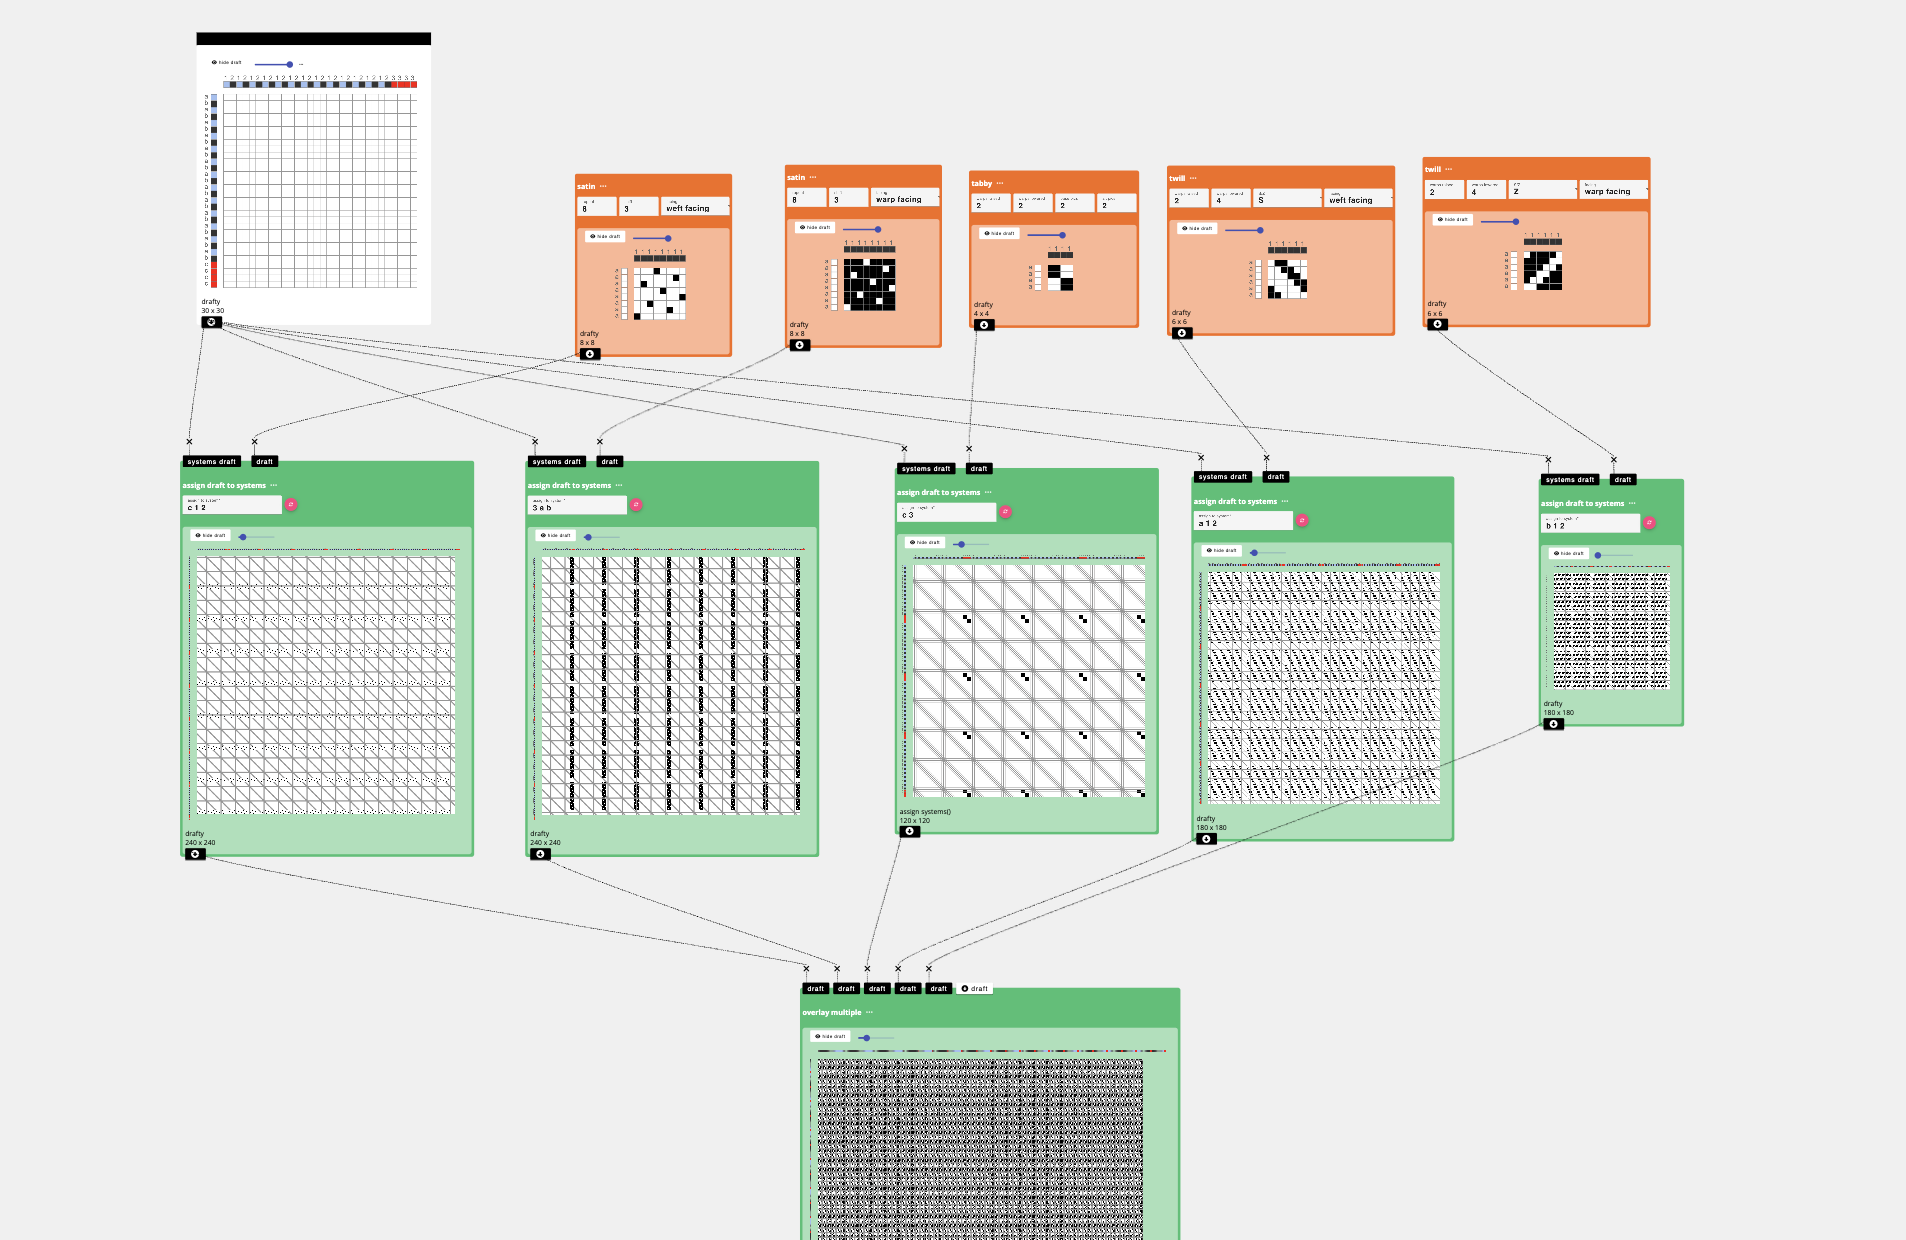
I drop them all into the overlap multiple operation and out came the result →
Chapter 6: On Designing Templates for Photoshop
Poppy DeltaDawn
I am going to show you how I design a doubleweave for the TC2. From there, you can edit your template to create more complex or customized structures. I am using Photoshop 2025 with a Macbook Pro, here! It is helpful to have a cursory knowledge of Photoshop and a cursory knowledge of weaving drafts. You can refer back to the first segment of this Digital Weaving to Save the World: RATIO!
First, let’s make the warp and weft design template.
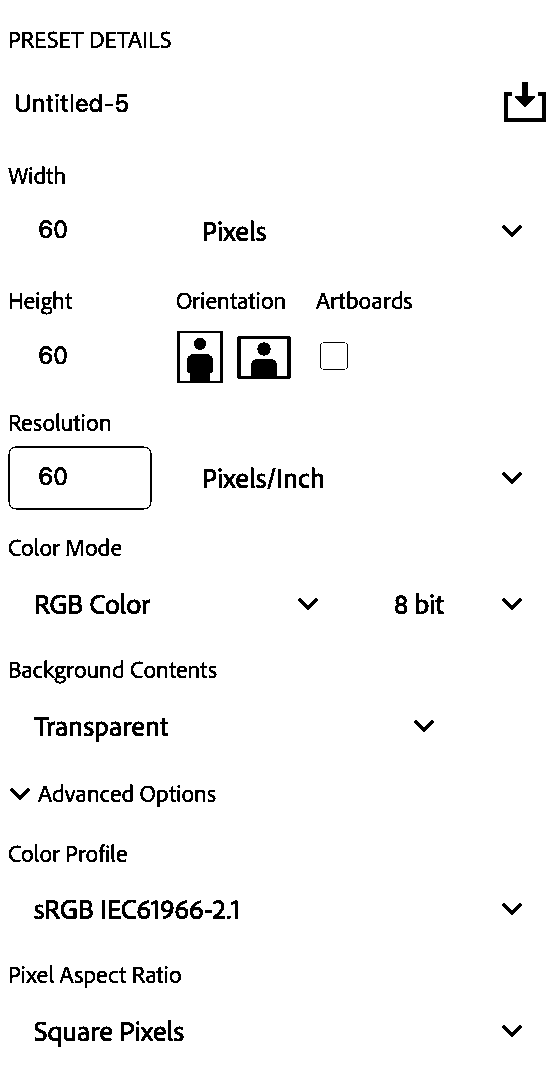
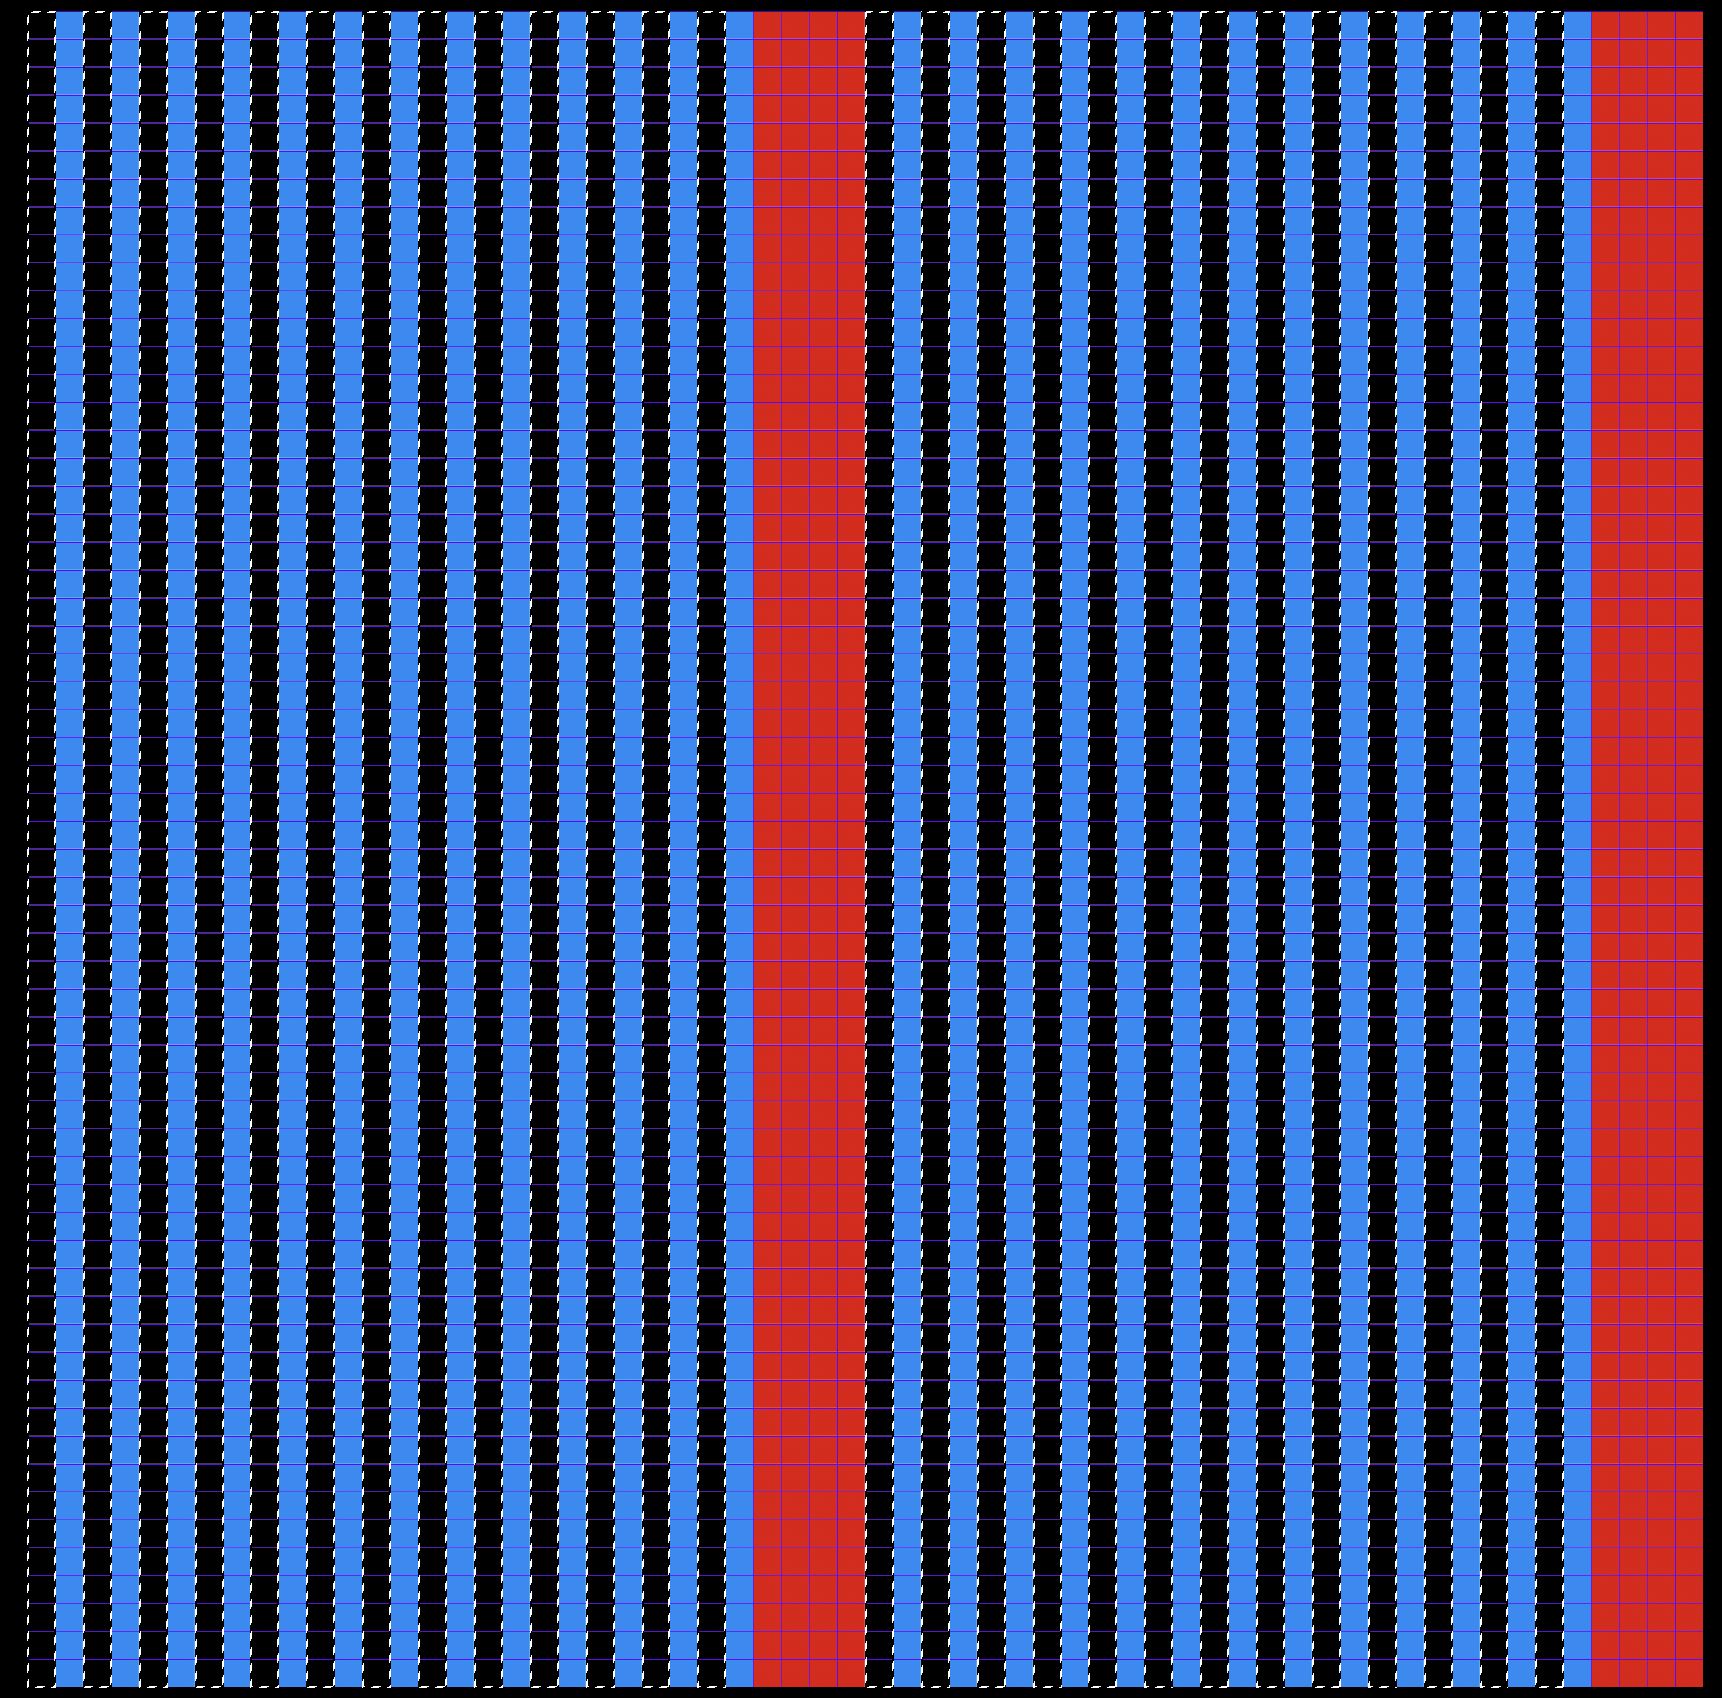
Open Photoshop and make a new document. This will be 1 pixel width, and the Unstable Design Lab (UDL) warp had 30 threads in a sequence. So:
the width will be 30 pixels and the height will be 1 pixel.
The resolution should always match the loom’s EPI. Ours is 60.
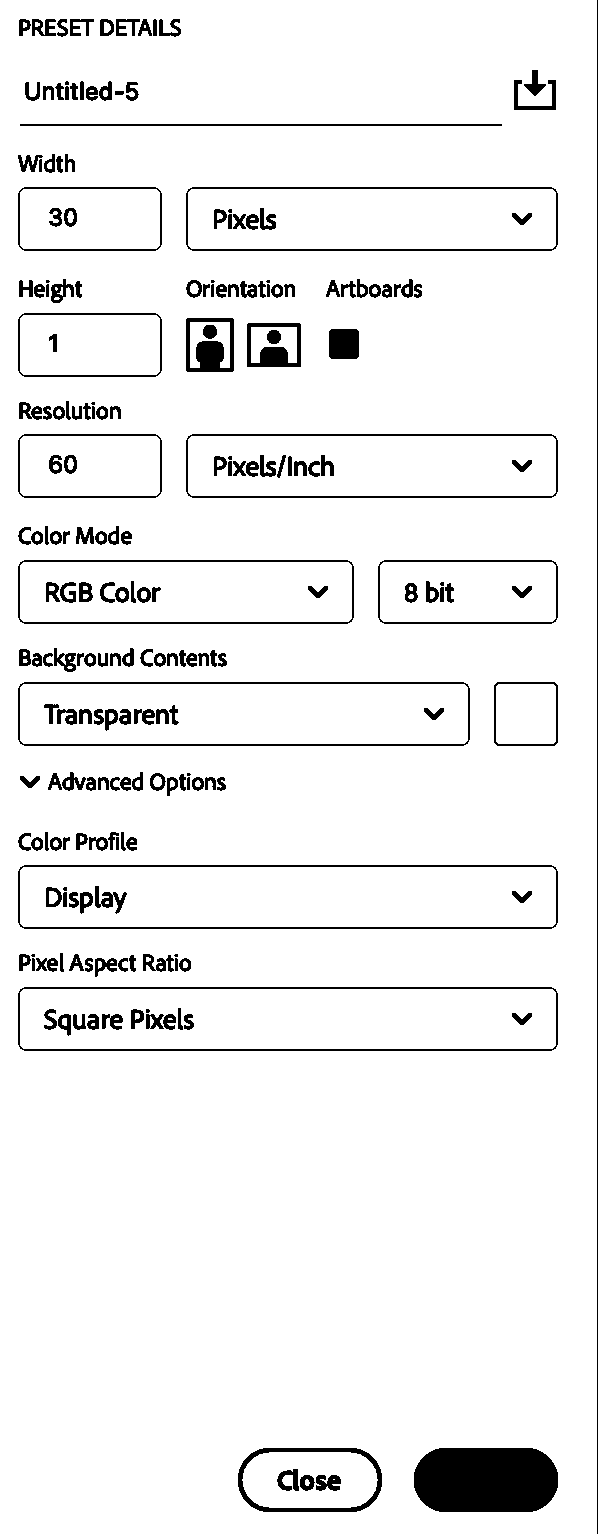
Make sure that Transparent is selected on the background contents and RGB color, 8 bit is selected. Ensure that Pixels/Inch is selected (a common mistake: inches selected).
Once the document is open, fit it to your screen (command+0)
Turn on your pixel grid (command + ’ )

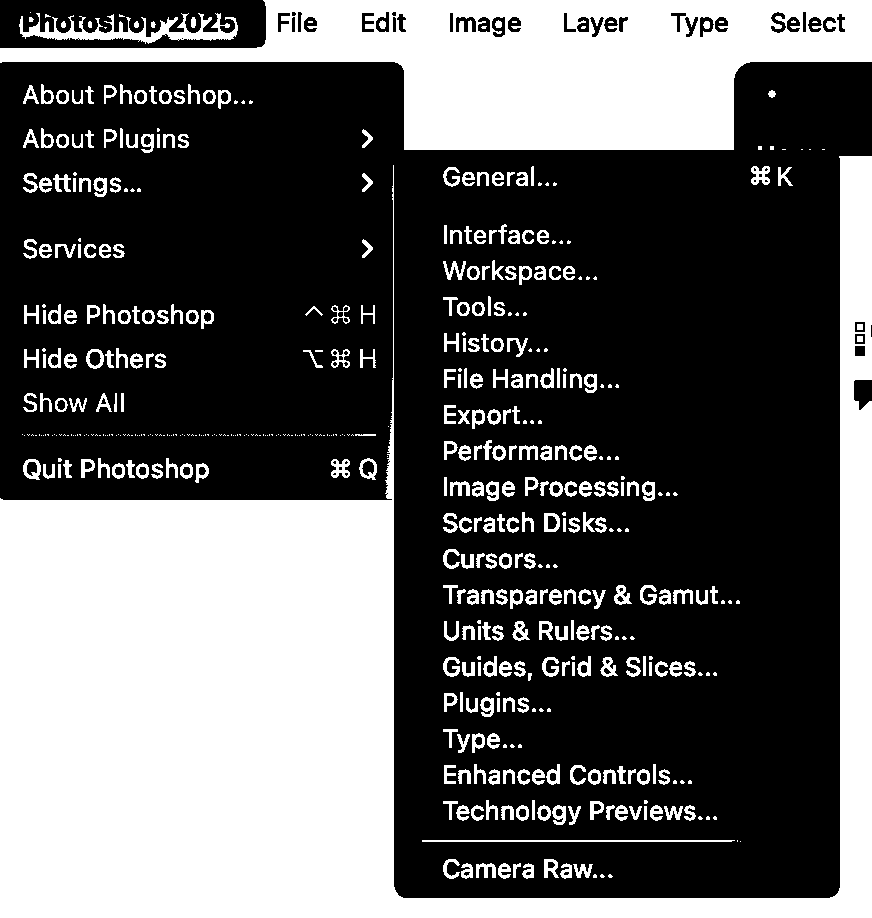
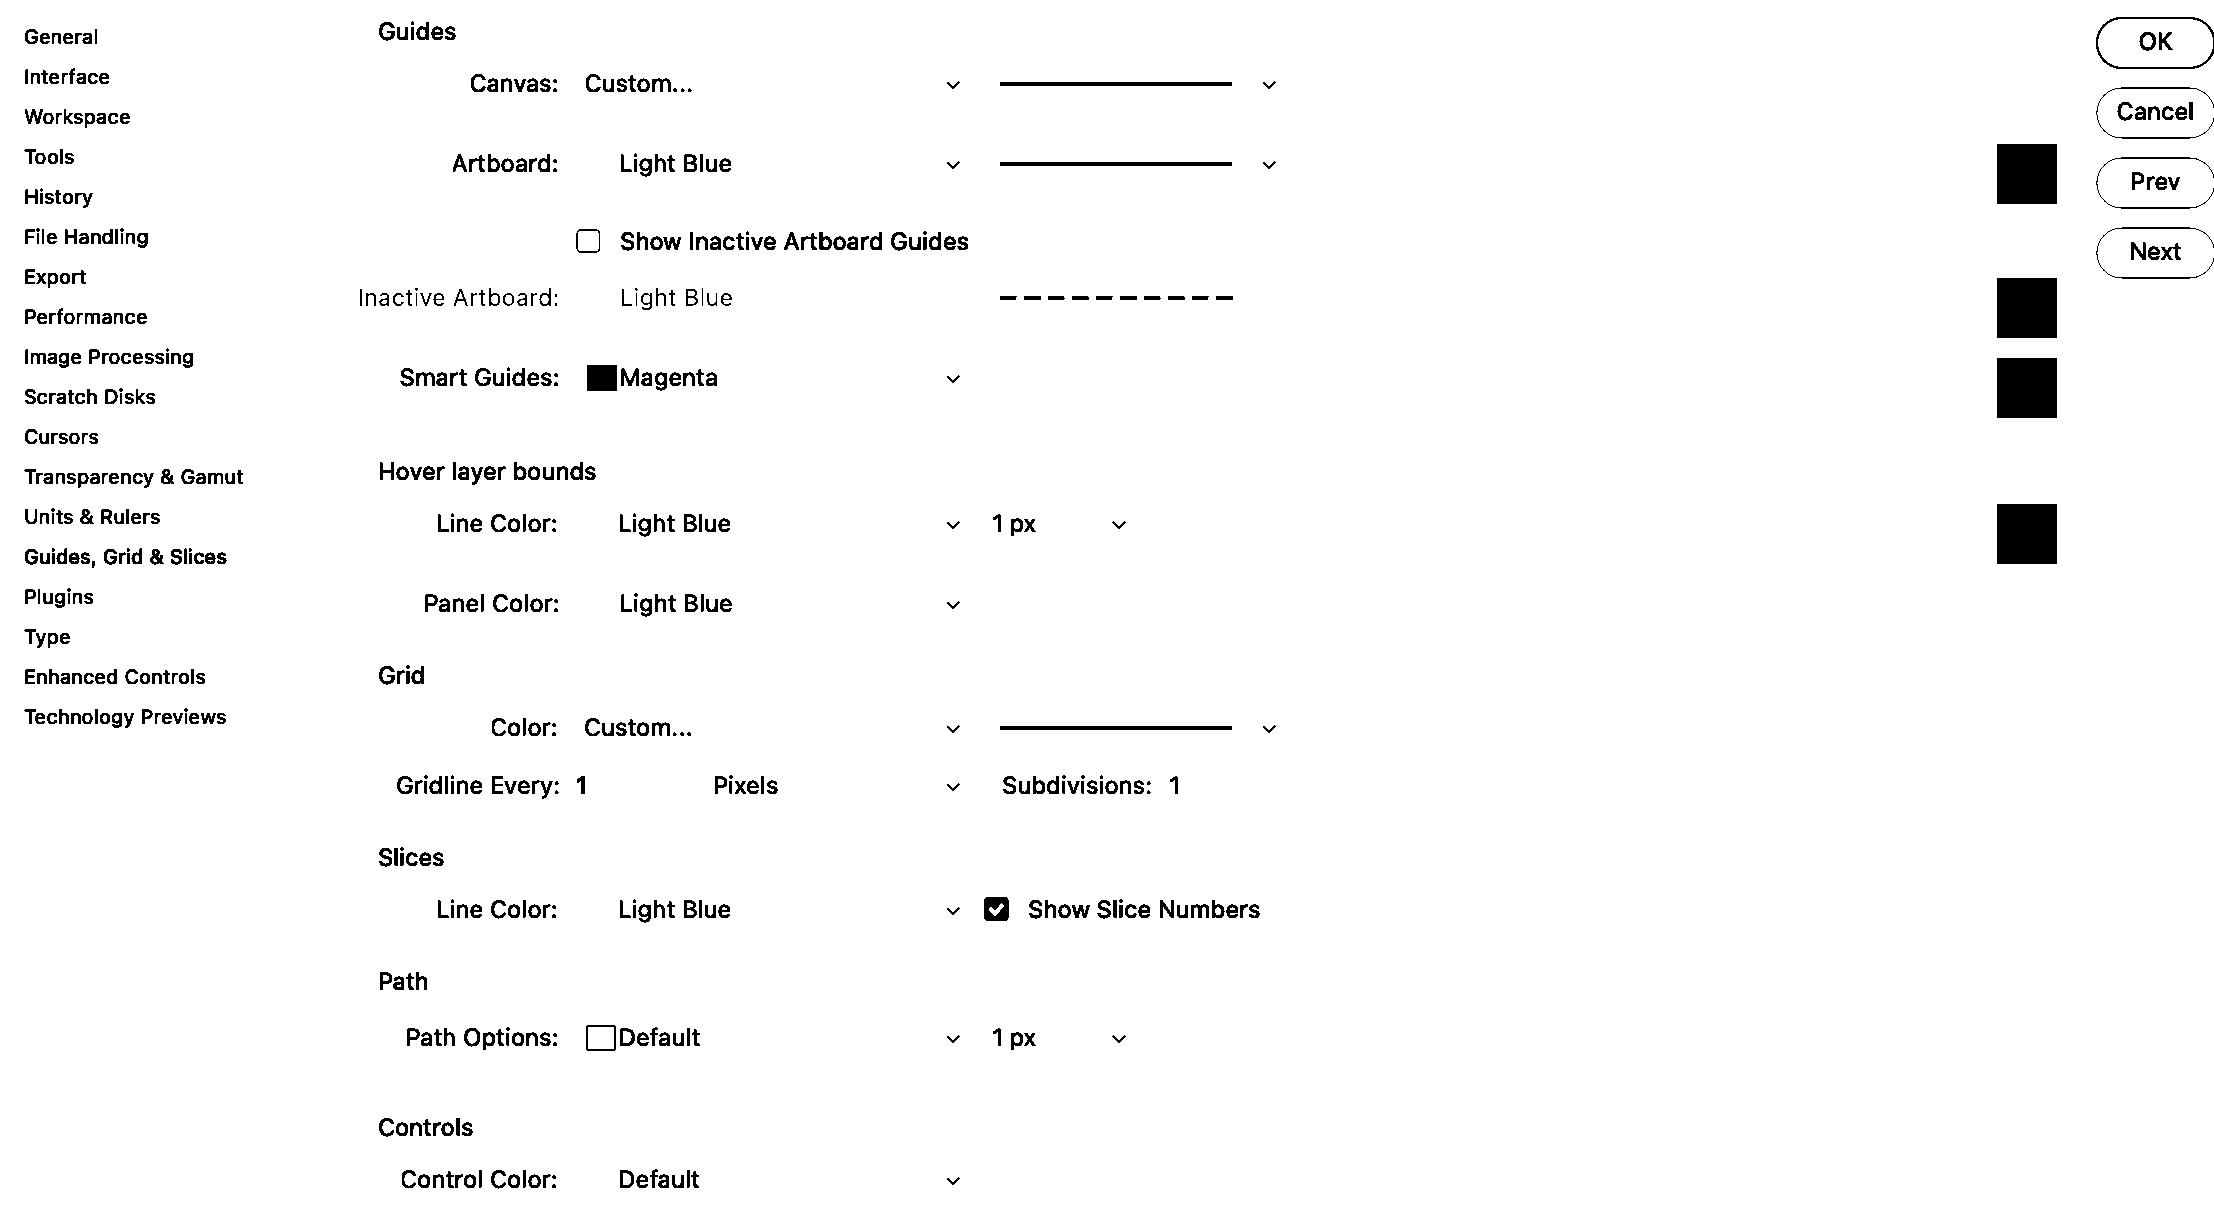
If you don’t have the pixel view pictured here, you will need to open your photoshop settings and adjust the grid in Guides, Grids, and Slices. Make sure that your grid is set to 1 pixel, subdivisions: 1. I use light blue!
Now using the pencil tool (B) set to 1 pixel size (adjust the size of your pencil quickly by using the [ and ] keys).
The pencil tool, not the brush tool has to be used. The pencil tool is nestled with the brush tool, and to access it, you can hold down the brush icon until the dropdown menu pictured here appears.

Now make a beautiful representation of your warp design! If you are using a monochrome warp, select a bright color to represent the warp. Using black and white can get confusing, since black and white are the colors that the loom understands as commands/structure.

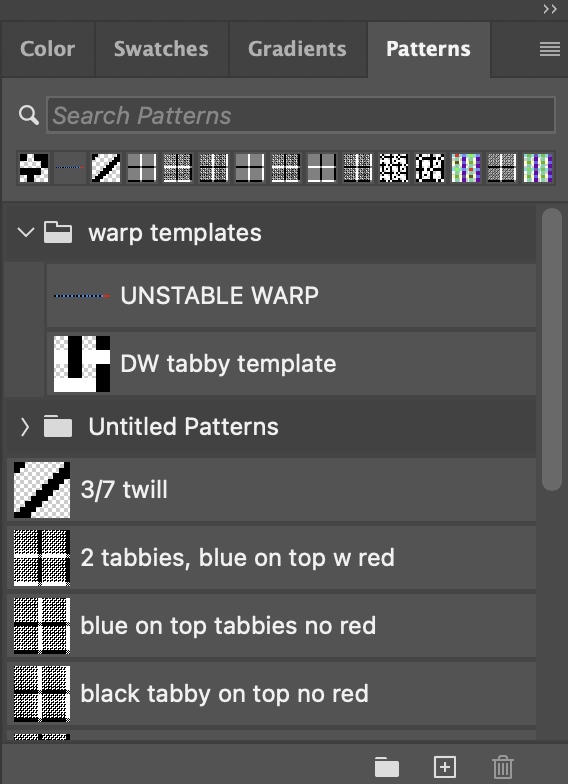
Once you have your warp pattern represented in pixels here (double check: it’s easy to get wrong, and if this is incorrect, all of your work will show it), save it as a pattern in photoshop.
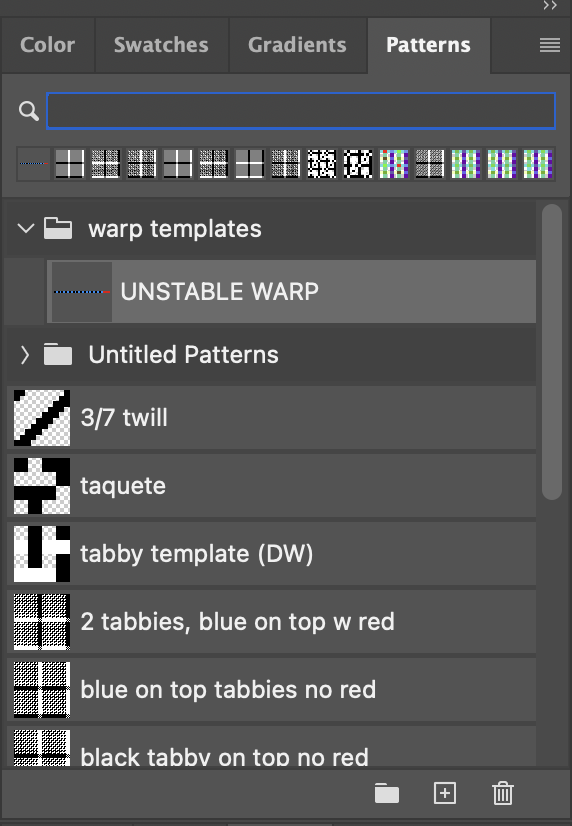
I like to keep my patterns window in the default place that Photoshop has it (top right). I also use the large list view format, so that I can see both the icon and the name of the structure.
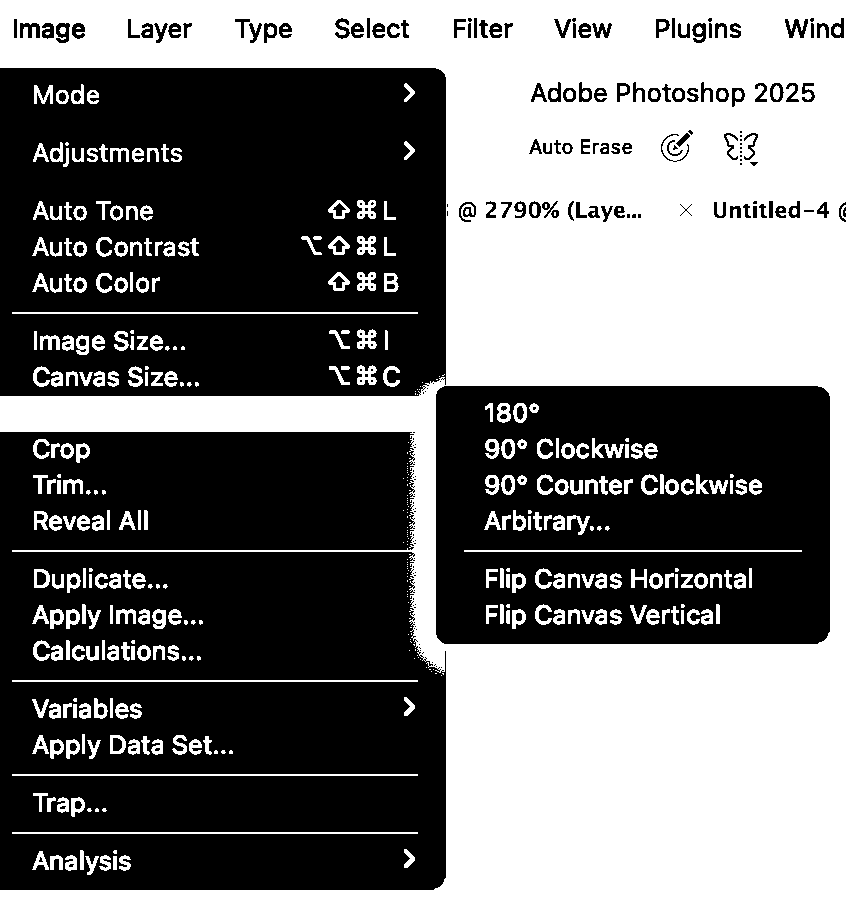
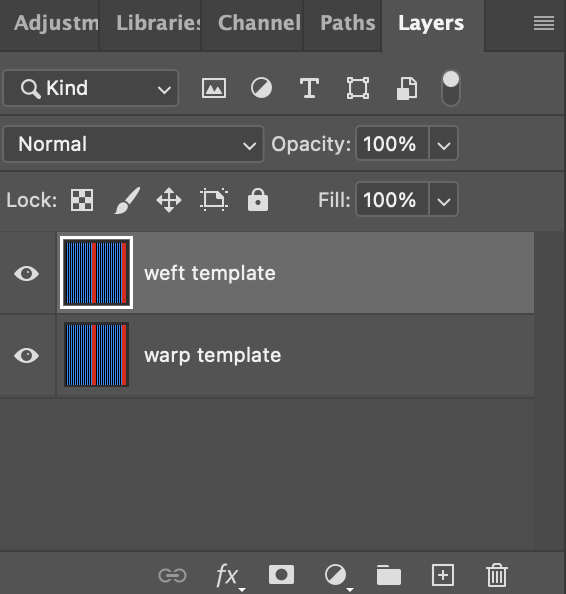
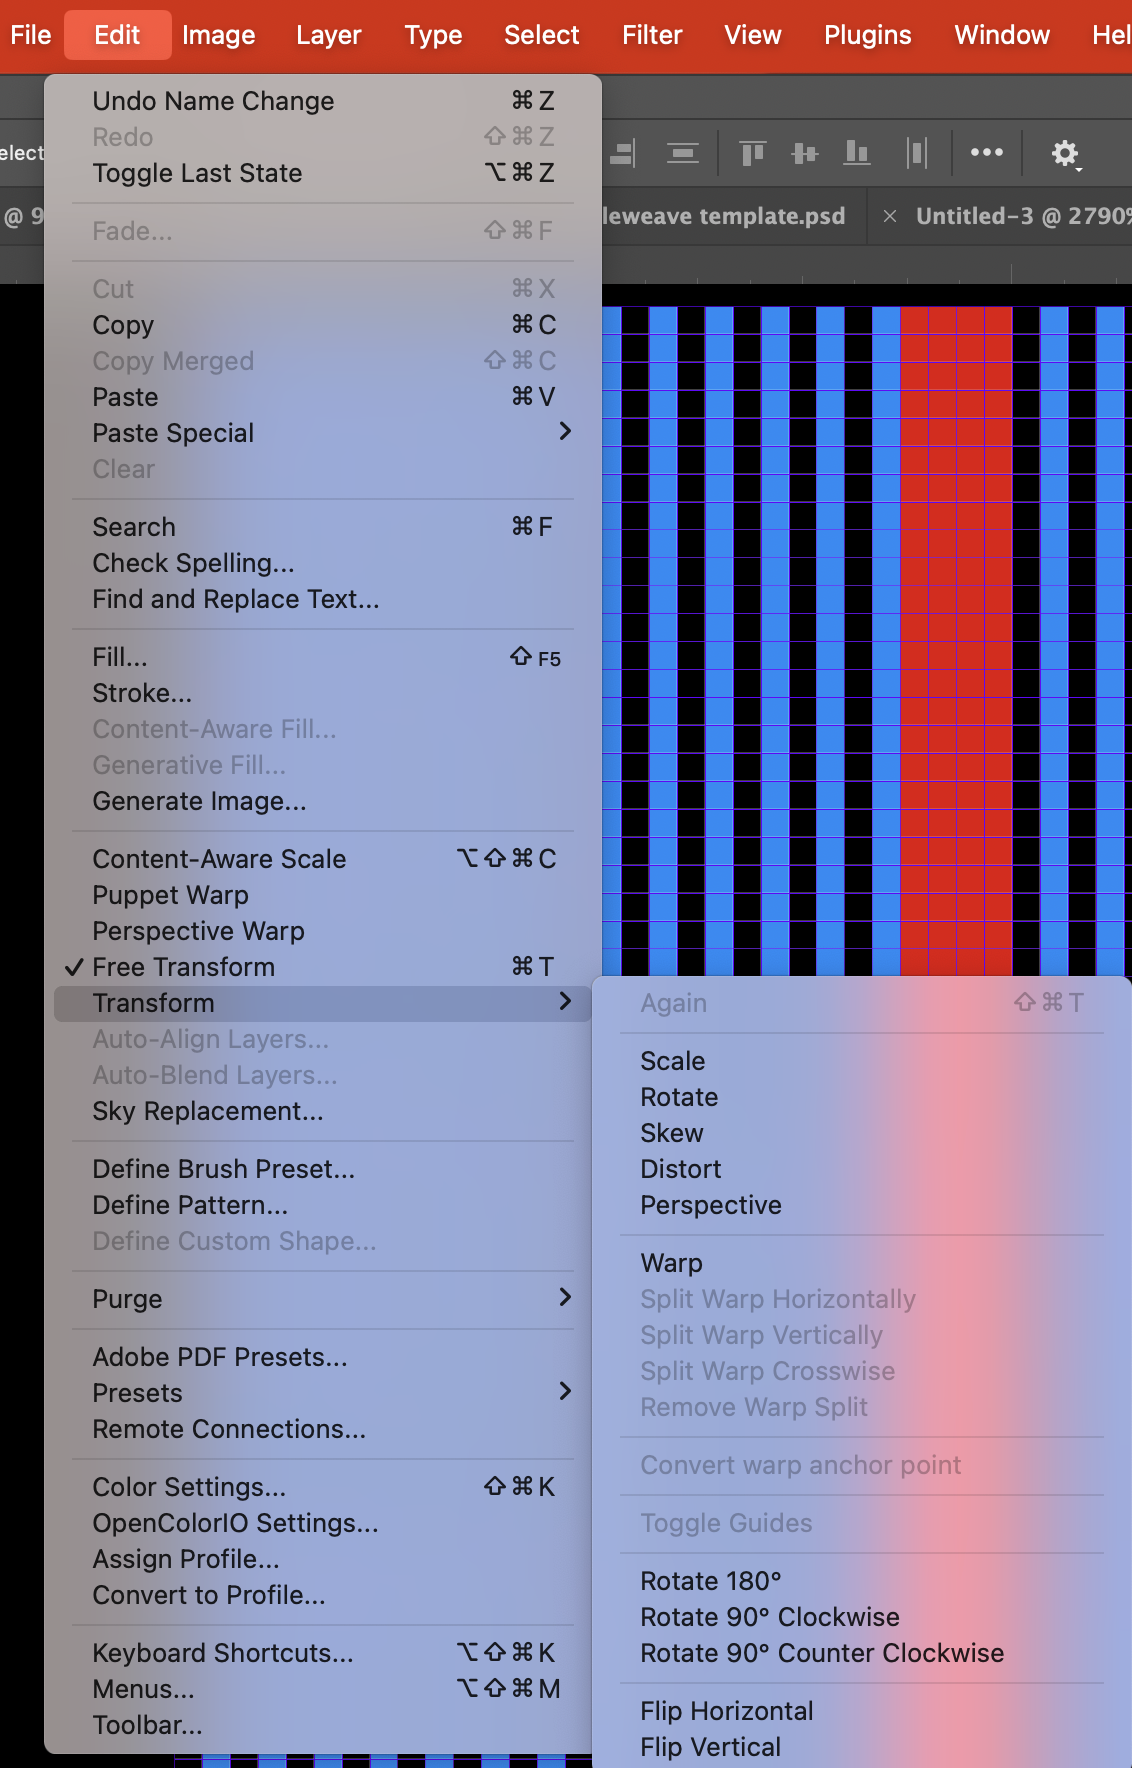
Once you have your warp structure saved as a pattern, go to the Image menu and choose Rotate 90° Clockwise.

Save your weft as a pattern in Photoshop, close without saving, and let’s get the party started.
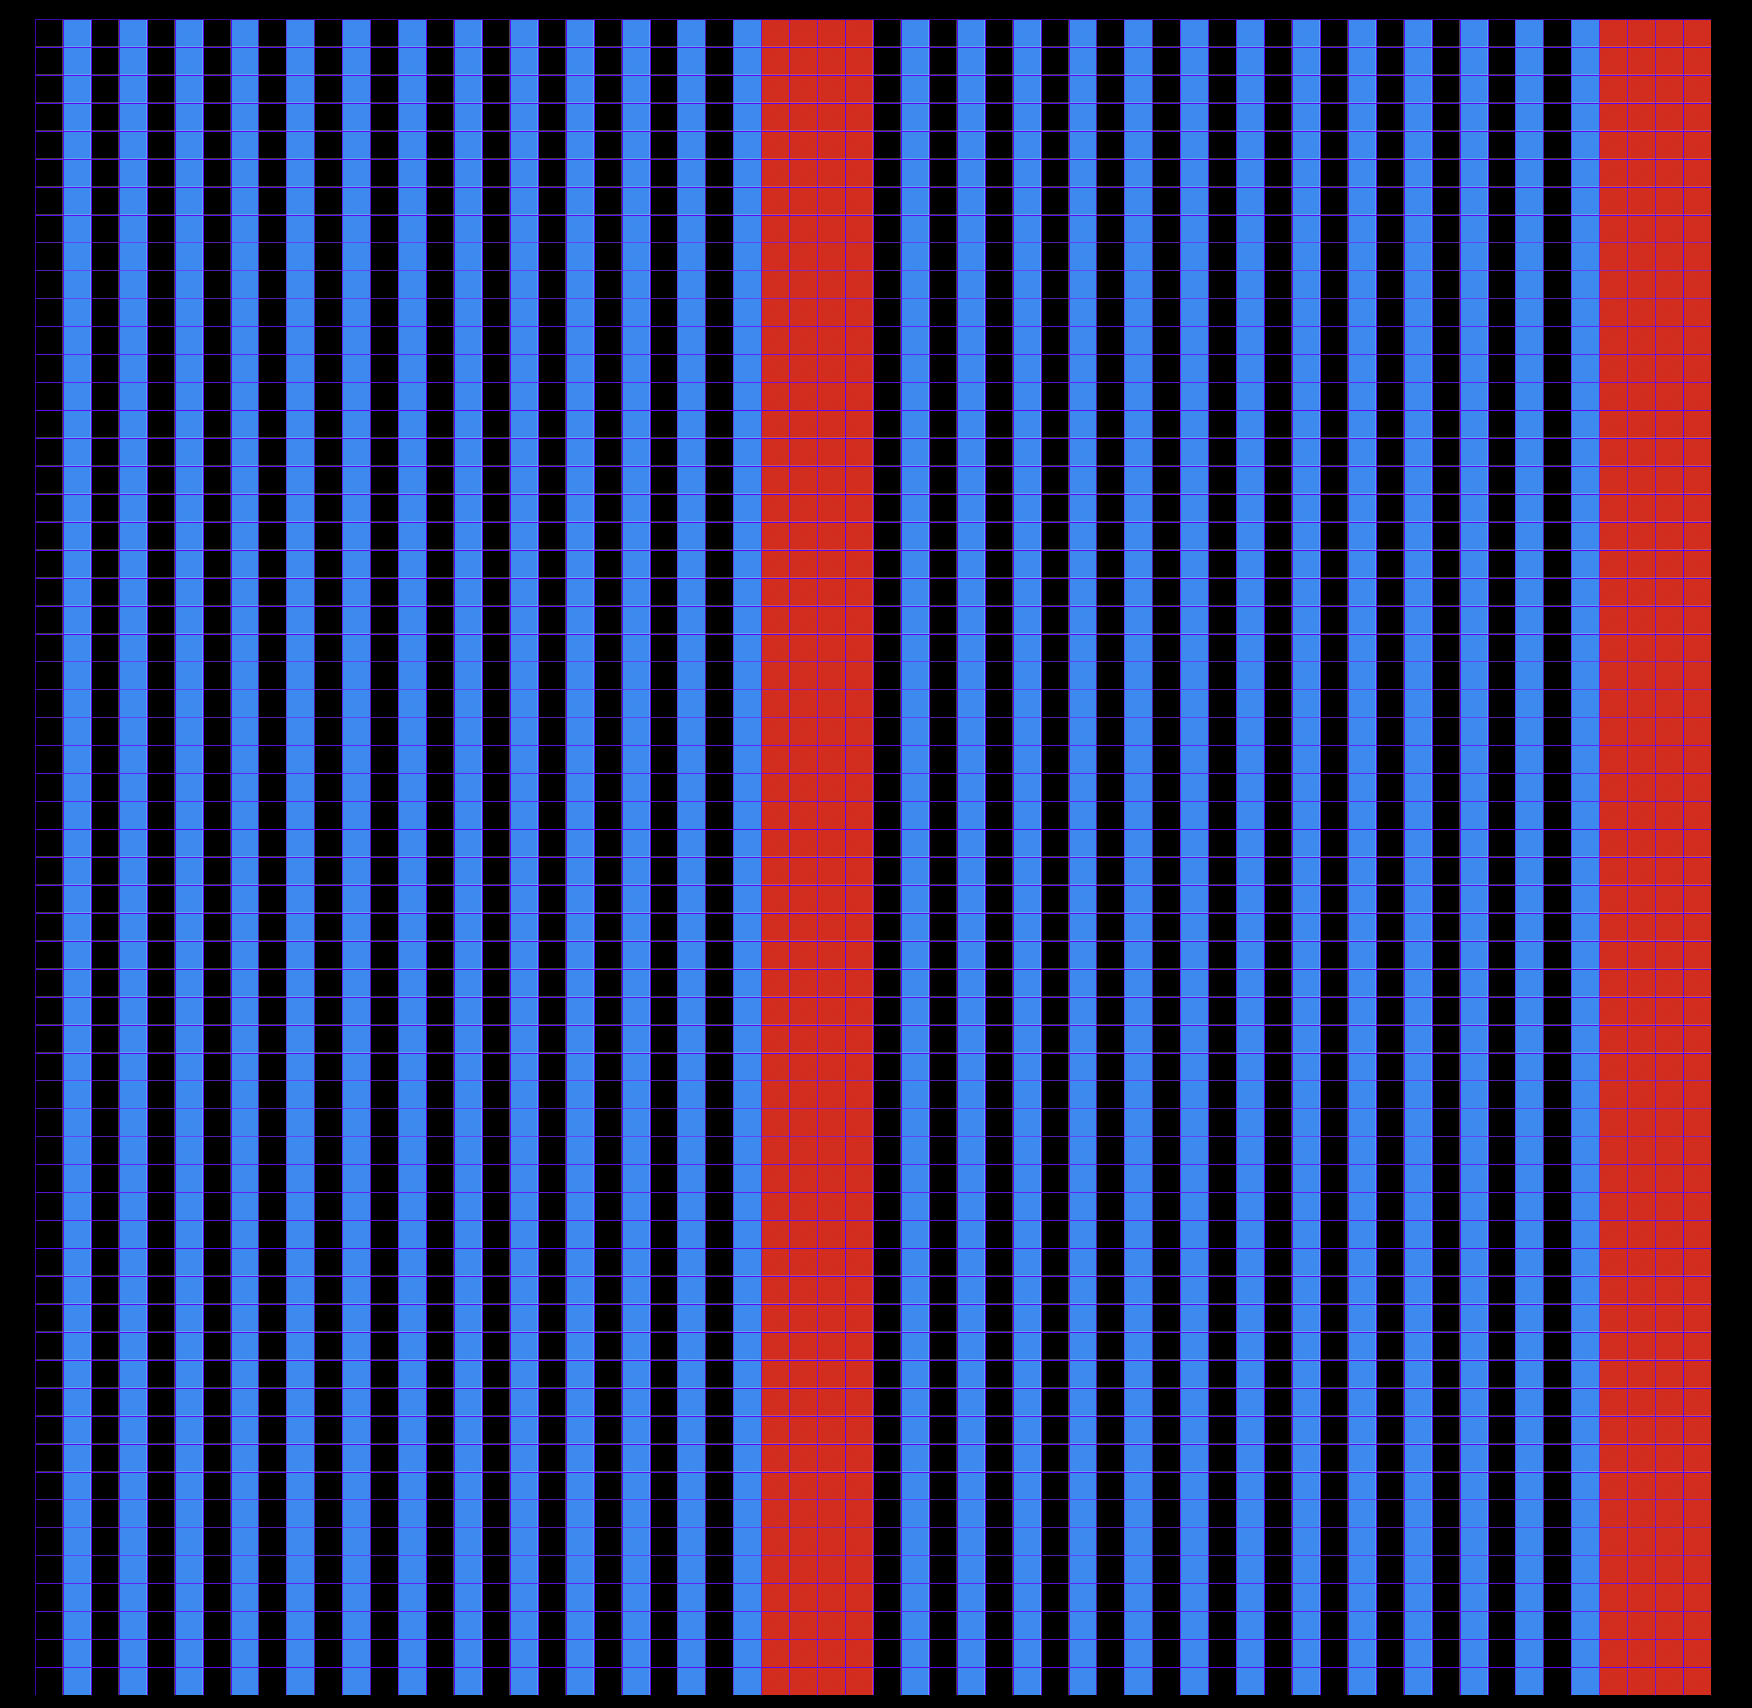
Close out of this document and make a new one. I need to see at least one repeat in the structure that I’m going to make so I understand how the threads repeat their lifting sequence. So since my pattern has 30 threads, I’m going to make my structure template document 60 x 60 pixels. The EPI/resolution coincidentally is also 60.
Fit your image to screen (Command + 0) and turn the pixel grid on if you haven’t already (command + ‘)
Make a new layer (shift + command + N) and click your new warp template from the patterns window.
Make a new layer (shift + command + N) and click your new warp template from the patterns window.
Now merge the two layers so that the warp is rasterized and we can work with the colors (Command+ E while the top layer is selected).
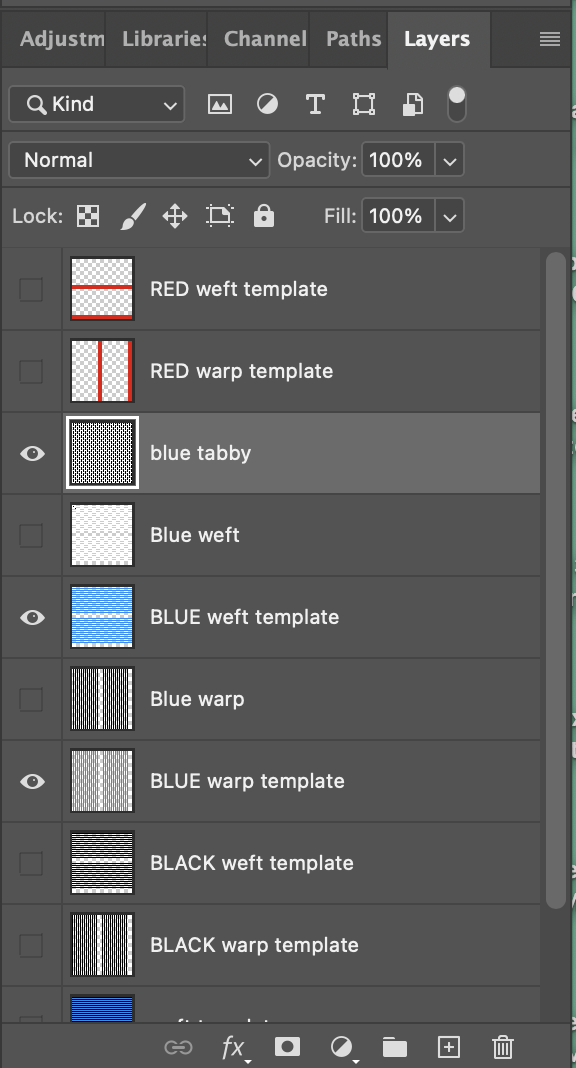
Make a copy of the layer (Command + J) rename the first layer warp template and the second layer weft template.
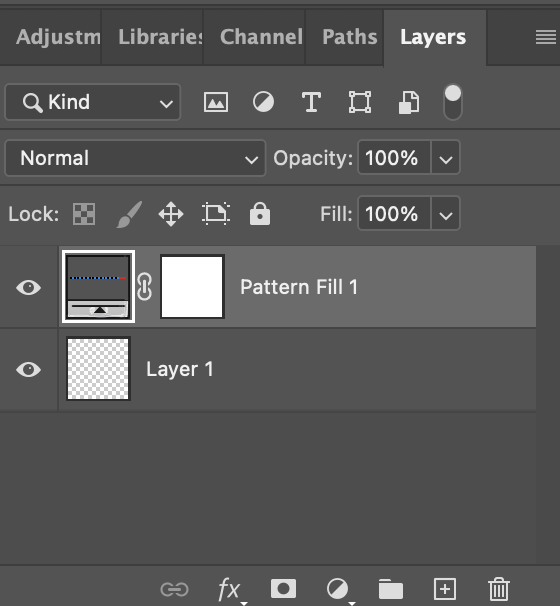

Make the weft template layer a weft by rotating the layer: from the Edit menu, select Transform > Rotate 90° clockwise.
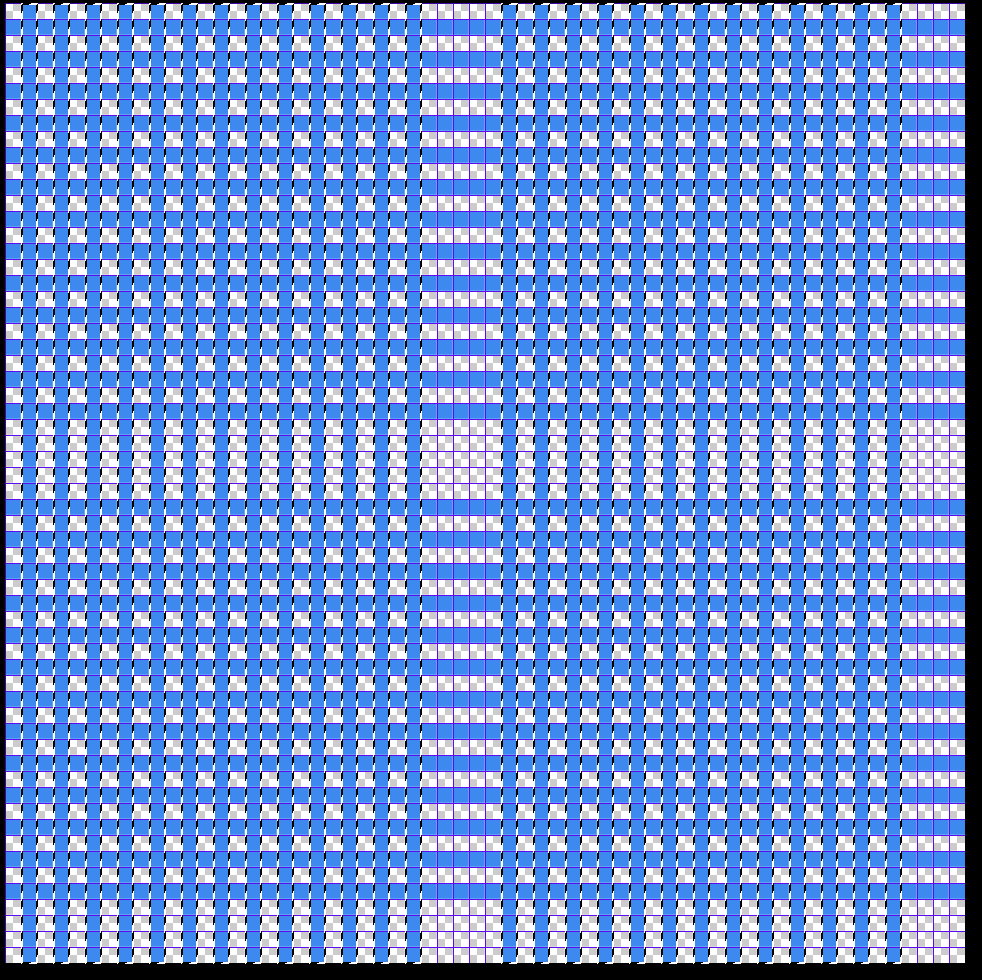
Now we have a warp and a weft! What we want is to visualize the two sets of threads interacting. We want to create simulations.
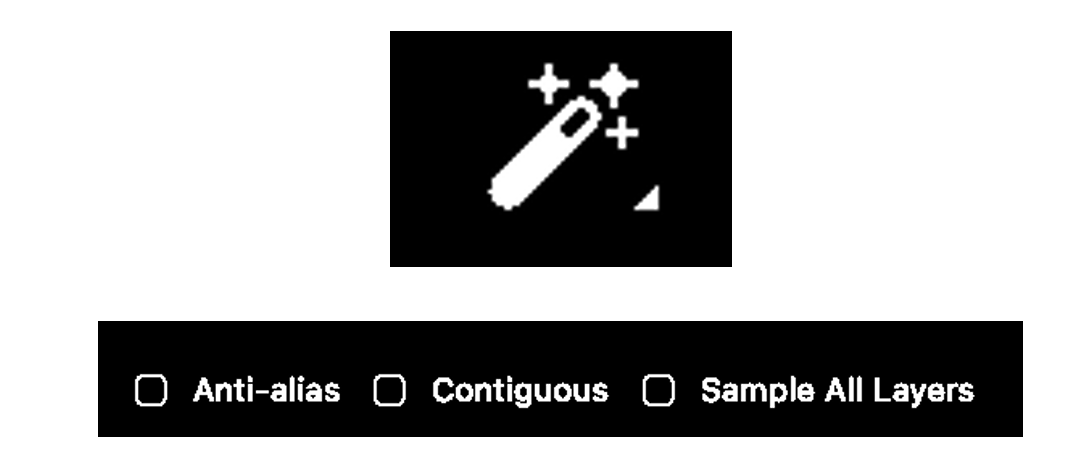
My favorite tool: the magic wand now comes in to separate the different threads. Select the wand tool, (W), and make double sure that the 3 check boxes on the top menu bar are unticked. This is the default. Sometimes I will want to use the contiguous function. Play around with selecting threads with your magic wand with contiguous unchecked and then checked if you don’t know what this is.
Make the weft template layer invisible. Select the black warp thread using the wand.
While you have the black threads selected, paste them onto their own layer by using the shortcut (Command+J). You should have a new layer! Title it black warp template.
Do the same for all the warp colors, and then all the weft colors. Label all layers. You should have a layer for every warp color and a layer for every weft color when this step is complete.
I reordered my layers so that each warp is with its corresponding weft.

Next, make everything invisible except for the blue warps and wefts. Select the blue warp layer, and with the magic wand tool, select them. Now make a new layer while the blue warps are selected (command + J) Name this blue warp. While the new blue warp layer you just made is selected, use the fill tool (G) to fill them with black.
Now repeat this step, making a new layer for blue wefts, but instead of black, fill the new blue wefts layer with white. (To quickly default to the system black and white, push D on your keyboard [for default]. Press X to swap the background and foreground colors).
Remember that the golden most important rule in all of weaving:
Black means lift the warp thread and white means lower the warp thread. In other words, Black is the warp and white is the weft.
Using this logic, we can deduce that any warp thread that is white will not show on the top of the cloth, and any warp that is black will. SO: If warps are black and wefts are white, the layer of cloth will be on the top. If warps are white and wefts are black, the layer will be on the bottom. THEREFORE, this layer that we are working on will be the top layer structure.
The only thing it’s missing is the structure; areas where the weft intersects with the warp. If we visualize this as a blueprint or lift plan of the cloth, we can see that currently the white wefts just sit on top of the black warp threads.
Zoom into the structure, and look at the top left corner of the structure (command + +).
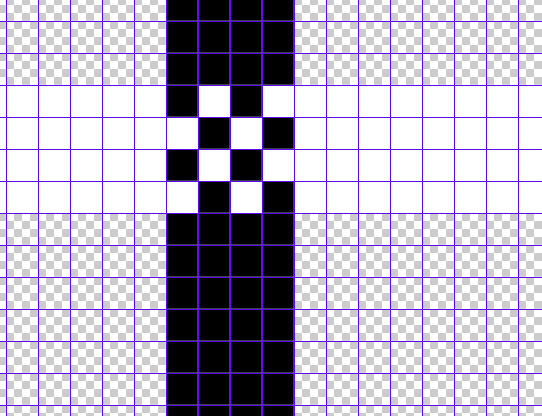
Using the pencil tool (B), fill the two diagonal weft/warp intersections (aka stitches), with black.
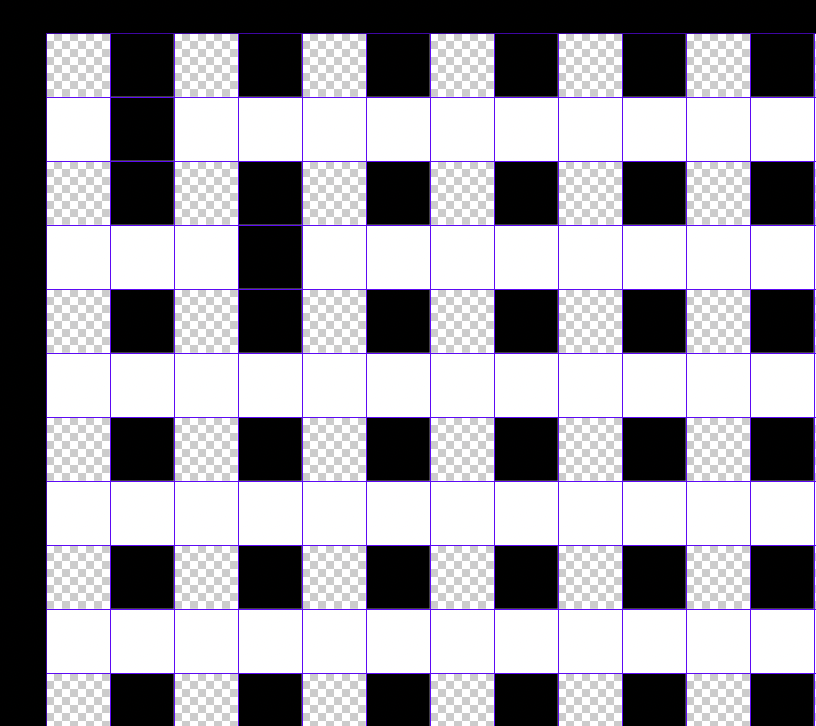
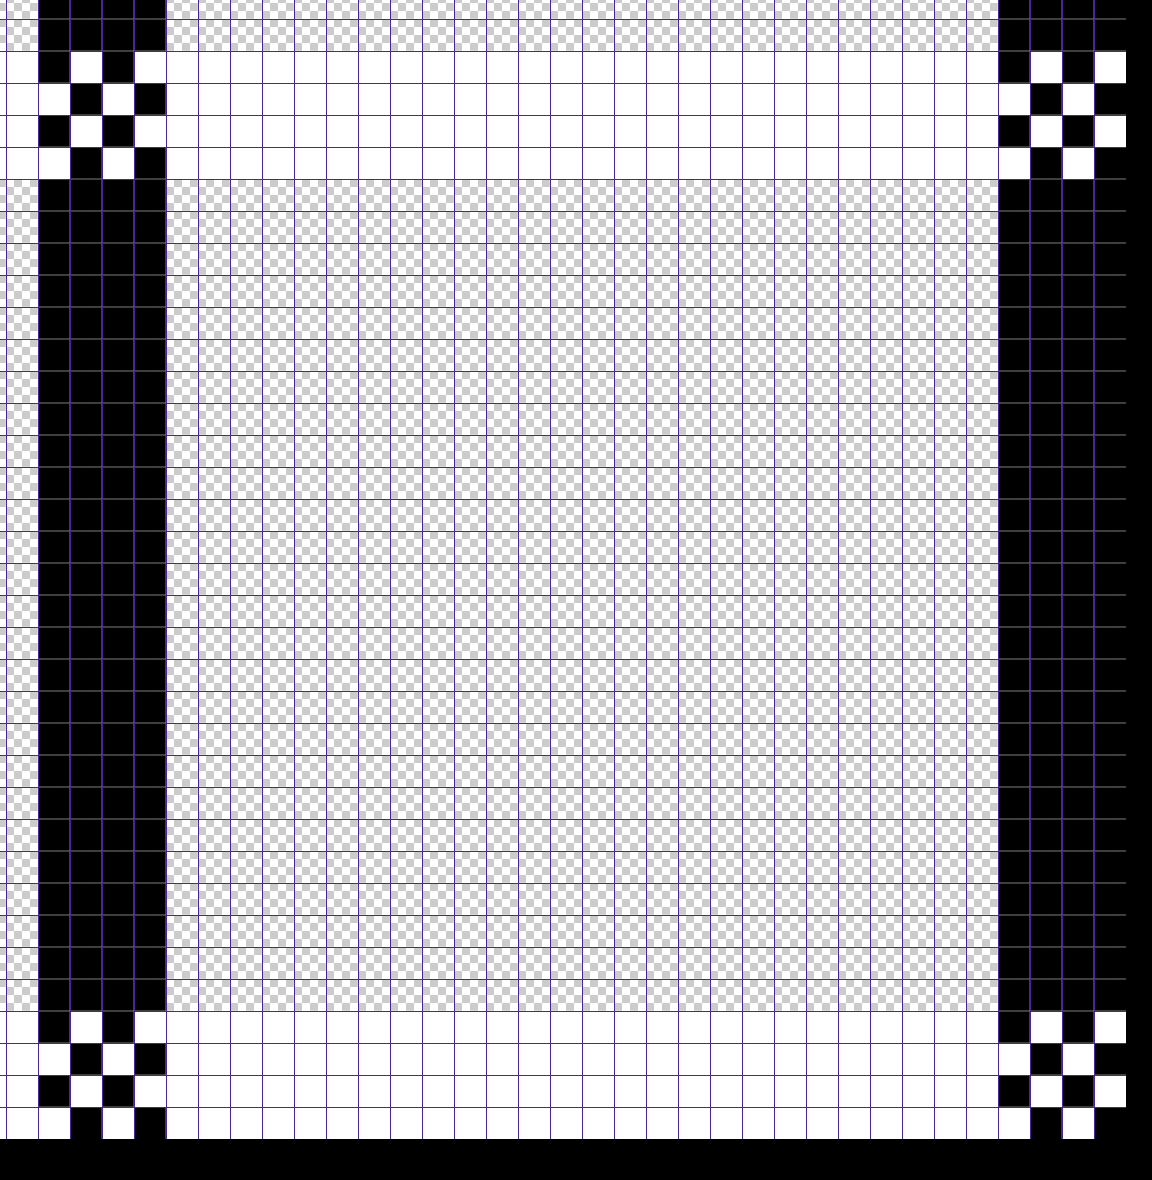
Amazing! Now: we could manually complete the structure with this method, but that would take a long time, and also we are prone to mistakes. Instead, use the marquee tool (M) to select the repeating structure of the tabby we just made.

Notice that I took care that I didn’t pick up any extra pixels: always remember that the left edge of the structure will repeat, meeting the right edge of the structure. The same of course applied to the top and bottom edges. They should correspond to each other, creating a seamless tiling repeat.
Once you have your select, save it as a pattern in Photoshop. Name it DW Tabby template. DW is for doubleweave.
Now return your attention to the layers window: make all layers invisible except for the blue warp and weft templates.
Make a new layer (Shift + command + N)
and fill it by clicking your new pattern.

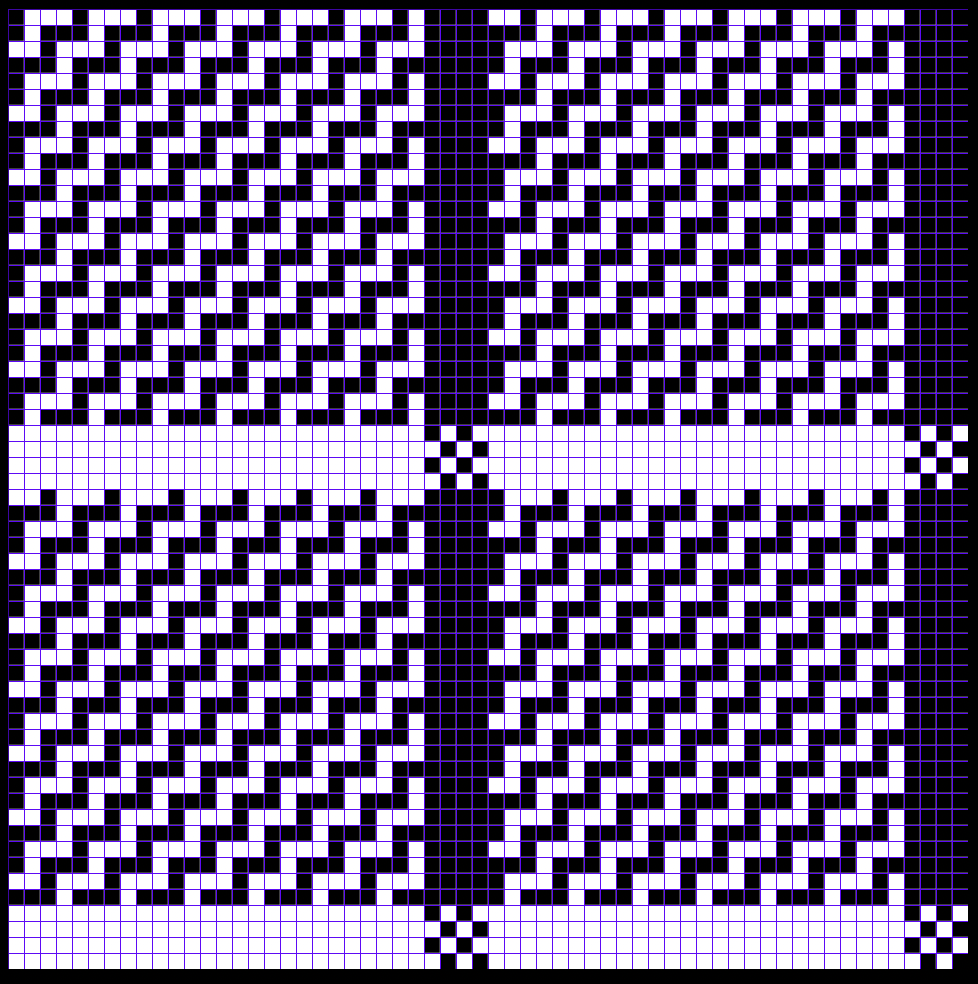
Look! Weaving! Now make one more new layer underneath the pattern layer you just made (shift + command + N), merge the two new layers together (command + E) and rename it blue tabby. Break a sweat, yet?
Now let’s make a black warp for underneath. We could do everything that we just did a second time, but I prefer the faster route: Make a copy of this layer (command + J), and rename it black tabby. Remember: because we want this layer on the bottom, we want the warps to be white and the wefts to be black. So let’s just invert them (command + I)

Now, make the everything invisible except for the black warp and weft templates. Because black and white are our commanding structure colors, I like to change the black in my warp to a technical color, so that I don’t get confused. I am going to use green to represent black. Select the warp and change it to green. While we’re at it, let’s change the black weft to a lighter green. Do the same to the blue weft: choose a lighter blue and replace it using the fill tool (G). Use the eyedropper tool (I) to select the blue and go lighter from there.
Make the blue invisible again but leave the black warp and weft templates visible. Return to the black tabby layer we made and make it visible.
Now we just need to align the black tabby layer to match the black warp and weft layers. Use the move tool (V) while the black tabby layer is selected. Use the arrow keys on your keyboard to nudge the layer to match the template layers.
You’ll know you were successful because you won’t see any of the green peaking through, except for the two edges. Fill in the green pixels with the pencil tool (B) while on the black tabby layer using black, to match the rest of the wefts.
(Alternatively, you could use the marquee tool (M), and the cut and paste function to move the left column and top row to the right column and bottom row)

One more step!!! All you have to do now is turn on the Blue tabby layer. That’s it! Now you can save this structure as a Photoshop pattern: Save it as DW 2 tabbys - blue on top. To make a structure with black on top and blue on the bottom, simply invert each tabby layer (command + I while selected on the layer)
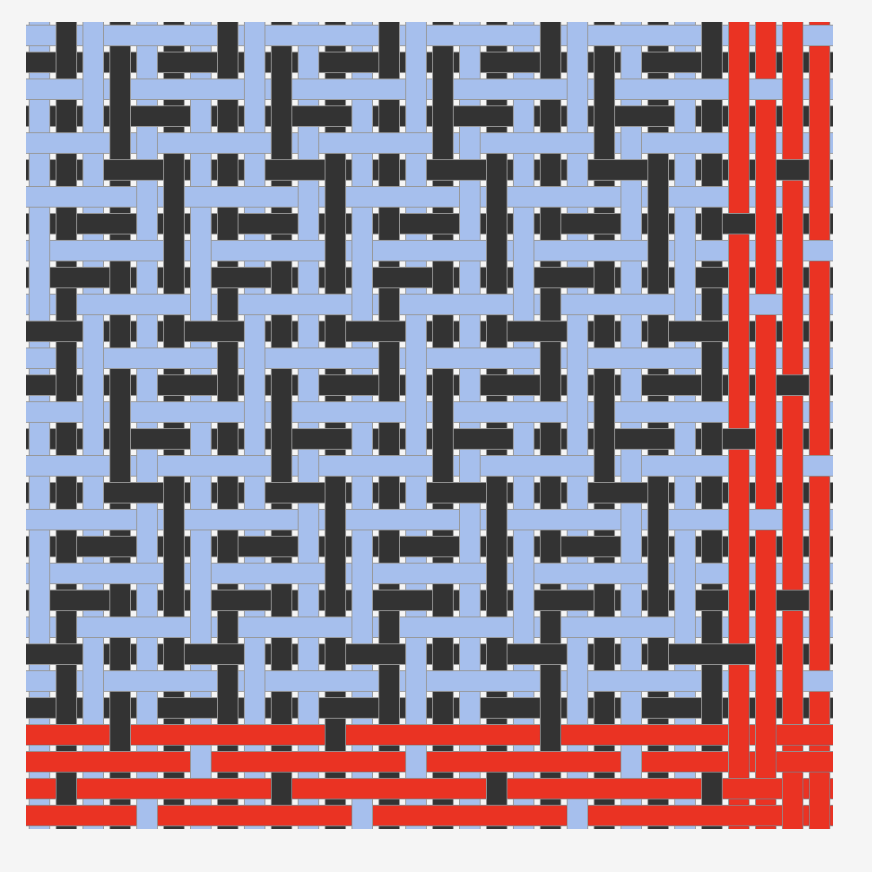
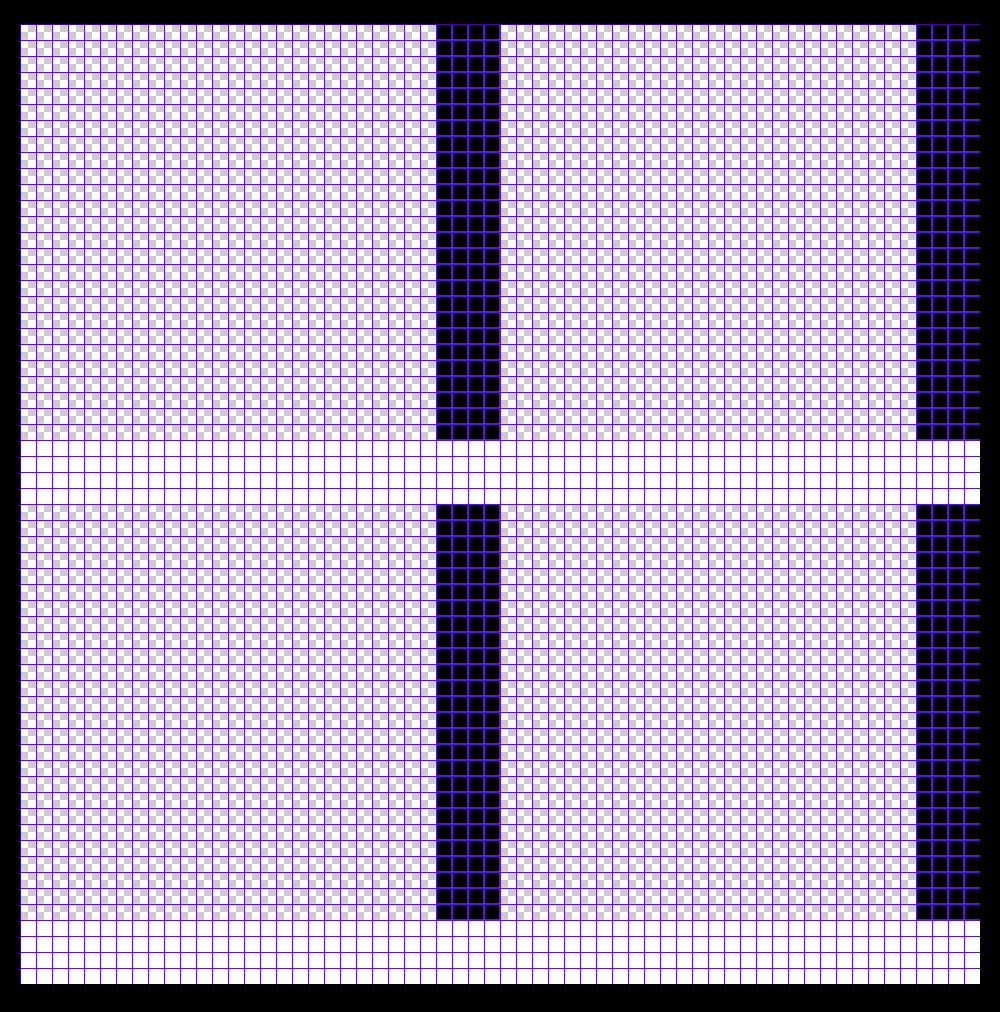
This structure is a basic doubleweave with a tabby on each layer. Because we have warp striping, if we use two shuttles, one with blue and one with black, we can have solid layers of black and blue: except!!! That our warp has red warp stripes of 4 threads between each sequence of 26 black and blue. So if we were to use this structure on the UDL warp, each layer would have two red interlopers.
We could separate the red from the blue and black though and give these their own layers in our cloth. Make all layers invisible except for your red weft and red warp template layers. Just like before, make copies of each of these, and make the red warp black and the red weft white, labeling each layer.
Put the weft layer on top and make sure it is selected. If we want to make the structure perfectly square; or match the weft sequence with the warp sequence in the cloth, we only have 8 intersections (aka stitches) at each junction to work with. I recommend filling it with a tabby. Use the pencil tool (B) with black on the weft layer.

You could just manually place the pixels since there is only 32 stitches total here, but I always prefer the faster method: after you have your first 8 pixels done, use the marquee tool to select it (M), switch to the move tool (V), and holding down option + command on your keyboard, use the mouse to drag a copy to the next intersection.
Repeat this step 2 more times to complete your stitches.
Now turn your Black tabby and blue tabby layers back on.
Repeat this step 2 more times to complete your stitches.
Now turn your Black tabby and blue tabby layers back on.
Save this structure: the red warps are black so that layer is on top.
To send the red layer to the bottom, all we have to do is invert the colors on both the red weft and warp layers. Do so and then save that structure – name them DW 2 tabbys Black on top, NO RED, and DW 2 tabbys Black on top W RED. My black layer is on top, and I confirmed this by making the red and blue layers invisible to see that the black warp threads were black/lifted.
So with this doubleweave that I have turned into a triple weave, we’ve got a plethora of options:
- DW 2 tabbys Black on top, NO RED
- DW 2 tabbys Black on top W RED
- DW 2 tabbys Blue on top NO RED
- DW 2 tabbys Blue on top W RED
- Remember these structures combine the red with the black and blue:
- DW tabbys Blue on top
- DW tabbys Black on top
Save this photoshop document as a DOUBLEWEAVE TEMPLATE! You can edit the tabbys to be any structure. Go nuts!